advertisement


Leak TL/12 Plus / Point One Plus

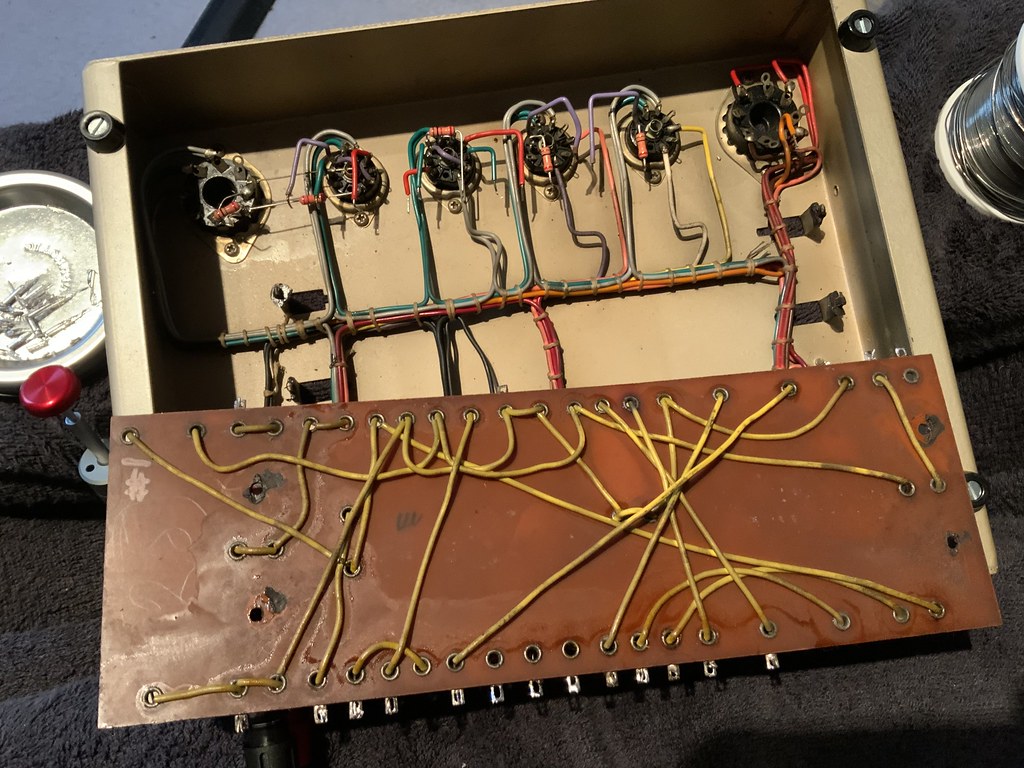
I suspect it was just crust on the lower pins, I’ve just measured continuity from the top side (it’s actually 3 & 8) and I get the same resistance as the meter leads (0.1 Ohm). I have reflowed this whole socket in the past, but I didn’t completely desolder everything so some of the solder is pretty dull.

I’ll try the 8 Ohm tap along with the plug from the Stereo 20 later. The transformer sockets on this one are very clean as this is the amp that had a star washer rattling around in the output transformer for some reason (likely been there forever as none were missing from the amp). I gave the sockets a very good clean with Deoxit D5 when I had the side cowling removed. I also can’t get any effect from tapping, jiggling or partially unplugging the impedance plug when the amp is playing. Changing tap is definitely worth doing though.

PS I measured the 3M3 carbon resistors again and they are still bang on.
 
No change, buzz and some crackling still present on 8 Ohm tap and with the known good (soldered) impedance selector from the Stereo 20.

I’m really running out of ideas here. Should I just do the 3M3 for the hell of it?

PS There is no upper budget. I’m happy to pay whatever it costs to get to the bottom of this. I’m getting to the point of either just shelving it until another mono amp of the same date and transformer types pops up and then try and build one good out of the two (at least I have nice cosmetics on this one) or paying a grown-up to come round with a signal generator (I have a scope) etc assuming there is anyone who could do this (Lancashire/Greater Manchester area). I think I’m at the point now where I’ve done all I’m really capable of short of just ripping absolutely everything out back to the bare board and rebuilding it again from scratch with another batch of components just hoping something changes, and that really isn’t a logical approach! I just can not find anything wrong with the thing - I’m confident everything is in the right place and every joint I’ve made is solid and nicely flowed.
 
One way to identify or locate the cause would be to desolder both tag boards of your TL12+s and swap them over, if the fault remains with the currant faulty amp the fault is not contained within the tag board components.

This also gives you the opportunity to inspect and check the underside of each tag board.

Hope this helps.
 
It would be useful for future reference if you could take a picture of the tag board side showing the wired links before you re-fit and re-solder the tag boards.

;)
 
Tony,
This type of fault is a real pain in the ar**. You have been patient, very patient.
I for one have run out of simple ideas, you have already covered all the bases, voltages, resistance measurements, poor connections etc.. I do not believe there is anything wrong with your work so far, components, soldering and so on.

You have nothing to loose swapping the 3.3M resistors out before anything else. These things can react differently under power to static (resistance|) checking.

I agree you need to explore using parts from the 'good' amp in Mr. Buzzy.
Personally I would start with the output transformer, but little difference in reality. Again this might be reacting differently under power to static checking.
The only risk is you end up with another fault...
 
It would be useful for future reference if you could take a picture of the tag board side showing the wired links before you re-fit and re-solder the tag boards.

;)

If I do it I’ll certainly document it well! I’ll not get straight to it as I’d like to see if any other ideas are incoming, but I have a feeling that is the direction I’ll be heading. I can see enough to know it’s pretty filthy up there.

If I did this would it be safe to actually wash the board, i.e. immerse it in water and give it a gentle scrub? I know the carbon film resistors and K40-Y9s would be fine, not sure about the electrolytics and 3m3 carbons, or the board.

I agree you need to explore using parts from the 'good' amp in Mr. Buzzy.
Personally I start with the output transformer, but little difference in reality. The only risk is you end up with another fault...

From the way I’m looking at it I think it would be easier/beneficial to swap the boards rather than the transformers. There are not that many more solder joints, plus I buried the transformer under the smoothing cap so there is a load of hassle getting that whole thing desoldered and out. It would also give me the option to clean all the crap out and inspect the wiring loom, which I suspect is well worth doing. There could be anything up there for all I know. I think it’s the final step that is within my ability, so I may as well do it. It’s about 18 joints per board, most of which I’ve been at already, so I should hopefully not screw it up. I’ll not do it today though. I need to step back for a day or two and just think. I’d still love a theory to work to, the frustration is not understanding.

Another thing is I’m convinced it is getting worse. Initially there was an occasional buzz on start up, but not always. Some times it worked fine. I next found (on Toprepairman’s suggestion) that buzz could be ‘cleared’ by replugging the interconnect. Next there was always a buzz on power-on. After I noticed a crackle had appeared. Now the crackle always seems part of it and yesterday I heard audio distortion after ‘clearing’. Today I didn’t keep going. I just turned off immediately on hearing the buzz and crackle.
 
You may well end up having to pack it up and sending to someone like Jez or myself., or Graeme and no doubt a few other possibilities.
 
If I did this would it be safe to actually wash the board, i.e. immerse it in water and give it a gentle scrub? I know the carbon film resistors and K40-Y9s would be fine, not sure about the electrolytics and 3m3 carbons, or the board.

Yes just fine, one of my more menial tasks working for my employer was to chuck a load of batch flow soldered circuit boards into a sink full of hot water and washing up liquid to remove all the solder flux.

When I worked for "Dolby Labs" in Stockwell, South London, they had an appliance that contained a chemical dip to remove the solder flux, I can't remember the chemical but it was very unpleasant to inhale too much of it.

Just make sure those Silver Mica capacitors mentioned upthread are coated completely with wax before the bathing!!

Give the tag boards plenty of time to dry out thoroughly before re-installing them.
 
When I worked for "Dolby Labs" in Stockwell, South London, they had an appliance that contained a chemical dip to remove the solder flux, I can't remember the chemical but it was very unpleasant to inhale too much of it.

I used to drive past them every day on my way to work.

Probably something from ICI - we had a small heated tank that did this - used to change the colours on cheap resistors and wash out all the lubricant from DIL switches, more trouble than it was worth.
 
... If I did this would it be safe to actually wash the board, i.e. immerse it in water and give it a gentle scrub? I know the carbon film resistors and K40-Y9s would be fine, not sure about the electrolytics and 3m3 carbons, or the board.
I've used the Keith Snook method for a number of years now. ( http://www.keith-snook.info/quad-303-amplifier.html )
Kitchen spray cleaner, soft 1/2 inch and brush tooth brush for stubborn dirt. Then rinse in soft / de-mineralised water. Plant mister or gentle trickle. I never immerse the whole piece. Dry with paper towel and 24 hours in the airing cupboard.

The crackle is the concern, it smacks of something breaking down...
 
Ok, I’ll get the boards out and report back. Soldering iron warming up now…

The crackle is the concern, it smacks of something breaking down...

Agreed, my personal suspicion, for what little its worth, is that may be the 3m3s, i.e. we may be looking at two separate problems.

I just want to get to the point of a credible problem diagnosis. There is no ‘budget’ to fix it, e.g. if the transformers are screwed I’ll either pay to get them both rewound, or maybe steal the 8778s from the grey Stereo 20. I could swap the cowlings easy enough to keep the cosmetics. I absolutely do not care about money, over the next few years this thread will pay for the amps in ad revenue. I view a lot of this sort of stuff as my job, so these amps can largely be expensed as I knew they’d generate some really good content. I obviously wasn’t expecting this sort of fight, but I’ll get there and hopefully be able to share a fair bit knowledge in the process. It all fits with what I intend is an increasing ‘Right To Repair’ aspect of site content. The last thing I want is a thread like this to frighten people off from vintage audio, so I need an accurate diagnosis and to be able to demonstrate the fix, or even better show some utterly dumb noob error I’ve made and help the next person reading the thread avoid it!
 
51174741688_b9d4e24c6e_b.jpg


Here’s Mr Buzzy’s giblets before any cleaning attempts. I can’t see anything obviously wrong. It looks like it has taken some heat at the right of the picture which is above the green 100 Ohm resistor. It is actually way cleaner than I was expecting.

I’ll get amp #1 gutted this evening and then see about cleaning them both up. I think I’ll take this opportunity to just swap the metal film 3m3 resistors in. They aren’t even remotely authentic, they’ll look like crap, but it rules a potential issue out as they will be entirely reliable. I’m curious to see if the crackling goes with them and it’s just easier to swap them now outside of the amp than almost inevitably have to do it later.

PS If anyone else is like me with a house so full of records, hi-fi etc that they just don’t have a table anywhere a Black ‘n’ Decker Workmate (mine is this one) is actually pretty good for this as you can adjust it so the transformers drop down the gap between the two top surfaces giving a stable and flat amp to work on. The folded towel obviously ensures no scratches to the paintwork.
 
This site contains affiliate links for which pink fish media may be compensated.
Sometimes an oscillation can be as simple as a bit of lead dress, if an input and output wire cross at the wrong angle or are running parallel and coupling.
 
Just looking closer at the board after a gentle hoovering I retract the comment about heat, it looks like the board was attached to the four posts with a black wax or very mild glue, and it is that I was seeing.
 
51174043892_9e4fcd9628_b.jpg


Here’s Amp #1 board. Again I can’t see anything obvious beyond some dirt and grime, though obviously this is the one that previously worked. I’ll go wash them both up and tomorrow I’ll fit the metal 3m3s assuming they are bone dry by that point.

I guess the fault finding process is yo swap them over and if the problem shifts with the board it is some dumb noob error I’ve made, if it stays with the chassis the output transformer is toast. I guess there are a couple more variables, but that will give a fair sized clue as to where the problem is.
 
if it stays with the chassis the output transformer is toast. I guess there are a couple more variables, but that will give a fair sized clue as to where the problem is.

Hopefully not. It could be a partially broken wire somewhere, or even a corroded connection inside the transformer (I noticed a few solder points where green when I removed the cowls from my Stereo 20). Still the slight possibility one of the pins in one of the sockets might be making slight electrical contact with another via old cleaner or flux or something. At least it'll all be easier to really take a good look and test of everything now with the boards out. I definitely commend your patience Tony I'd likely be pulling my hair out by now!
 
Boards washed-up and looking pretty decent, certainly vastly better. I went at them pretty hard with washing up liquid, isopropyl alcohol, Sevisol Foam Cleanser 30 (magic in a can!) and then a couple of good rinses in clean water. They are now drying on the radiator on a low heat. Predictably I washed my #1 & #2 numbering off, but I can still ID them easy enough from where the wax still remains and looking at the solder on a couple of the desoldered tags.

I’m not going to rush to reassemble as I realise this is a good opportunity to test the now exposed loom (which I still need to clean) etc. If anyone wants me to measure any resistances, beep for continuity etc just let me know and I’ll post some findings.

I’ll clean up the looms and stick the metal film 3m3s on the boards tomorrow. I’m done for tonight.

I definitely commend your patience Tony I'd likely be pulling my hair out by now!

I have remarkably little hair to pull out these days! I am starting to get a little tired/frustrated with it now, but I am pretty patient with this type of thing and I do feel I am still learning stuff. Plus it’s all good site content, and I do need to think about that now and again. To be honest this is nothing compared to the time and effort I put into the TD-124. That took many years and a lot of money to get to a point where I was genuinely happy with it. The 149s too, in fact they took five years to even find a pair in a cosmetic condition I wanted to buy! The only thing I go nuts at is if I make a mistake, e.g. if I dropped the iron on a wire, broke a tag or whatever it would trigger me for ages, i.e. I get annoyed with my own stupidity, never the kit.
 
This site contains affiliate links for which pink fish media may be compensated.


advertisement


Back
Top