
You are using an out of date browser. It may not display this or other websites correctly.
You should upgrade or use an alternative browser.
You should upgrade or use an alternative browser.
Wot CDP rail grease?
- Thread starter The Captain
- Start date
The Captain
~~~~~~~~~~
Just to short two such pads as @ansis posted a pic of, earlier. Just use a croc clip to short the two blobs/pads together!
Depending on exactly which laser mech you are looking at - these are usually marked in the silkscreen printed text on the PCB.
Apologies, but I'm lost Martin. It's not that I can't do something ( adding, soldering a wire, or desoldering a blob, or adding a crock clip.. is a 3 second excercise: it's just I don't undertand what is being suggested to do).
I see only -one- blob on ansis's photo. He's highlighted only one. But not explained -why- this photo taken, or the significance of this blob. You here are now talking about connecting -two- blobs. So I'm totally, utterly, doubly-lost.
And also, in order to get to this blob on the underside of the laser section, I need to disconnect the ribbon. So afaict I'm in a catch22. Triple-lost.
Would you be good enough to just go back a step, & perhaps explain this blob.. & it's relationship with a 'static jumper' for me?
Thanks, Capt.
The Captain
~~~~~~~~~~
That's already factory blob which shorts two pads on board, it comes such on new laser so you won't damage mounting it. Did you even looked at your own device in marked place?
Ok, great so I know what this blob's factory-function is. It is a shorting solder blob then.
But knowing what it's function is, doesn't tell me why you took a photo of it.
You must have taken the photo, because it has relevance to something discussed. But I am thinking so hard on what this might be. I have asked twice, but no-one tells me. So it remains an arbitrary photograph. A total mystery.
Ansis. Please could you tell me -why- you took this photo? (Am I meant to attach something to this blob?? Is the photo taken for ID purposes?? I have no idea, as there's no information with this photo).
Thanks, Capt.
The Captain
~~~~~~~~~~
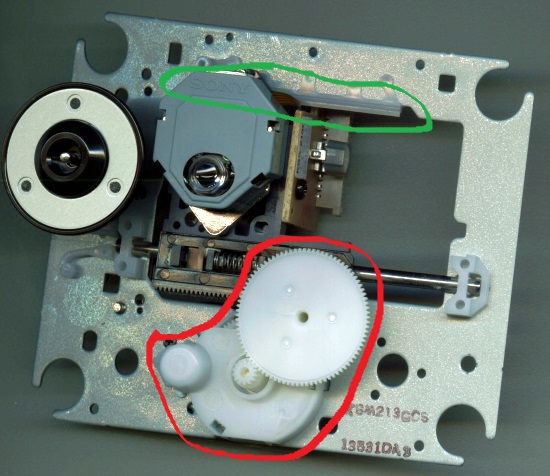
Check green plastic rail for cracks and red gears for dirt in teeths
Those ribbon cables are LIF or low insertion force, you can disconnect them carefully if needed but first must solder antistatic jumper on laser board so not to damage laser diode.
@martin clark
Martin could you help. I'm in a fug here. Ansis here says " you can disconnect it [the ribbon connector] but first must solder antistatic jumper on laser board..".
Have you any idea what this "antistatic jumper" is, that ansis is referring to here?
He suggests I have to solder something. But what remains an utter mystery.
Does it have anything to do with this mysterious "blob" of solder I wonder (highlighted in his following photo #33) ?
Do I have to attatch a wire, to this solder, perhaps?
Thanks, Capt
martin clark
pinko bodger
the blob highlighted, bridges-together two solder pads, so when you remove it later, you see two solder blobs.
I am lazy tso use a croc clip instead to short the pads together before removing the ribbon cable to remove the laser: and remove the clip/solder bridge after reinstallation of the ribbon into the connector..
I am lazy tso use a croc clip instead to short the pads together before removing the ribbon cable to remove the laser: and remove the clip/solder bridge after reinstallation of the ribbon into the connector..
The Captain
~~~~~~~~~~
the blob highlighted, bridges-together two solder pads, so when you remove it later, you see two solder blobs.
I am lazy tso use a croc clip instead to short the pads together before removing the ribbon cable to remove the laser: and remove the clip/solder bridge after reinstallation of the ribbon into the connector..
Hi Martin. Ok this helps thanks. So let me get this right ( Im still confused tbh).
1. The highlighted blob, is simply a bridge then: so the idea is to DESOLDER it -?? ( not solder anything at all then).
2. This disconnected 'bridge' then becomes this "anti static jumper" ??
3. This disconnection, is neccessary, in order to safely remove the ribbon connection between transport & main cdp motherboard pcb below it.
As you might tell from this, I am still hopelessly lost with ansis's photo, of a highlighted area, if there's no information given with it.
Thanks, Capt
The Captain
~~~~~~~~~~
How can a disconnected situation become a jumper!? The opposite must be true, that a connected situation becomes a jumper. JesusHchrist.
This -might, possibly- suggest therefore: that ansis photo #33 is suggesting what it should look like AFTER SOLDERING, after ADDING such a blob of solder.
Is this right???
This -might, possibly- suggest therefore: that ansis photo #33 is suggesting what it should look like AFTER SOLDERING, after ADDING such a blob of solder.
Is this right???
martin clark
pinko bodger
Yes ^ that is right!
The Captain
~~~~~~~~~~
Yes ^ that is right!
Martin that gets me a tiny bit closer to understanding. I am still hopelessly lost though. Please please.. could you perhaps lend me a little more help than just 4 words here tho-?
I really feel left adrift here chaps.[[ I just wish ansis could explain the photo]]. Or someone, anyone, if they know/ understand the significance of it/ why it was posted.
I am now not sure if this photo #33 is A) of how I am meant to get it looking like, of B) whether this is what it comes like (a new one? Is that the idea of the photo?), or C) what I might find, in order then change it to look like this.
You see on the Apollo transport replacement clip ( which may be of use, or a hinderance I cannot tell until I understand this photo #33).. shows him DESOLDERING a joint. One only. Not SOLDERING.. but DESOLDERING.
Now, in ansis photo #33 he suggests that I should be SOLDERING something, but he doesn't say what: now one might assume it is the "Blob" he refers to, that he highlights in red ( whatever else could this highlighted solder blob be??).
If so, there is now a contradiction. Desoldering something. Or Soldering something.
Someone help me out, please!
Capt.
The Captain
~~~~~~~~~~
@ansis
Please. Could you explain photo in #33. I cannot make sense of what this blob is: what are you suggesting is done to it? & where someone might expect to find this blob? I have no idea if:
This is a photo of a new sony K.. laser mechanism perhaps-? (are you suggesting to change mine from no jumper... to SOLDER it.. to look like this-?)
or maybe..
This is a photo of a Planet 2000 laser mechanism-? (are you suggesting to change the bridged solder blob.. to DESOLDER it.. so it doesn't look like this-?).
Thanks, Capt
a.palfreyman
pfm Member
Captain,
I believe that the photo Ansis posted shows what it should look like with the solder blob added to protect the laser diodes. You have said that the mechanism unscrews easily so all you need to do is unscrew it and turn it over so you can see the underside of the circuit board. Identify the two pads at the position shown in the photo and add a blob of solder across them. Then you can safely unplug the mech to work on it. When you have done so, reconnect, remove the solder blob and then refit the mech.
I believe that the photo Ansis posted shows what it should look like with the solder blob added to protect the laser diodes. You have said that the mechanism unscrews easily so all you need to do is unscrew it and turn it over so you can see the underside of the circuit board. Identify the two pads at the position shown in the photo and add a blob of solder across them. Then you can safely unplug the mech to work on it. When you have done so, reconnect, remove the solder blob and then refit the mech.
The Captain
~~~~~~~~~~
Captain,
I believe that the photo Ansis posted shows what it should look like with the solder blob added to protect the laser diodes. You have said that the mechanism unscrews easily so all you need to do is unscrew it and turn it over so you can see the underside of the circuit board. Identify the two pads at the position shown in the photo and add a blob of solder across them. Then you can safely unplug the mech to work on it. When you have done so, reconnect, remove the solder blob and then refit the mech.
Hi 'freyman.. fantastic! Thank you for reading my spiel & clarification!
Ok now I understand what to do, once, & if I can actually get to this solder spot --prior-- to removing the transport.
What I've said though, is although I can loosen the tray & slightly turn it over (so I can just add grease to both rails).. I cannot remove the transport. Because of the ribbon connector prevents me doing so. I therefore cannot get to this solder... because... the ribbon connector prevents me removing the transport.
I can only get to this solder 'blob' spot, if I remove the ribbon from the main pcb ( or at the transport end, which would be the easier option).
So I'm in a Catch22. This is what I was trying to explain. (Why then the confusing suggestion of doing X at this solder spot.. if I've explained how I can't get to it without unplugging the ribbon connector.. is kinda perplexing).
Ok. What I'm gonna do, now I'm clearer on this blob thing. New thread, with photos of my tilted transport ( partially removed but still tethered to the pcb). And ask, refreshed, on a new thread.
Many thanks, Capt.