a.palfreyman
pfm Member
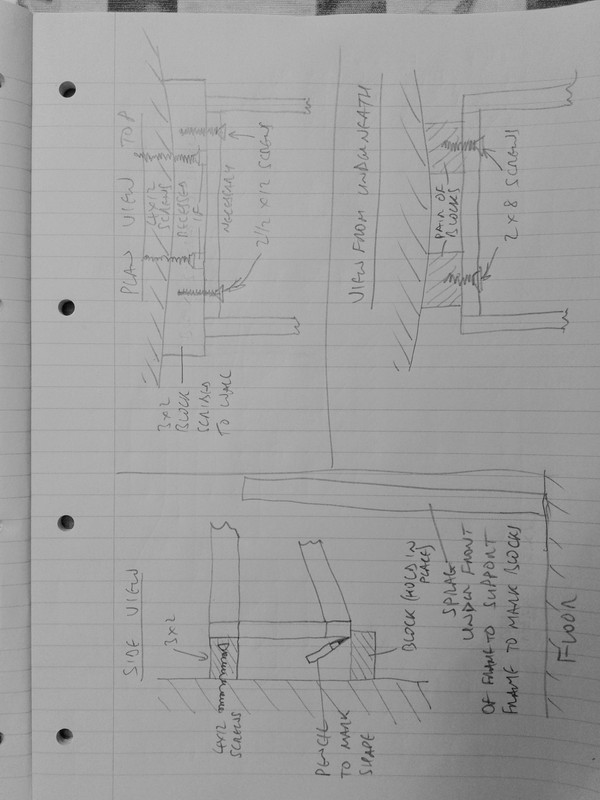
If you get some 3 x 2 PSE (that's planed up stuff) then cut a piece just longer than the width of the shelf, along with a couple of 'props' to sprag it off the floor so it's level and at the desired height, then blu-tac it in place with the 2in wide face against the wall. Then, use a block and pencil to 'scribe' (i.e. copy) the shape of the wall onto the back upper surface of this block. You can then rough this shape with a saw so it will sit against the wall. Put a couple of holes through (away from the wall shelf fixing positions) and drill through into the wall. Then put some glazing putty around the edges of the back (cut) face and screw into position with say 4in x 12s. You can tap either towards the bottom or top edges to help seat it and keep the front face vertical whilst tightening the screws and when happy, cut the excess putty that has squeezed out with a putty knife or scraper. Then use some 2 1/2" 12s to screw the shelf to the wall block. Pre-drill the wall block with say 2-3mm drill so you don't split it. Fit the shelf frame to the block and use a prop at the front to keep it level and then place a couple of short blocks up to the underside of the bottom of the frame, against the wall and draw along each block where it touches the back of the frame. Cut these and fit between wall and frame and screw into each block through the lower frame fixing holes. These will then sprag against the wall under load. To tidy it up, paint with gloss, or emulsion paint of appropriate colour. It's also worth nipping the fixings into the wall a day or so later just to ensure they are tight if the putty has settled a little.
HTH.
Andy P
HTH.
Andy P
")