
You are using an out of date browser. It may not display this or other websites correctly.
You should upgrade or use an alternative browser.
You should upgrade or use an alternative browser.
Tips and techniques for speaker refoams
- Thread starter Fox
- Start date
I used to get a lot of speakers repairs done when I was with group & event stuff. I first used to attempt this myself, & believe me I am no mug with any DIY, but eventually I found it better to get it done professionally.
Refoaming might appear to be relatively simple, but is best done if you have specialist tools & techniques that can clean properly & apply glue accurately.
Maintaining consistency - like getting 2 repaired speakers to behave exactly the same in stereo as each other - is not easy
Your speakers might have a particular foam or rubber surround that has a specific compliance, kits dont do that level of detail.
Also the other parts of speakers need to be cleaned, repaired - e.g. coils relacquered - & the bits in the kits don't cover this.
The company I used in the past passed away with the owner a few years ago so I don't have a personal recommendation, but Mr Google will help locate company's in your area
Refoaming might appear to be relatively simple, but is best done if you have specialist tools & techniques that can clean properly & apply glue accurately.
interesting. So lets look at what those are and see if they cannot be learned. Like when i learned how to custom wind pickup coils, or reveneering, there was lots of sucking through teeth from people in the know, but once learned it was very rewarding to know that skill.
Although this video doesn't deal with foam surrounds it might contain some helpful tips on cleaning old gunk off the rim.
http://www.youtube.com/watch?v=lxGswEB3O_Q
http://www.youtube.com/watch?v=lxGswEB3O_Q
Dowser
Learning to bodge again..
Yes to dust cap removal (you need to slide paper spacers between voice coil and magnet to position the cone before gluing the surround onto the basket)). It takes practice, care and patience in my opinion.
The guy who taught me gave me a junker to start with - from memory it took 3 attempts before I got it right. Key learning for me was that more paper spacers to ensure the voice coil is central to the magnet, while fiddly initially, makes it much easier when you are gluing the foam surround down (less likely to move the coil in the process, buggering things up).
Good luck")
Richard
The guy who taught me gave me a junker to start with - from memory it took 3 attempts before I got it right. Key learning for me was that more paper spacers to ensure the voice coil is central to the magnet, while fiddly initially, makes it much easier when you are gluing the foam surround down (less likely to move the coil in the process, buggering things up).
Good luck
Richard
One thng is i spoke to wembley seakers (the ESCO of speaker repairs?) who quoted £39 plus vat per speaker if i remove the drive units and mail them the speakers which saves me time for other more pressing projects, diy is still an option but that seems like a good deal especially bearing in mind they presumably have access to the right foams and experience... Etc
Chris Hayes
Active Member
I've managed a refoam without removing the dust caps using clothes pegs to centre cone, with a bit of care it's not as difficult as it looks. Just gently press on the cone and listen for rubs.
The Captain
~~~~~~~~~~
Ive done a few pairs. 1st 2 pairs i did were a breeze once I got the dustcap off (this was the tricky bit- glueing a new one back on is the easiest bit). Once shims inserted you have the cone firmly in place to work on/ and reassurance it will sit perfectly central -so I would take dust cap off as a rule- degunking is easy, use a knife and scrape etc/ say a blunt stanley blade best. Glueing is easy/ nothing to it bar common sense, as is joining together. Then lastly glueing a new dustcap on, as said easiest bit.
I did get a bit cocky and tried a refoam leaving dustcap on.. I had a mare tbh, the joining wasnt as easy, and wasnt sat perfectly central, so I wasted a new foam ring (pain as I had two sent from US, so at the mo Ive one 4" mid done, one orig with holes).
To remove dustcap I used again a stanley, using the point with real care and concentration, obviously avoiding any nip into the main cone underneath, or the adjacent voicecoil protruding, gently working round prizing it off. I actually reglued the orig one back on one pair/ absolutely just like it was before once done).
When the USA websites speak about "elmers glue" is that pva or is there some other kind of glue i should be considering?
Done some research.
One USA repairer suggested i'd be fine with a DIY refoam and save my money. He did sugget i use a c battery to extend the cone (bear in mind the polarity!) before either shimming or stretching methods, he recommended centering by stretching as the ae2s have aluminium not paper dust caps and may be tricker to get off.
Anyway, Acousic Energy wanted to sell me 4 x speakers at £859 (£179 ex vat each) plus delivery and fitting charge so they can **** right off there and then when foams are 12 quid a pair. Its retipping all over again.
337alant
Negatively Biased
All the bits you need here
http://www.speakerbits.com/categories/speakers/list-200.aspx
step by step guide scroll right down the page
http://www.speakerbits.com/products...-repair-kits-refoam-repair-kits/list-155.aspx
Alan
http://www.speakerbits.com/categories/speakers/list-200.aspx
step by step guide scroll right down the page
http://www.speakerbits.com/products...-repair-kits-refoam-repair-kits/list-155.aspx
Alan
2 x ae1 foam kits ordered for my ae2s
These are the scrappy little bastards, the top ones are On the verge of crumblng ang mostly ready to be cleaned off, the lower ones are in a worse state. Chunks missing on the rims. The cabs will get some cleaner, filler and a respray also. Crossover is fine.

IMG00052-20110616-1643 by Tanais Fox, on Flickr
These are the scrappy little bastards, the top ones are On the verge of crumblng ang mostly ready to be cleaned off, the lower ones are in a worse state. Chunks missing on the rims. The cabs will get some cleaner, filler and a respray also. Crossover is fine.
IMG00052-20110616-1643 by Tanais Fox, on Flickr

Missing a binding post knob by Tanais Fox, on Flickr
I cold possibly fabricate something a little more elegant for the biamping option, but i could do wih a knob for the binding post.
I was missing a pair of the exact same type of plastic nuts on a pair of mission 780s. I did try and replace them with regular M sized nuts but they wouldn't fit.
I eventually got a cheap replacement off a pair of binding posts from ebay, courtesy of a seller based in China. They're not a perfect fit or visual match but it works and will go finger tight.
I eventually got a cheap replacement off a pair of binding posts from ebay, courtesy of a seller based in China. They're not a perfect fit or visual match but it works and will go finger tight.
eddie pugh
pfm Member
fox
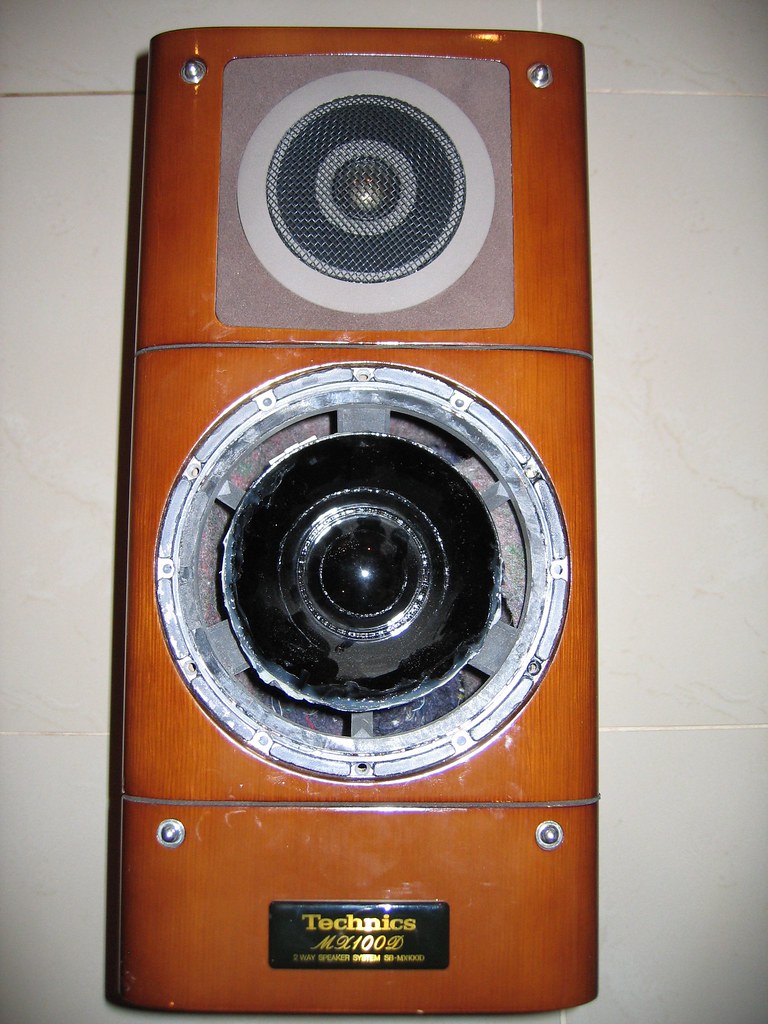
I chanced upon a lovely pair of these Technics MX100D's a few months back which a friend of mine was about to put in the skip and managed to refoam one mid bass without too much trouble. The cone and dustcap is some really tough mineral loaded plastic material and I reckoned it was virtually impossible to cut off the dustcap without doing serious damage to something.
I got a pair of rings from Fred Buist in the Netherlands (www.audiofriends.nl) and they fitted perfectly. I even glued the inner foam ring flange to the rear of the cone as per the original. Mine were a bit of pain to do because the previous ownder had gobbed silicon glue all over the foam to try and get some more life out of them and a lot of this had attached itself to the cone and I had to physically cut it off.
I checked for scraping noises and fed it some tones as the glue was drying
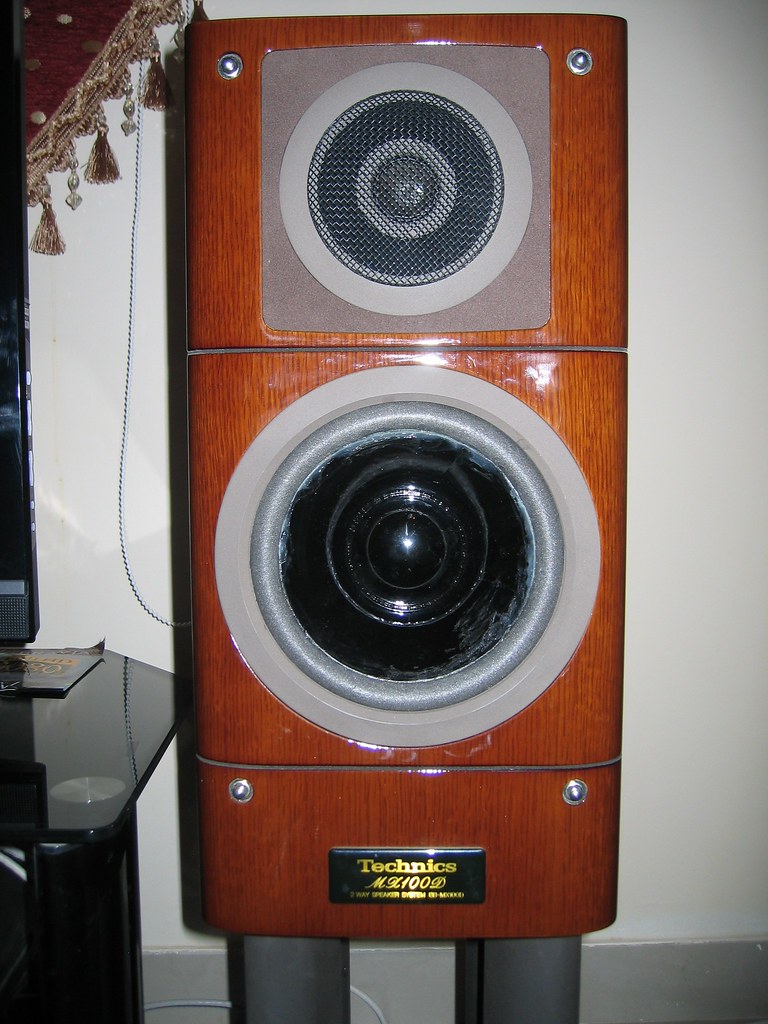
The cone looks a lot cleaner in real life than it does in the photo and the speaker sounds just fine. I only wish I could get my hands on the other mid bass driver to finish the job. The previous owner sent it off to a friend in Singapore to try and get a replacement and it has gone awol
I chanced upon a lovely pair of these Technics MX100D's a few months back which a friend of mine was about to put in the skip and managed to refoam one mid bass without too much trouble. The cone and dustcap is some really tough mineral loaded plastic material and I reckoned it was virtually impossible to cut off the dustcap without doing serious damage to something.
I got a pair of rings from Fred Buist in the Netherlands (www.audiofriends.nl) and they fitted perfectly. I even glued the inner foam ring flange to the rear of the cone as per the original. Mine were a bit of pain to do because the previous ownder had gobbed silicon glue all over the foam to try and get some more life out of them and a lot of this had attached itself to the cone and I had to physically cut it off.
I checked for scraping noises and fed it some tones as the glue was drying
The cone looks a lot cleaner in real life than it does in the photo and the speaker sounds just fine. I only wish I could get my hands on the other mid bass driver to finish the job. The previous owner sent it off to a friend in Singapore to try and get a replacement and it has gone awol
Michael J
pfm Member
I cold possibly fabricate something a little more elegant for the biamping option, but i could do wih a knob for the binding post.
Use banana plugs. Sorted.
Well ae tech is not giving me any data on foams just full wack on swapouts so they lost the gig. I ordered pair from the usual nederlands supplier eveyone goes to which are sold for ae1 ae2 - as battery tip guy said, foams change compliance over their lifetime and situation so don't lose sleep. New 3rd party foams will be better made and better sounding than crumbling originals no longer available. Same analogy as cartridge retipping.
Will attempt DIY. Candidate amp will be crown studio amps.
Will attempt DIY. Candidate amp will be crown studio amps.
RustyB
Registered Ginga
I don't bother removing the dust caps for AE's.
Just make sure the coils aren't rubbing before the glue has fully dried.
If you use PVA/EVA you'll have plenty of time to massage them.
Will be interested to hear your thoughts on the AE2's once you've got them going. Not everyone's cup of tea, but for the right person in the right room, potentially a whole lot of entertainment.
And they go seriously LOUD, while staying clean.
right here we go:
As I found them. Here's the poor state of the woofers and generally bashed-up cabinetry ready for a refoaming. apologies for the crappy mobile phone pic.

ae2 ready for a refoam by Tanais Fox, on Flickr

AE2-refoam-begins by Tanais Fox, on Flickr
This is the state of the AE2 cones. The foams had perished through old age (these are 25 year old speakers after all!) but this does not mean to say they cannot be repaired. Far from it. A new set of foams for all 4 woofers cost me 25 quid inc ship from www.goodhifi.com -- cheaper than the £600 or so Acoustic Energy wanted for 4 x Woofer replacement! The Woofers are made with aluminium cones and an aluminium cone cap glued to the cone while the tweeters here have an aluminium dome. Was recommended to re-foam without dust cap removal especially if the rear motor had not perished.

AE2 Refoaming Begins by Tanais Fox, on Flickr
With the cone stripped of all glue both on the basket and on the cone itself the foams are glued to the cone first as a contact adhesive. Both sides are left to go tacky and then after 10-15 minutes or so they are bought together to stick. They are left for an hour or so.

AE2 Refoaming Complete by Tanais Fox, on Flickr
Foams are tested for being central so that the coils do not scrape the sides and they are left in place. Because the AE2s use an aluminium-ceramic sandwich cone their movement is quite fixed and no scraping of the sides was detected.

All-set-and-ready by Tanais Fox, on Flickr
One of the four AE2 drivers to show how the finished job looks. Good for another 20 years I hope.

AE2 Cabinet Respray by Tanais Fox, on Flickr
In the meantime the cabinets are given a respray. The inside walls are lined with resin/cement so are super rigid and super heavy. Holes are filled, dents are built up and sanded and generally the whole thing bought up to par. Plasti-kote black satin is fantastic stuff if used sparingly and built up slowly with little and often coats. I have used it many times to spruce up old rackmounted cases and so on.
As I found them. Here's the poor state of the woofers and generally bashed-up cabinetry ready for a refoaming. apologies for the crappy mobile phone pic.
ae2 ready for a refoam by Tanais Fox, on Flickr
AE2-refoam-begins by Tanais Fox, on Flickr
This is the state of the AE2 cones. The foams had perished through old age (these are 25 year old speakers after all!) but this does not mean to say they cannot be repaired. Far from it. A new set of foams for all 4 woofers cost me 25 quid inc ship from www.goodhifi.com -- cheaper than the £600 or so Acoustic Energy wanted for 4 x Woofer replacement! The Woofers are made with aluminium cones and an aluminium cone cap glued to the cone while the tweeters here have an aluminium dome. Was recommended to re-foam without dust cap removal especially if the rear motor had not perished.
AE2 Refoaming Begins by Tanais Fox, on Flickr
With the cone stripped of all glue both on the basket and on the cone itself the foams are glued to the cone first as a contact adhesive. Both sides are left to go tacky and then after 10-15 minutes or so they are bought together to stick. They are left for an hour or so.
AE2 Refoaming Complete by Tanais Fox, on Flickr
Foams are tested for being central so that the coils do not scrape the sides and they are left in place. Because the AE2s use an aluminium-ceramic sandwich cone their movement is quite fixed and no scraping of the sides was detected.
All-set-and-ready by Tanais Fox, on Flickr
One of the four AE2 drivers to show how the finished job looks. Good for another 20 years I hope.
AE2 Cabinet Respray by Tanais Fox, on Flickr
In the meantime the cabinets are given a respray. The inside walls are lined with resin/cement so are super rigid and super heavy. Holes are filled, dents are built up and sanded and generally the whole thing bought up to par. Plasti-kote black satin is fantastic stuff if used sparingly and built up slowly with little and often coats. I have used it many times to spruce up old rackmounted cases and so on.