
You are using an out of date browser. It may not display this or other websites correctly.
You should upgrade or use an alternative browser.
You should upgrade or use an alternative browser.
Craig B
Re:trophile
Looks like the American magazines debut of Shure SME Series 2 was via this ad that appeared in both Audio magazine and High Fidelity in January of '63.
Interesting tidbit is that the original headshell was made for SME by Ortofon (mentioned within the May 1963 High Fidelity Magazine review linked to above).
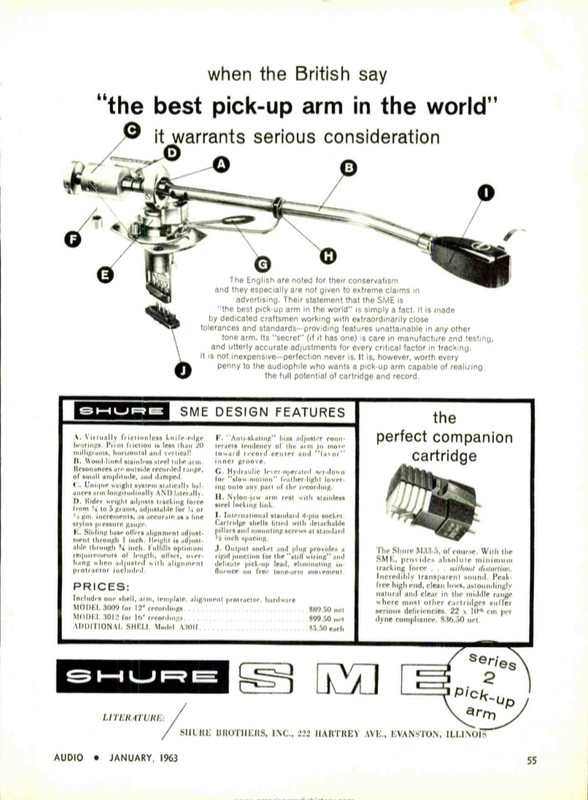
Interesting tidbit is that the original headshell was made for SME by Ortofon (mentioned within the May 1963 High Fidelity Magazine review linked to above).
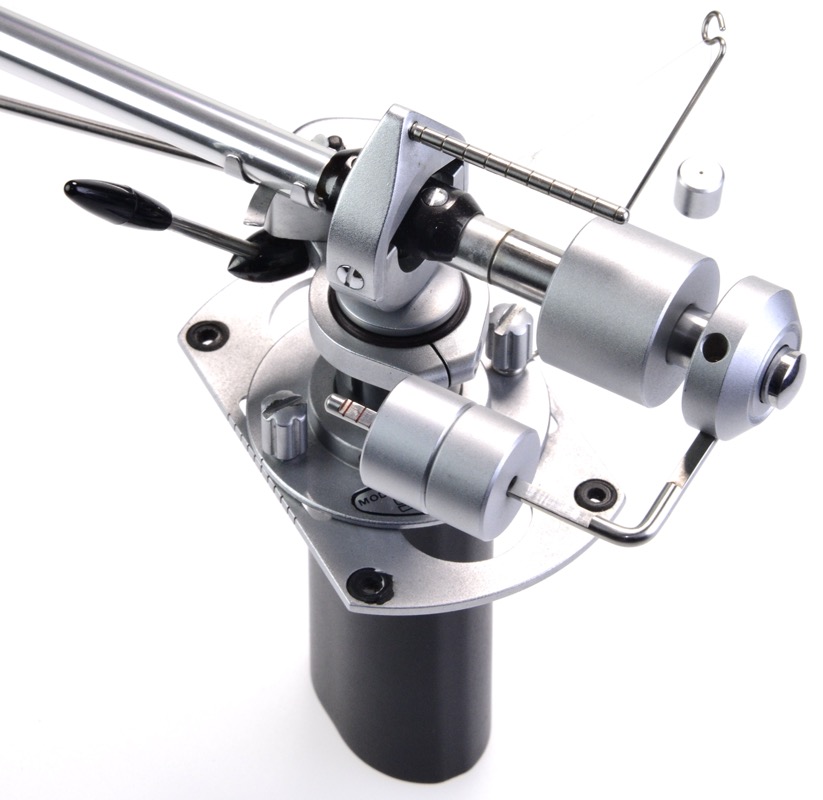
This is the inside of the dashpot cover from my 3009 series 2 non-improved. You can see a tarry substance in each ‘corner’ which is probably what holds it in place. Mine came off with finger pressure, but heat, as was suggested above, might help.
 F3B8E0F7
-1C74-4A67-9D1E-47E8B878A6B0 by Kevin Thomas, on Flickr
regards
Kevin
F3B8E0F7-1C74-4A67-9D1E-47E8B878A6B0 by Kevin Thomas, on Flickr
regards
Kevin
Craig B
Re:trophile
It was Ortofon's short vs. long headshells for SPU Type A vs. G (respectively) that started the different top vs bottom pins thing (with Type A having a bottom pin only, and G a top pin only). Basically, there were variants of Ortofon tonearms for A vs. G headshells with the slots being either top or bottom and therefore only accommodating one or the other cartridge/headshell assembly. When SME designed the original 3009 with sliding base adjustment they put slots both top and bottom within the headshell socket such that either Ortofon SPU A or B could be accommodated.All original SME-supplied headshells have one pin to my knowledge. I think the bottom one is for compatibility with some other earlier shells from other brands. My SPU knowledge is not great at all, maybe some very early ones had a bottom pin, or two pins?
Last edited:
Tony L
Administrator
Early SME S.2 headshell with two pins:
Really good post, but I’m certain that is not an early SME headshell, from the side it looks like the one from the M2R range (see fingerlift screw), though I’ve never seen one to confirm it has two pins. I’m pretty sure the solid headshell in my first post of this thread is the earliest SME-made shell (i.e. not a rebadged Ortofon). It only has a top pin.
The two pin design addresses an obvious flaw to my mind, I wish they had adopted it. There is just enough ‘slop’ in the headshell mount on any SME that if you look carefully you’ll note the shell is pushed very slightly up at the front by the strong spring force of the pins. It very slightly impacts VTA etc. I assume two pins would make for a marginally more solid and better mated joint too. A missed opportunity.
PS Edit: that is definitely a M2R headshell!
Craig B
Re:trophile
Right you are, Tony, that headshell is S2-R.Really good post, but I’m certain that is not an early SME headshell, from the side it looks like the one from the M2R range (see fingerlift screw), though I’ve never seen one to confirm it has two pins. I’m pretty sure the solid headshell in my first post of this thread is the earliest SME-made shell (i.e. not a rebadged Ortofon). It only has a top pin.
The two pin design addresses an obvious flaw to my mind, I wish they had adopted it. There is just enough ‘slop’ in the headshell mount on any SME that if you look carefully you’ll note the shell is pushed very slightly up at the front by the strong spring force of the pins. It very slightly impacts VTA etc. I assume two pins would make for a marginally more solid and better mated joint too. A missed opportunity.
PS Edit: that is definitely a M2R headshell!
UPDATE: References to early two-pin SME headshells deleted from previous post (as nowt could be found as evidence).
Last edited:
Tony L
Administrator
In an act of possible/probable insanity I’ve just spent £1k on another early split-weight 3009 Series II! I doubt anyone has ever spent more! This one (eBay). A ridiculous amount of money, but it certainly looks like the example I’ve been hunting for a very, very long while now. It is apparently complete with the extra black counterweight too, it has the rare solid headshell (I’ve been looking for another, and they are never less than £150 or so), and it is apparently fully boxed. It is the version I have always wanted on my 124, and I’ve never seen a tidy complete boxed one come up before. Not one. It certainly looks cleaner than the one that is the previous subject of this thread (which I’ll eventually sell minus the headshell).
PS An aunt died very recently leaving me £1k and I’ve been looking for something to stick it all in rather than just bung it into savings/investments. It can be part of my daily use turntable (even if I rationalise my 3009 collection a bit and recoup some if it!).
PS An aunt died very recently leaving me £1k and I’ve been looking for something to stick it all in rather than just bung it into savings/investments. It can be part of my daily use turntable (even if I rationalise my 3009 collection a bit and recoup some if it!).
This site contains affiliate links for which pink fish media may be compensated.
Is there a way to judge the age of a 3009 II?
I know they have a serial number, but I’ve never found any tables showing the years of production by serial number. Also, IIRC, the serial number is on the bed plate, which might easily get swapped over the lifetime of an arm.
Does anyone know roughly the years of production of the split counter-weight model, non-improved, improved versions?
regards
Kevin
Tony L
Administrator
Suggest having a look at the end stub, as this appears to be sans original coupling rubber.
I think that is right. Certainly looks very similar to my current split-weight. As ever with SME there are countless changes between versions.
After scrutinising the pictures the only thing I can see I’d want to change are the baseplate acorn nuts where someone has taken a screwdriver to them (just don’t!). I’ll just swap those with mint ones. I also wish they’d posted pictures of the box inserts, paperwork and cables. What I can see in the (remarkably good) pictures all looks legit to me.
FWIW The arm I have has an even lower number (#12673 vs. #16xxx of the eBay arm) and I suspect dates from 1964 as I have brochures, price lists, receipts etc that came with it. Certainly for the Shure M44-5 that was fitted to it. SME would have been really scaling production up over this period as these arms had very little competition. What looks like quite a large serial difference it is likely within a year. Maybe 1965, which would be a great match for a TD124/II! That said it is really the functionality I crave here. The split-weight is a much nicer design if you change cartridges and want to rebalance the arm regularly. Much easier to deal with than the one-piece counterweight/outrider assembly. The latter along with the perforated shell made the arm much lower-mass, so I understand why they did it, but these days that doesn’t matter as much as most cartridges are medium to low compliance anyway.
Is there a way to judge the age of a 3009 II?
I don’t know how to decode the serial numbers, but being a geek I could very likely get it within a years or two just by looking at it! There are only four official types of the original arm, Series I, Series II, Series II Improved, and the much later R, but most went through some pretty significant changes that can really nail them down time-wise.
Craig B
Re:trophile
I did notice the acorn nuts condition, but didn't want to come across as being too negative wrt what is a wonderful find. After all, considering the age of these, finding one that likely only needs a couple of fasteners and rubber grommets replacing in order to appear as new is almost a miracle. Your patience has obviously paid off.I think that is right. Certainly looks very similar to my current split-weight. As ever with SME there are countless changes between versions.
After scrutinising the pictures the only thing I can see I’d want to change are the baseplate acorn nuts where someone has taken a screwdriver to them (just don’t!). I’ll just swap those with mint ones.
Tony L
Administrator
I’m more than a little nervous as even pictures that good can hide things, e.g. I’d have liked to see the armtube under the arm-rest to see if it had scratches (the 3009 on my deck is perfect in this regard, in fact it could pass as new), plus I’d very much like to have seen the packaging, manual, cable and extra weight, as I’m certainly factoring these heavily into the value. It certainly looks good, and acorn nuts are no issue, I stuck NOS ones on my current arm and the S2 Improved I have boxed-up, so I’ll just swap stuff around a bit. I want to keep my existing arm exactly as-is (it is boxed, with manual etc), I’ll hold onto that regardless, though the other split-weight (minus headshell) and boxed fixed-shell S2 Improved may find their way onto the market. I have sold a couple recently, a beautiful one exactly like the one on my deck, and a very early Improved, so I’m not entirely hoarding the things!
Craig B
Re:trophile
Were I were holding onto my existing arm anyway, it wouldn't trigger my OCD too much to swap end stubs and counterweights between them, should an arm tube prove not to be fully up to scratch(less), for example. Certainly beats swapping tubes between two SME arms (speaking from experience here).I’m more than a little nervous as even pictures that good can hide things, e.g. I’d have liked to see the armtube under the arm-rest to see if it had scratches (the 3009 on my deck is perfect in this regard, in fact it could pass as new), plus I’d very much like to have seen the packaging, manual, cable and extra weight, as I’m certainly factoring these heavily into the value. It certainly looks good, and acorn nuts are no issue, I stuck NOS ones on my current arm and the S2 Improved I have boxed-up, so I’ll just swap stuff around a bit. I want to keep my existing arm exactly as-is (it is boxed, with manual etc), I’ll hold onto that regardless, though the other split-weight (minus headshell) and boxed fixed-shell S2 Improved may find their way onto the market. I have sold a couple recently, a beautiful one exactly like the one on my deck, and a very early Improved, so I’m not entirely hoarding the things!
Tony L
Administrator
Yes, I may end up doing that regardless as my existing arm has been RCA-converted and I’d be reluctant to do that to a very rare boxed early one. I’ll give that some thought, though I’m also tempted to make a really nice armlead for the SME four pin connector as a downward cable exit makes way more sense than the side-exit on a TD-124. My vdH 501 cable does rub against the plinth slightly. I’ll almost certainly do things in small stages over a period of time. I’m definitely not selling the 3009 currently on the deck, that is the best example I’ve ever seen! I’m totally obsessive and I can’t find any cosmetic flaw! The only annoyance is the cueing drops too fast so it really needs stripping down at some point to add fresh gloop. A job I’ve not done to a SME as I couldn’t work out how to get the cover off!
InSides
dŵr
A job I’ve not done to a SME as I couldn’t work out how to get the cover off!
This is something I may yet need to do on all three of mine (well, five if we count immediate family) - but have been putting it off. There is no good instruction video that I have found, or even a pictorial - so I may have to resort in making one, even if I cause damage on one of them.
Tony L
Administrator
This is something I may yet need to do on all three of mine (well, five if we count immediate family) - but have been putting it off. There is no good instruction video that I have found, or even a pictorial - so I may have to resort in making one, even if I cause damage on one of them.
I’m suspecting it involves desoldering the arm-base, removing the whole lift-lower/armrest assembly, removing the little rubber pad that may get damaged, and then taking a heat gun to it or heating the whole thing up in hot water. The cover is obviously glued on somehow, so that will need softening. It has to be possible, and possible without leaving even the slightest hint it has been done. I’ve not owned one that can just be slid off in place, and I’d obviously not take any tools to it.
I’m suspecting it involves desoldering the arm-base, removing the whole lift-lower/armrest assembly, removing the little rubber pad that may get damaged, and then taking a heat gun to it or heating the whole thing up in hot water. The cover is obviously glued on somehow, so that will need softening. It has to be possible, and possible without leaving even the slightest hint it has been done. I’ve not owned one that can just be slid off in place, and I’d obviously not take any tools to it.
Mine came off with minimal force, but that may be because someone had previously removed it and the adhesive wasn’t as strong subsequently (it looked like a smear of some sort of tarry substance).