advertisement


Respraying Ittok Headshell

jagdesign

pfm Member
I managed to pick up a nice early LP12 with a split counterweight Ittok LVII a couple of weeks back. Unfortunately the arm has been subjected to typical Linn cartridge tightening procedures, so the paint is damaged. Rather than going down the touch-up route, has anyone attempted removing the headshell altogether, stripping (or prepping) and respraying?

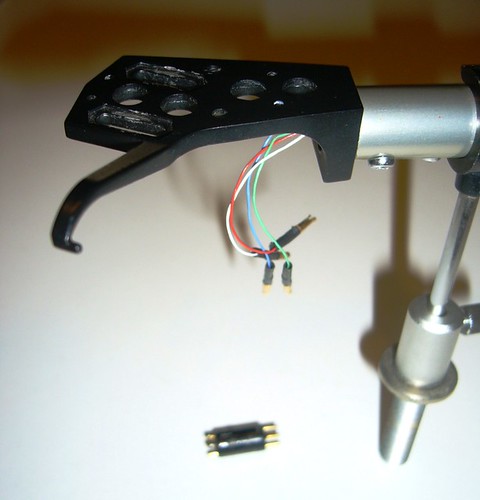
It looks as thought it's just held in with a couple of screws on the underside of the armtube, and presumably some thread-lock or adhesive. Can't quite see in the link below if the headshell connectors are soldered on the armtube side (I imagine so), so perhaps I'd consider an internal rewire at the same time. https://www.ebay.co.uk/itm/22478373...d=link&campid=5338728743&toolid=20001&mkevt=1

Welcome any thoughts.
 
This site contains affiliate links for which pink fish media may be compensated.
I'd be far more inclined to mask off the arm and airbrush the headshell lightly with some matt black
Far less risky...and I think that's how Johnny 7 does it

Yes, that did cross my mind - a little tricky to remove some of the existing paint around the slots with it still in situ, but I could rig something up to hold it steady.
 
If it wasn't for the internal wire guide eyelet that is screwed on within the headshell collar, loosening off the tiny slotted grub screw would allow the pins assembly to be held back whilst the headshell is eased off (post removal of the 3 x pan head screws) such that the delicate internal wires aren't fractured. Holding the pins assembly stationary would be necessary as there will be virtually no slack in the wires within the tube.

IOW, because of this wire guide, pulling the headshell off will necessitate a full rewire.

Ittok-LVII-Headshell.jpg
 
Thanks Craig, that's very useful to know. Maybe I'll give the respray in-situ a go, then attempt removal/rewire if it doesn't cut the mustard.
 
Very doable if your reasonably proficient at DIY electrical stuff
Or threading needles.

The hardest part is soldering the fine wires onto the pin terminals either end. Best to practice with an off cut of wire first.

Some remove the headshell pins assembly and wire straight through to the cartridge tags. Personally, I'd rather the ability to change out a broken headshell lead rather than having to rewire because of one lead fracture. The electrical difference is virtually nil, certainly inconsequential to sound quality.

Linn Ittok LVII Cardas rewired (original headshell pins assembly below):
4249927574-e7752717f9.jpg
 
I’ll see I can find my old thread where I resprayed the head shell. IIRC lots of paint stripping, filler and carefully applied multiple paint layers with days of drying in between.
 
@flatpopely that would be great - there are a couple of nut graunches in mine, so I was contemplating some metal epoxy or similar to try and tidy this up. Interested to see how you went about it.
 
Presuming the head shell is aluminium alloy, using the correct etch primer is vital to get a good bond for the paint. Apart from that it should be fairly straight forward. Epoxy filler sounds like a good idea.

I am thinking of doing this, I.e. dismantling the arm, painting the head shell and rewiring with Cardas litz. From the little that is available on the internet about this, I get the impression is is better to remove the arm tube from the yoke, rather that pull the new wires through using the existing ones, and if I do all this I may as well dismantle and clean the bearings? Or should I leave well enough alone? Any comments welcome.
 
Metal filler does not seem like a good idea to me
As soon as you try to do another screw up in that area it will gawl up or flake off immediately
 
Presuming the head shell is aluminium alloy, using the correct etch primer is vital to get a good bond for the paint. Apart from that it should be fairly straight forward. Epoxy filler sounds like a good idea.

I am thinking of doing this, I.e. dismantling the arm, painting the head shell and rewiring with Cardas litz. From the little that is available on the internet about this, I get the impression is is better to remove the arm tube from the yoke, rather that pull the new wires through using the existing ones, and if I do all this I may as well dismantle and clean the bearings? Or should I leave well enough alone? Any comments welcome.
Unless there is lack of electrical continuity between any of the four headshell pins and the corresponding pins within the arm pillar plug, and/or lack of continuity between tonearm tube metal or pillar metal and ground pin out then I'd leave the wiring alone.

If you are concerned about the condition of the bearings, suggest giving it both a lateral bearing swing test and a vertical bearing friction test first before deciding whether these need attention. The swing test is quite straight forward. As to Linn's different coloured test weights for vertical friction tests of Ekos (red), Ittok LVII/LVIII (blue), and Basik/Akito (yellow), these will be as many milligrams as each tonearms vertical bearing friction spec. Regardless, any tonearm that will move downward when a weight of 20mg is dropped upon the floating headshell from a height of 1cm above is fine.

See section 4.15 in 'Linn Tonearms and Cartridges.pdf'.

Linn-Ittok-Swing-Test.jpg
 
Last edited:
Looking at Ittok LVII heashell and pins assembly again, it occurs to me that one might be able to persuade a few mm gap between black painted shell metal and tonearm tube end, exposing a couple of mm of unpainted headshell shaft within, all without (hopefully) threatening internal wire fracture. If so, one could then mask off from the bare metal headshell sleeve within all the way back, preferably enclosing the whole arm, but for headshell black, within a plastic bag.

The trick here (should it work) will be loosening off the pins assembly set screw, removal of the 3 x headshell fastening screws and then easing out the shell whist preventing the pins assembly from being brought forward with. IOW, the amount of travel will be limited by how far forward the headshell will shift before the attached wire loop guide eyelet within fouls the back of the pin/wire connections. Suggest trying a 1mm gap then checking that the pins assembly still moves freely back and forth, then try another 1mm gap and repeat pins freedom test.

WARNING: One must hold only the tonearm tube and headshell whilst exerting twisting/pulling force (donning rubber gloves for grip recommended). Obviously, this is with the tonearm completely removed from the deck, with counterweight off, and with the remaining weight at the back of the arm always resting on a padded surface.


advertisement


Back
Top