advertisement


MM cartridge recommendations for original Mission 774 arm

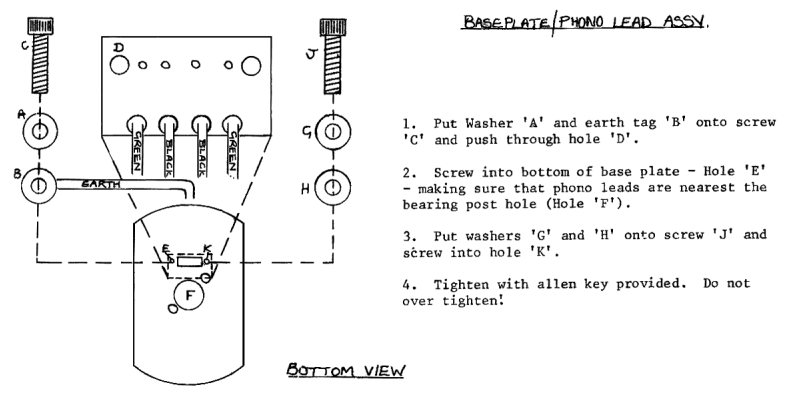
Yes, the original wiring piggybacked arm wand ground on Rch -ve (green) and this was made common to the arm base (and hence arm pillar/yoke) via the PCB/SIP socket assembly. This is why Mission were specific about connecting the external ground wire via 'hole D' in the PCB and hence into threaded 'hole E' in the metal base plate, with the arm pillar clamp tying arm pillar and bearing yoke in.

Sort of like Rega's take on Thorens' old wiring only discontinuing the ground being piggybacked on signal -ve at the external lead.

Here is the old 4-pin SIP connector wiring diagram insert from the 774 instructions.

1052462612-Red-Wire-Ground-Installation-png-1763957e1fd82dee74fca7d34552d1a1.png
Just saw your photo Craig - fairly sure my 775 (without rubber decoupling on counterweight, so I think that means sold as an arm only?) came with the yellow headshell earth wire connected to one of the cartridge earth returns. For sure OP should ensure point D is earthed to chassis to find out :)
 
Just saw your photo Craig - fairly sure my 775 (without rubber decoupling on counterweight, so I think that means sold as an arm only?) came with the yellow headshell earth wire connected to one of the cartridge earth returns. For sure OP should ensure point D is earthed to chassis to find out :)
It just means that yours was a later 'improved' variant. Mission dropped the decoupling within and produced a nicer baseplate.

Yellow piggybacked along green, which is the closest pin to hole D in the SIP socket/PCB assembly.

At this point, I think @Phil Bishop may have to have a closer look within the arm wand tube end. I tried zooming in but can't quite make head nor tail of this, other than there appears to be a fair sized solder blob within. We'll need a closeup of in there, as well a shot of the flying lead that comes out the back end, as well the male SIP plug.

52103843825_6abe84d3fa_b.jpg


P.S. I had a 774S/775 (and an 775SM/Helius) just like yours for years. Even if buying an S/775 or SM/775 as package, the arm typically came boxed. I can't quite remember how many of these arms I 'assembled' but it was somewhat more than a lot. With some popular cartridges, I could get the overhang almost right on by eyeballing how much tube stuck out the back of the arm wand clamp. :D
 
Thanks for all the input guys, I'll do some experimentation when I get the relevant bits through the post. I'm confident in the rewiring job as I had a good chat to the chap who did it beforehand. When I inherited the arm there were wires all over the place and he advised what needed to be connected to what. I do feel a bit out of my depth here - I currently have a Rega RB303 on it and it does the job without any fiddling about. I may just go that route and sell the Mission on but I'll have a fair crack at getting it working before I do. I just worry every time I try to set it up that I'll break something. The wiring is so delicate and that bloody pillar that needs tightening with the allen bolt and keeps slipping! I sometimes feel life's too short :)
 
Thanks for all the input guys, I'll do some experimentation when I get the relevant bits through the post. I'm confident in the rewiring job as I had a good chat to the chap who did it beforehand. When I inherited the arm there were wires all over the place and he advised what needed to be connected to what. I do feel a bit out of my depth here - I currently have a Rega RB303 on it and it does the job without any fiddling about. I may just go that route and sell the Mission on but I'll have a fair crack at getting it working before I do. I just worry every time I try to set it up that I'll break something. The wiring is so delicate and that bloody pillar that needs tightening with the allen bolt and keeps slipping! I sometimes feel life's too short :)
It's a wonderful life, for a hobbyist with a multimeter, Phil. :)
 
@Phil Bishop - where did the 774 sticker go? :) But makes it easy, with a dvm on ohms check for continuity between that solder tab in headshell and one of the cartridge earth returns - looks like it’s been soldered, so should connect to one. As said though, when I re-wired mine I left it free and mounted it to SME base plate.

@Craig B - to get Baerwald on my 774 & Asaka on an LP12 I ended up with a few mm more overhang than normal…sounds great - love the adjustable arm tube length :)
 
Thanks for all the input guys, I'll do some experimentation when I get the relevant bits through the post. I'm confident in the rewiring job as I had a good chat to the chap who did it beforehand. When I inherited the arm there were wires all over the place and he advised what needed to be connected to what. I do feel a bit out of my depth here - I currently have a Rega RB303 on it and it does the job without any fiddling about. I may just go that route and sell the Mission on but I'll have a fair crack at getting it working before I do. I just worry every time I try to set it up that I'll break something. The wiring is so delicate and that bloody pillar that needs tightening with the allen bolt and keeps slipping! I sometimes feel life's too short :)

if it’s too hard, I’ll give you £59 for the 774 :D

it’s a much better arm, persevere ;)
 
Yep, tried sticking it on the other day with a bit of Pritt.....it fell off again :D
Pritt is good for that.

After you've had chance to have a look down the shaft, as it were, preferably with a multimeter, then a same size rectangle of 3M™ 'Double Sided Tapes for Thin Bonding' should do. Cut to size using the label as template, peel one side of the tape and stick it to the back of the label, then peel and stick the remaining side to affix the label to the arm wand. Should you not get the tape perfectly aligned when sticking it onto the back of the label, simply use a hobby knife to trim off any excess overlap before final peeling and sticking the label on.
 
Update - today bonded tonearm base to Systemdek chassis with temporary earth wire and used nylon bolts (horrible) to fix cartridge to headshell. Hum issues solved.

Given me enough confidence to order an ATVM540ML which Amazon were doing a deal on today.

So, just got to tidy things up now.

Can anyone recommend a seller of decent quality 20 mm non magnetic bolts, not silly audiophile prices?

Thanks to all for advice here, Craig et al ;)
 
You will get used to it - biggest problem i had was getting used to setting the VTA (holding the pillar while tightening the locking screw - you can see my workaround at Vinylengine).
I originally used a pack of small washers as spacers to hold the height while it was locked off.
But it's a superb arm and so much better SQ wise than the RB250/300
 
Update - today bonded tonearm base to Systemdek chassis with temporary earth wire and used nylon bolts (horrible) to fix cartridge to headshell. Hum issues solved.

Given me enough confidence to order an ATVM540ML which Amazon were doing a deal on today.

So, just got to tidy things up now.

Can anyone recommend a seller of decent quality 20 mm non magnetic bolts, not silly audiophile prices?

Thanks to all for advice here, Craig et al ;)
You're welcome, Phil.

Craig

P.S. The metal cartridge screws had nothing to do with the hum. Also, I wouldn't worry about using ferromagnetic bolts with any of the MMs that you are likely to fit.
 
Thanks chaps, sounds great even with the humble OM10 with the only criticism being some IGD towards side ends. That said, alignment is only approximate at the moment.

Won't send you a photo as you would not like it - I have a blob of blu tank on the headshell to get the right tracking force. I do have a cartridge insert weight but can't be bothered to fit it as I only want to undo those nylon bolts when I have some decent metal bolts to substitute them with - have ordered some at 18.5 mm which should be neater.

Just got to tidy things up now and hope I don't have an accident when doing so! :eek:

Agreed @cobbers about setting the pillar height - really tricky as the allen screw adjustment/tightening is not easy. If you could send me a link to your VE technique that would be great :)

Thanks again all and apologies for my mini tantrums :rolleyes:
Yes, you'll definitely be wanting the weight plate in. The OM series only weigh 2.5g without, 5g with. Difficult to find a tonearm that can balance 2.5g, that is, other than the old Dual ULM ones.

Haven't noticed any 'tantrums' myself, 'mini' or otherwise. Naturally, these kind of things can be frustrating until one gets them all figured out. I'd say you've pretty much sussed it now, Phil.
 
Because it makes it so much easier to set and adjust the height - is there anything wrong in making the job easier - so frustrating trying to maintain the height when you are trying to lock it off.
 
Because it makes it so much easier to set and adjust the height - is there anything wrong in making the job easier - so frustrating trying to maintain the height when you are trying to lock it off.
Assuming an 'improved' arm mounting plate, should one find it difficult to snug the C-clamp up just enough to hold the arm whilst eyeballing how level things are then the clamp has likely been grossly overtightened at some point prior.

Regardless, wrt making the job easier, one could easily knock up a temporary spacer using a rubber T-nut and a suitable length bolt. Nylon would be good here for its none marring nature.


advertisement


Back
Top