john.luckins
pfm Member
Hi All,
I thought I would report on my HackerNAP clone, built while I am awaiting the HackerNAP parts. It is built on NAP140 clone boards from Jims audio on Ebay and is fitted with T03 output transistors. I have bodged 4 PFM Gyrator (Cap Multipliers) to fit and played around with a number of different PSU options based on what bits I have hanging around. Its not a pretty sight in its prototype form and weighs an absolute ton, but it does sound rather good and certainly better than my previous NAP135s in both my opinion and that of others who have listened to both. It has evolved from birth over the last week and there have been no nasty accidents on the way. The cat knows to stay well clear or risk being fried
Circuit modifications:
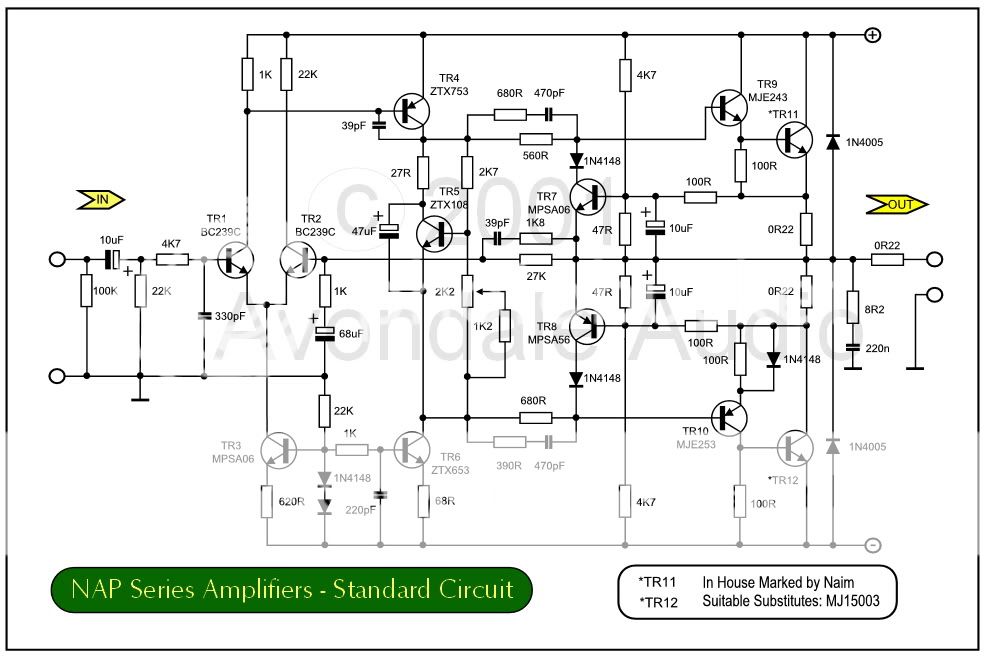
The Jims Audio boards are the standard NAP 140 circuit and good quality. The circuit is at the link below with modifications as follows:
1. Using 2SD 756 for Vas stage current sink higher gain, Ft and lower Cob so in theory a better device in this position.
2. Using 2SB 716 for VAS transistor same reasons as 1. Considerably better Hfe and speed than ZTX 753 it replaces.
3. protection circuit not installed
4. Still using Naim original design MJE 243 and 253 for the driver stage. Prefer these to MJE15030/1 as Hfe and gain linearity better at lower power.
5. BUV 60 as output NPN higher voltage and current rating to BDY58 and slightly lower Ft. I have BDY58s to use in final version.
6. Split the 22k resistor to the current sinks with a 4.7uF cap to ve rail.
Circuit additions:
1. Powered LTP and VAS stage using cap multipliers with IRF 610 and 9610.
2. Filtered the feed to cap multipliers through a 20mH choke, series 39 Ohm resistor and a 1000uF smoothing cap.
3. Same supplies feed both channels.
4. 2 X 30-0-30 200VA non screened transformers with bog standard rectifiers and snubbers (100R +0.1uF) feed front end.
5. 2 X 432VA R core 27-0-27 with high speed 25JPF40/25CPF40 rectifiers and snubbers as above for power stage.
6. 2 X BHC 22000uF 63 V feeding power stage
7. 2 X BHC 15000uF 63 V feeding front end
I started with just the two 200 VA transformers feeding both front end and power stage together and gradually upgraded the monster, listening as I went. I didnt want to loose the characteristic Naim presentation so I have stuck with the Tantalum caps for now, and it seems to have worked. My aim was to see if I could get this build to exceed the performance of my NAP 135s which I sold 6 months ago. Initially the sound into my PMC DB1s was like an unrefined Nait, with a slightly thin bass but with some of the Naim PRAT. Good for spinning a few disks but a bit tiresome after an hour or two.
What made improvements to the sound:
Smoothing the mid point of the 22kohm feed to the two current sinks using the 4.7uF cap to the negative rail brought a worthwhile improvement to the depth of detail
Adding the cap multipliers and splitting the feed to the front end gave a much greater improvement in the detail and depth. This wasnt subtle, and I became aware of detail and perspectives to the sound that I didnt get with my 135s. You know when you hear so many new things happening in a range of familiar recordings. The bass was still thin and lacking authority though.
Adding the choke made a small further improvement to the detail. Now sounding very tidy and precise.
Putting the snubber (100ohm + 0.1uF) across the AC terminals of the rectifier removed a great deal of the hash and glare that I thought was down to the slightly agricultural 200VA transformers I was using.
Finally, adding the 2 X 27-0-27 R Core 432 VA transformers and 22000uF caps to the feed the output stage alone brought back the bass weight and authority that I had missed from the 135s.
It may be an ugly beast but my family and friends agree that it outperforms my previous 135s at all volumes in my 5 metre square listening room where it is driven by a CDS3 and a Starfish. My son could tell it was better from upstairs. Im not sure that the R cores are best suited to driving the output stage compared with toroids which have less series inductance. Im certain that the two other transformers can be improved upon. Their rating is excessive and R cores would be better here than on the output stage. Higher voltage lower power R cores for the front end are hard to find. The benefit of isolating the voltage feed to the front end is considerable and I think Naim missed a trick by not doing this themselves. It would have been considerably cheaper to do in the NAP250 and 135s than the full power regulator.
What is next:
Improve the earthing where the speaker and Zobel return earths run common mode with the front end earth for about 2 inches a big no-no.
Load up the Cap multipliers with 1 watt resistors to get their output resistance down (greater current = higher Gm = lower Rout)
Tweak the Cap multiplier voltages to maximize them, possibly feeding the gate of the FET from a separate transformer/rectifier to eliminate interference
Clean the boards of all traces of flux.
Use non wirewound emitter resistors in the output stage
A Polypropelene Zobel Cap.
Measure the transformer inductances to establish the best values for the snubbers - tricky!
Source better quality Tantalum capacitors - pricey!
Wind new inductors for the Cap multiplier supply.
Consider a separate regulated feed to the driver transistors (MJE243/253). I have a suitable +- 40 volt 500mA shunt regulator
Build up my second set of boards and bridge the amp to remove all high signal currents from the earth rails. I understand this is what the NAP500 does. Need to consider adjusting the output impedance and damping factor as there will be two amps in series.
Use what I have learnt from this to improve my forthcoming HackerNAP build.
Anyway, back to listen again .and a big thanks to Hacker for his NAP and the PFM Gyrator boards.
Here's some piccies...
http://s869.photobucket.com/albums/ab257/John_Luckins/
John
I thought I would report on my HackerNAP clone, built while I am awaiting the HackerNAP parts. It is built on NAP140 clone boards from Jims audio on Ebay and is fitted with T03 output transistors. I have bodged 4 PFM Gyrator (Cap Multipliers) to fit and played around with a number of different PSU options based on what bits I have hanging around. Its not a pretty sight in its prototype form and weighs an absolute ton, but it does sound rather good and certainly better than my previous NAP135s in both my opinion and that of others who have listened to both. It has evolved from birth over the last week and there have been no nasty accidents on the way. The cat knows to stay well clear or risk being fried
Circuit modifications:
The Jims Audio boards are the standard NAP 140 circuit and good quality. The circuit is at the link below with modifications as follows:
1. Using 2SD 756 for Vas stage current sink higher gain, Ft and lower Cob so in theory a better device in this position.
2. Using 2SB 716 for VAS transistor same reasons as 1. Considerably better Hfe and speed than ZTX 753 it replaces.
3. protection circuit not installed
4. Still using Naim original design MJE 243 and 253 for the driver stage. Prefer these to MJE15030/1 as Hfe and gain linearity better at lower power.
5. BUV 60 as output NPN higher voltage and current rating to BDY58 and slightly lower Ft. I have BDY58s to use in final version.
6. Split the 22k resistor to the current sinks with a 4.7uF cap to ve rail.
Circuit additions:
1. Powered LTP and VAS stage using cap multipliers with IRF 610 and 9610.
2. Filtered the feed to cap multipliers through a 20mH choke, series 39 Ohm resistor and a 1000uF smoothing cap.
3. Same supplies feed both channels.
4. 2 X 30-0-30 200VA non screened transformers with bog standard rectifiers and snubbers (100R +0.1uF) feed front end.
5. 2 X 432VA R core 27-0-27 with high speed 25JPF40/25CPF40 rectifiers and snubbers as above for power stage.
6. 2 X BHC 22000uF 63 V feeding power stage
7. 2 X BHC 15000uF 63 V feeding front end
I started with just the two 200 VA transformers feeding both front end and power stage together and gradually upgraded the monster, listening as I went. I didnt want to loose the characteristic Naim presentation so I have stuck with the Tantalum caps for now, and it seems to have worked. My aim was to see if I could get this build to exceed the performance of my NAP 135s which I sold 6 months ago. Initially the sound into my PMC DB1s was like an unrefined Nait, with a slightly thin bass but with some of the Naim PRAT. Good for spinning a few disks but a bit tiresome after an hour or two.
What made improvements to the sound:
Smoothing the mid point of the 22kohm feed to the two current sinks using the 4.7uF cap to the negative rail brought a worthwhile improvement to the depth of detail
Adding the cap multipliers and splitting the feed to the front end gave a much greater improvement in the detail and depth. This wasnt subtle, and I became aware of detail and perspectives to the sound that I didnt get with my 135s. You know when you hear so many new things happening in a range of familiar recordings. The bass was still thin and lacking authority though.
Adding the choke made a small further improvement to the detail. Now sounding very tidy and precise.
Putting the snubber (100ohm + 0.1uF) across the AC terminals of the rectifier removed a great deal of the hash and glare that I thought was down to the slightly agricultural 200VA transformers I was using.
Finally, adding the 2 X 27-0-27 R Core 432 VA transformers and 22000uF caps to the feed the output stage alone brought back the bass weight and authority that I had missed from the 135s.
It may be an ugly beast but my family and friends agree that it outperforms my previous 135s at all volumes in my 5 metre square listening room where it is driven by a CDS3 and a Starfish. My son could tell it was better from upstairs. Im not sure that the R cores are best suited to driving the output stage compared with toroids which have less series inductance. Im certain that the two other transformers can be improved upon. Their rating is excessive and R cores would be better here than on the output stage. Higher voltage lower power R cores for the front end are hard to find. The benefit of isolating the voltage feed to the front end is considerable and I think Naim missed a trick by not doing this themselves. It would have been considerably cheaper to do in the NAP250 and 135s than the full power regulator.
What is next:
Improve the earthing where the speaker and Zobel return earths run common mode with the front end earth for about 2 inches a big no-no.
Load up the Cap multipliers with 1 watt resistors to get their output resistance down (greater current = higher Gm = lower Rout)
Tweak the Cap multiplier voltages to maximize them, possibly feeding the gate of the FET from a separate transformer/rectifier to eliminate interference
Clean the boards of all traces of flux.
Use non wirewound emitter resistors in the output stage
A Polypropelene Zobel Cap.
Measure the transformer inductances to establish the best values for the snubbers - tricky!
Source better quality Tantalum capacitors - pricey!
Wind new inductors for the Cap multiplier supply.
Consider a separate regulated feed to the driver transistors (MJE243/253). I have a suitable +- 40 volt 500mA shunt regulator
Build up my second set of boards and bridge the amp to remove all high signal currents from the earth rails. I understand this is what the NAP500 does. Need to consider adjusting the output impedance and damping factor as there will be two amps in series.
Use what I have learnt from this to improve my forthcoming HackerNAP build.
Anyway, back to listen again .and a big thanks to Hacker for his NAP and the PFM Gyrator boards.
Here's some piccies...
http://s869.photobucket.com/albums/ab257/John_Luckins/
John
")