advertisement


Another Thorens TD124 overhaul

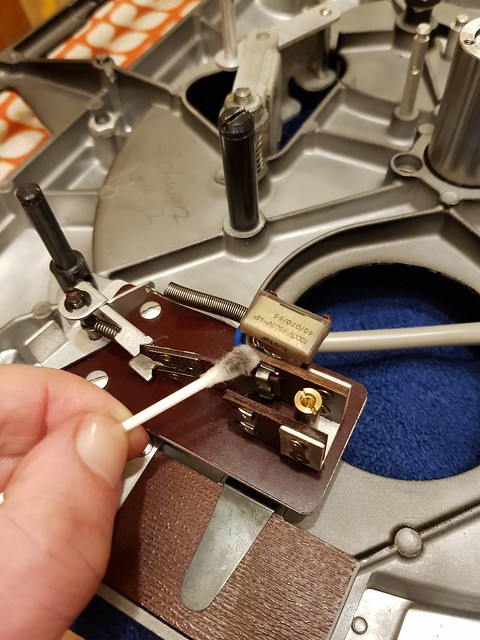
It was very apparent from the outset that Simon's unit had a few issues, both aesthetically and mechanically.

From a function perspective the major issues were an absolutely horrendous amount of slop in the stepped pulley bearings and idler wheel bearings.

The old stepped pulley bushes were pressed/pulled out and replaced. In this pic you can see the new bushes in the syringe being vacuum loaded with oil and the the filthy old worn our bushes.

20240328_101342 by Michael Pickwell, on Flickr

Goodness only know what the old bushes had been lubricated with but it looked like some sort of black grease. Anyway, they were absolutely knackered!

Bizarrely I also found that some muppet had fitted a motor thrust pad into the stepped pulley! The motor thrust pad is smaller and not the correct fit at all for the stepped pulley. This was of course duly swapped out for the correct item. Finally, the bearing well was sealed with PTFE tape to prevent the oil from leaking out.

Motor thrust pad versus stepped pulley thrust pad size comparison.

20240328_102528 by Michael Pickwell, on Flickr
 
Even though Simon's unit has a replacement Schopper bearing the captive ball at the bottom of the spindle was already showing some wear and so was removed and replaced with a upgrade grade 5 ceramic ball.

20240328_205339 by Michael Pickwell, on Flickr
 
The cover plate for the electrical connections board was cracked and broken. Since this covers the electrical connections it can be considered to be a safety critical item and needed to be replaced.

Understandably Simon didn't fancy paying an extortionate price for a new old stock one, so I fabricated a new one for him out of thin fibreglass board.

20240409_203009 by Michael Pickwell, on Flickr
 
One of my pet hates is the standard bearing cap on the TD124 which is a flimsy pressed sheet steel affair and next to useless. They're simply not stiff enough and over time the get deformed into a concave shape, which lowers the performance of the bearing. They very often end up weeping oil too, which is messy at best and often means the bearing runs out of adequate lubrication.

Thankfully several aftermarket upgrade bearing caps are available and I'm about to put my own into production.

Simon's unit gets the honour of being the first customer deck to be fitted with one of mine (actually one of the pre-production test samples).

20240415_102504 by Michael Pickwell, on Flickr

Before I could fit the new bearing end cap I had to tidy up the bottom of the bearing housing by lightly 'dressing' it with a file to remove some burrs that if left would likely have caused a leak. My gaskets haven't arrived from the manufacturers yet so a new gasket was hand cut from a sheet of gasket paper.

A new nylatron thrust pad and grade 5 ceramic bearing complete the main bearing overhaul and upgrade.
 
The motor on Simon's had been previously rebuilt by Schopper and was still running very nicely but I still stripped it down for an inspection and service.

Whoever drilled out the rivets was a bit heavy handed.

20240409_210256 by Michael Pickwell, on Flickr

Happily there were no major problems to report but I did notice that one of the felt washers was strangely thin. These act as an oil reservoir for the bushes and so you want them to be able to hold as much oil as possible. I therefore replaced the odd thin washer with a new thicker one.

20240409_210425 by Michael Pickwell, on Flickr

The bushes were recharged with fresh oil and a new ball and thrust pad were installed.
 
It's a good idea to clean the switch contacts as they're often really dirty.

20240409_204510 by Michael Pickwell, on Flickr

Schopper had already replaced the spark suppressor capacitor but they use Rifa PHE series capacitors which I find to be prone to failure, so I removed it and fitted an new reliable modern MKP part.
 
The speed selector plater really let the unit down aesthetically so Simon ordered a new one from Riverside Audio and had the original serial number stamped on it. I think this is a really great service. Chapeau to Riverside Audio.

The rivets were drilled out to remove the old one.

20240410_101501 by Michael Pickwell, on Flickr

Looking soooo much better with the new plate fitted!

20240415_110921 by Michael Pickwell, on Flickr

The eagle eyed might notice that the missing three grey friction pads on the clutch assembly have also been replaced, a bluebelt fitted and the dim neon strobe bulb replaced with a nice bright new LED one.
 
Hello Mike, pleased to see all the progress you are making on my TD124 but shocked at the same time that so much needs attention after Schopper did a rebuild only a few years ago. I bought it secondhand rebuilt so maybe something deteriorated over time but thank goodness it’s in safe hands now and getting properly sorted. I am just waiting for Retrotone to get their top platters back in stock and then that can be fitted. Thanks for all the work so far Mike.


advertisement


Back
Top