advertisement


TD160 Mk2 & SME 3009 S2

Hoopsontoast

pfm Member
Ive just bought a new SME arm board for the TD160 Mk2

https://soundsupports.co.uk/product/td160-sme-armboard/

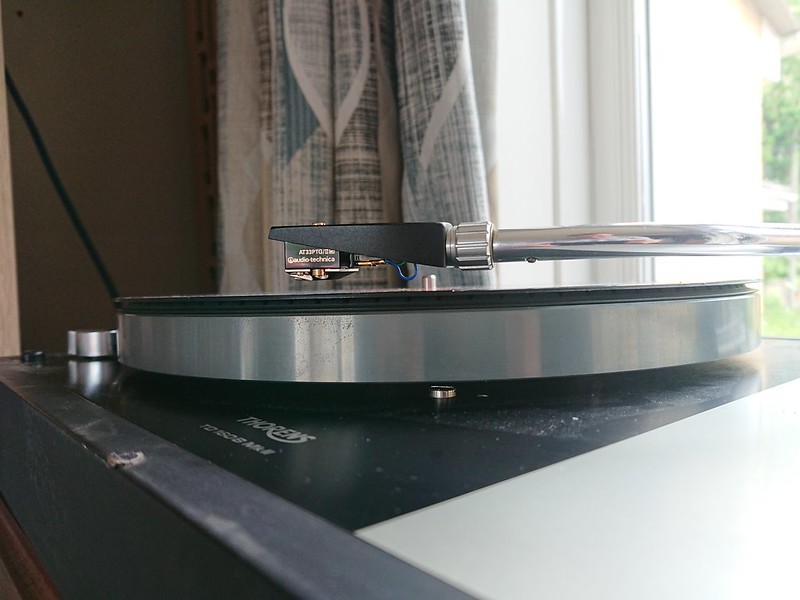
Fitted it no problem, fitted the SME 3009 S2 (Non Improved) and it won't go low enough to allow the cartridge to sit on the record.

One thing I noticed, is the collar that holds the arm rest and 'ram' seems to be higher.

SME_S2_unimproved_back.gif


Compared to mine, I've loosened the allen screw on that collar (even taken it out) and the collar will rotate but certainly not move up or down at all along the Pillar.


Sme
by Robert Seymour, on Flickr

And on the deck


Sme
by Robert Seymour, on Flickr


Sme
by Robert Seymour, on Flickr

Am I missing something?
 
Might be my eyes, but the armboard looks quite above the top plate?

Edit: If I remember correctly I had an issue where one or more of the screws were too long for the armboard and they went through and touched the subchassis causing me to scratch my head for a bit until I noticed.
 
I think @matt j is right. A long time ago I fitted an SME SIII to my TD160, and my armboard was lower than yours. As I recall (over forty years ago!) the armboard sat only just clear of the turntable surface.

Mick
 
If you look at the whole cueing arm platform and how it attaches to the arm pillar you will notice it is actually threaded. It is secured by a little clamp bolt at the back on the platter side. As such the whole cuing platform relationship can be adjusted, though it is easier done with the arm off the deck: undo the set screw, loosen the VTA bolt and screw the whole arm-pilar upwards, this will effectively lower the cuing platform. It will take a little trial and error, but can be done easy enough. Best to do it with the screening can removed so you can make sure you are not twisting the fine arm wires. Basically you want to keep the arm and cuing platform straight and rotate the arm pillar upwards say a quarter to half a turn without introducing any twisting into the wiring. It’s hard to put into words, but actually very simple.

PS Nice split weight, I have envy.
 
Might be my eyes, but the armboard looks quite above the top plate?

Edit: If I remember correctly I had an issue where one or more of the screws were too long for the armboard and they went through and touched the subchassis causing me to scratch my head for a bit until I noticed.
I did think it might be that but the armboard is sitting level on the sub chassis.
 
I did think it might be that but the armboard is sitting level on the sub chassis.

In which case it sounds like Tony might be on the money then, it basically needs more arm pillar feeding through so you can lower the cueing platform?

I'm sure my armboard was a lot lower though, it almost sat in the hole. Is the suspension all set up nicely?
 
If you look at the whole cueing arm platform and how it attaches to the arm pillar you will notice it is actually threaded. It is secured by a little clamp bolt at the back on the platter side. As such the whole cuing platform relationship can be adjusted, though it is easier done with the arm off the deck: undo the set screw, loosen the VTA bolt and screw the whole arm-pilar upwards, this will effectively lower the cuing platform. It will take a little trial and error, but can be done easy enough. Best to do it with the screening can removed so you can make sure you are not twisting the fine arm wires. Basically you want to keep the arm and cuing platform straight and rotate the arm pillar upwards say half a turn without introducing any twisting into the wiring. It’s hard to put into words, but actually very simple.

PS Nice split weight, I have envy.

Yes Tony, thats it!

I did not realised it that threaded, carefully adjusted it and it all looks about right! Its easy when you know how!
 
In which case it sounds like Tony might be on the money then, it basically needs more arm pillar feeding through so you can lower the cueing platform?

I'm sure my armboard was a lot lower though, it almost sat in the hole. Is the suspension all set up nicely?

Matt, I've not touched the suspension yet after its spent ~15 years in a garage. I wanted to get it setup first with the SME arm to check it's all OK first, and then start a propper refurb!
 
Yes. That armboard is way too high. After setting the suspension bounce, the top plate of the armboard will be 1-2mm proud of the top plate of the deck. The narrower bit of the armboard should be within the top plate cutout.

Setting the TD160 suspension if a bit a pain compared to an LP12. Too soft and the armboard hits the top plate, too hard and there is no bounce. When adjusting, set the spring near the arm first as this carries most weight. Set that so that the armboard clears the top plate by 1-2mm. Now adjust the other two springs until the platter is level with the top plate. You should now be near the region of getting the bounce going. Tweak springs 2 and 3 until you get the bounce right.

Edit to add: this is my TD160 Super
In addition to Duncan's suggestions above, I'd only add that it is also important to ensure that the 3 upper rubber grommets are centred wrt the 3 sub-chassis hanger bolts. This can be achieved by lifting each spring/lower grommet up off from the corresponding lower washer and rotating both spring and upper grommet slightly until all are centred. Having all 3 grommets centred will also centre and square the arm board within the top plate cutout.

As to what such rotation achieves, each spring has a natural bias to lean in one direction due to them having a weaker side vs. a stronger side. You'll notice the floating suspension shifting/rotating as each spring is turned.

[Image credit: Linn Products Ltd.]
susp_t1.gif
 
Last edited:
Well, a bit of playing around and I'm up and running. The first issue is the original SME cable, as mentioned, is too tall and does not fit under the base plate, I have a spare old cable that came with it, with a lower profile SME 4-pin connector so I think I'll make a new one up.
Currently running it without the base and raised up with a box.

Had a play with the suspension, got it about the right height, and bouncing nice and even up and down, only issue is it seems to be over slightly to the right so the arm-board does not quite fit square inside the slot, I think the solution above making sure the sprints are centered correctly will solve that.

Not sure if the two weights are supposed to be together, I found it easier to adjust splitting them to set the balance. Yes I realise I have not mounted the anti-skate weight, I just wanted to make sure all was working as it should.

The real issues are:

  • I can't for the life of me work out alignment of the cartridge. Using both the original SME single null point protractor, and my basic Ortofon one, its well off, requiring the arm to be moved away from the spindle, despite the mounting distance being pretty much correct. Even at its longest distance slid back in the mount, its well off, are there different sizes of SME headshell?
  • The arm lift is far too aggressive, too stiff at the bottom it shakes the whole sub platter and when lowering it just dumps the cart down as all the movement is in the first 10-15 degrees.
  • I've fitted a new OEM Thorens Belt, starts up quickly but especially starting in 45rpm the whole sub platter shudders and wobbles for a few seconds. 33rpm is not so much of an issue, and seems spot on speed wise with my Rega Strobe. 45rpm looks a little fast.


TD160B Mk2 & SME 3009 S2
by Robert Seymour, on Flickr


TD160B Mk2 & SME 3009 S2
by Robert Seymour, on Flickr
 
That look much better. You may find that the judder is caused by a build up of belt residue on the clutch and sub-platter. Give them a really good clean. Scotchbrite or similar on the sub-platter. I replace my clutch with a machined aluminium one from Audiosilente. I have no judder on 33 or 45. If you go down this route make sure you get the right type and for the right frequency.
 
I can't for the life of me work out alignment of the cartridge. Using both the original SME single null point protractor, and my basic Ortofon one, its well off, requiring the arm to be moved away from the spindle, despite the mounting distance being pretty much correct. Even at its longest distance slid back in the mount, its well off, are there different sizes of SME headshell?

It is a Stevenson arm geometry, do not try to align it with a two-point Baerwald protractor! The single point SME one is correct (assuming you have the right one for the arm, you may not have - the null point is about 60.5mm, so check it with a ruler).

The arm lift is far too aggressive, too stiff at the bottom it shakes the whole sub platter and when lowering it just dumps the cart down as all the movement is in the first 10-15 degrees.

It is old and may even need re-filling. Try really exercising it as chances are what of the viscous damping fluid that remains has slumped down to the bottom. Just try using it a couple of hundred times and it may sort itself out, mine did.
 
It is a Stevenson arm geometry, do not try to align it with a two-point Baerwald protractor! The single point SME one is correct (assuming you have the right one for the arm, you may not have - the null point is about 60.5mm, so check it with a ruler).


It is old and may even need re-filling. Try really exercising it as chances are what of the viscous damping fluid that remains has slumped down to the bottom. Just try using it a couple of hundred times and it may sort itself out, mine did.

Tony, I used the single point SME one that came with the arm, it looks the same original one as shown in the manual. Even on that its quite far out of alignment. I'll double check on the null point measurement.
 
I don’t understand how that is possible. If it is the correct protractor (60.5mm null point, SME did eventually move to Baerwald towards the end of the ‘Improved’ era), and the arm is in the right place then it really should just align. I’d expect it to end up towards the back of the slot as it is a pretty tight fit on a small deck like a TD-160 (it is towards the back on a 124 too), but it should still align.
 
Tony, I used the single point SME one that came with the arm, it looks the same original one as shown in the manual. Even on that its quite far out of alignment. I'll double check on the null point measurement.
It certainly looks better now. The only thing I would say is that the headshell doesn't look like the one that usually came with these arms, though I'd be surprised if that accounted for any radical change in geometry. When I had the same set up you've got now (and which I wish I still had!) I remember using an ADC headshell with slots which gave a bit more adjustment.
 
Your headshell is a rare and collectable early one before the whole low mass thing came along. It is worth quite a bit! It is perfectly legit and will suit the MC cart you have installed well. To the best of my knowledge the mounting holes are in exactly the same place as the usual perforated shell. You are missing the finger-lift, it should have one.
 
It certainly looks better now. The only thing I would say is that the headshell doesn't look like the one that usually came with these arms, though I'd be surprised if that accounted for any radical change in geometry. When I had the same set up you've got now (and which I wish I still had!) I remember using an ADC headshell with slots which gave a bit more adjustment.

I believe the earlier arms came with the solid headshell rather than the perforated 'ultra-light' ones that came with most Improved arms. Again, this headshell looks the same as the one in the original manual.
 
Your headshell is a rare and collectable early one before the whole low mass thing came along. It is worth quite a bit! It is perfectly legit and will suit the MC cart you have installed well. To the best of my knowledge the mounting holes are in exactly the same place as the usual perforated shell. You are missing the finger-lift, it should have one.

I have the finger lift but it does not seem to sit flat under the headshell (between the cart and headshell), possibly be one from the later shells?
 
I can't for the life of me work out alignment of the cartridge. Using both the original SME single null point protractor, and my basic Ortofon one, its well off, requiring the arm to be moved away from the spindle, despite the mounting distance being pretty much correct. Even at its longest distance slid back in the mount, its well off, are there different sizes of SME headshell?
Two questions:
  1. Are you sighting the alignment from directly above, exactly as described within the manual, or are you attempting to align via the cantilever from front on (the latter method of which I like to call 'interweb style')?
  2. With the tonearm all the way forward, does the headshell appear to point outwards relative to the SME protractor gridlines, yet appears to point inward with the tonearm all the way back? If so, then tangent must exist someplace in between (and can be more elusive with the elongated mounting hole parallel to the plinth vs. angled toward the spindle).
 
Last edited:


advertisement


Back
Top