advertisement


Planet 2000 cdp fix: redux!

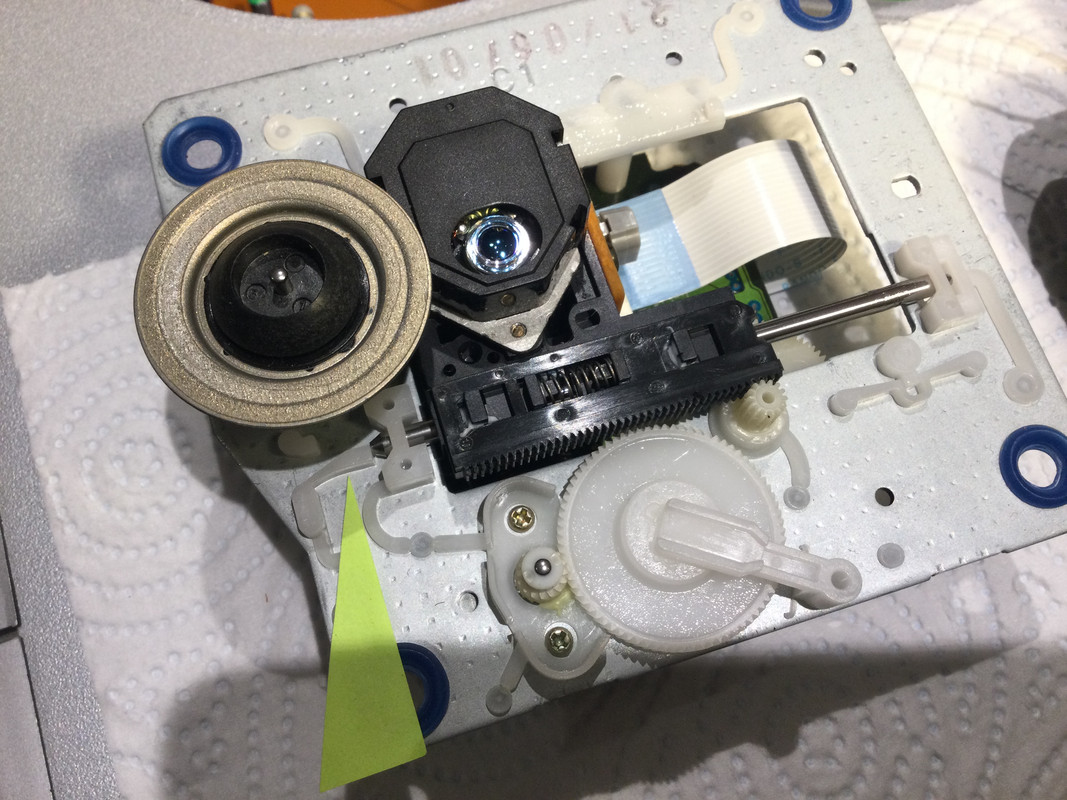
Definitely a crack. As @Craig B sez, there is a visible step. If you can feel it with a fingernail passed over it, it is significant. IPA and a toothbrush to clean it. Let it dry thoroughly. Spot of gel super glue wicked into it and leave overnight. Some fine sandpaper / emery cloth to dress it which you should slide along the rail rather than across so any minor grooves won't matter.

Hi 'freyman, good to have a 2nd opinion on the crack. Right then, will look up emery paper. I was wondering about superglue & wet n dry sandpaper (without water) ie very fine s'paper myself today. Gel stuff.. good idea that.

Great I'll explore this line of attack, before considering replacing the block (tbh this idea I find a little terrifying!)

Thanks chaps.
 
@Craig B can I ask, regarding step 4 (unclip metal bar)..

Not seeing any obvious clip, would this step mean easing this [arrow] small placcy bit -aside- to release the bar maybe? Its fiddly numnums admiral Craig.

(The pdf no.1 contained only a russian text, single small info thing/ I guess something amiss: so I hadn't in fact seen the steps you kindly redid for me above).

C9-FE01-C4-81-A0-436-B-9-EE3-73-F81-A1730-AE.jpg
 
Yes, fine wet n dry will be OK. Will just take a little longer. It may help to lightly sand first (after IPA degrease) as some fine dust will work it's way in to the crack and help repair the crack when you wick the super glue in.
 
Yes, fine wet n dry will be OK. Will just take a little longer. It may help to lightly sand first (after IPA degrease) as some fine dust will work it's way in to the crack and help repair the crack when you wick the super glue in.

Great thanks. Ipa, now I'm fairly sure you don't mean soak it in pale ale.. so ipa = isopropyl alcohol-?

My diy Lp cleaner uses this, so I have some.. so all set to try this idea tmrw. And lube the gear wheels too.
 
Don't think that plastic holds superglue as most of them are based on cyanoacrilate and that rail there is most likely PTFE, if I was you I just would've replaced whole mech
 
Don't think that plastic holds superglue as most of them are based on cyanoacrilate and that rail there is most likely PTFE, if I was you I just would've replaced whole mech

Hi ansis, great link thanks. I may well get this.

Yes I understand your point about ptfe etc, but I may as well try with the superglue idea 1st.

If no joy, then I can consider replacing the mech. Now I do see a complete circuit board attatched to my mech though, which I need to obviously separate from it. You can see this pcb it in my "cracked rail?" photo #36.

So unless I'm mistaken, I don't think it's quite as simple as just swapping the mech in your link, for my one.

Thanks, Capt
 
@Craig B can I ask, regarding step 4 (unclip metal bar)..

Not seeing any obvious clip, would this step mean easing this [arrow] small placcy bit -aside- to release the bar maybe? Its fiddly numnums admiral Craig.

(The pdf no.1 contained only a russian text, single small info thing/ I guess something amiss: so I hadn't in fact seen the steps you kindly redid for me above).

C9-FE01-C4-81-A0-436-B-9-EE3-73-F81-A1730-AE.jpg
Yes, that will be the 'plastic spring'. You'll want to follow steps 2 and 3 in the second service doc...

Step 2 :
Use a small flat head screw driver to bend the plastic
spring to one side allowing the silver running bar to be released
from the housing.​

Step 3 :
Once released you can now pull the running bar in
the opposite direction towards you.​

Consult the pictures of the Rega tech with the nice manicure releasing the plastic spring with a screwdriver such that the running bar can be pushed past the plastic spring until it comes free of the holder down the other end (i.e. free of the RH plastic bar holder in your pic). Then the running bar can be tilted up over the RH bar holder and pulled out fully from the optical block (i.e. pulled rightward in your pic).
 
Last edited:
Is the crack that bad on the other (top) side of the rail too? Underneath doesn’t matter, the laser head puts pressure on top side via gravity. Those rails are molded onto the metal frame of mech, no way to replace.

When you can buy a new mech for £7, I am surprised you have not ordered a new one :)
 
It's the great D.I.Y. challenge, man vs. machine, innit?

haha, guess so, but I’d rather have a working machine quickly :) - I have 5 or 6 of the Sony mechs I’ve replaced with new ones, and around 15 Philips VAM12x things, all with notes on original problem. When replacements dry up, or get stupidly expensive, I’ll look to repair those I can.
 
haha, guess so, but I’d rather have a working machine quickly :) - I have 5 or 6 of the Sony mechs I’ve replaced with new ones, and around 15 Philips VAM12x things, all with notes on original problem. When replacements dry up, or get stupidly expensive, I’ll look to repair those I can.
Re the Sony mechs, I've a minty deluxe Sony ghetto blaster here that has the same mech in as my original Planet. Picked it up off the curb on garbage collection day on my sister's street about 10 years back. Works perfectly as garage radio/AirPort Express destination, with the CD mech only being put thought its paces once every 6 months or so for exercise. Still works!
 
If no joy, then I can consider replacing the mech. Now I do see a complete circuit board attatched to my mech though, which I need to obviously separate from it. You can see this pcb it in my "cracked rail?" photo #36.

So unless I'm mistaken, I don't think it's quite as simple as just swapping the mech in your link, for my one.

It is as easy as removing 4 (or even 3) screws and desoldering 2 motors.
Correction Re: Craig B's last picture:
2) pull the rod all the way to the left until laser is free because you can't lift it in that position. And for easier work I personally would remove that biggest gear so you can slide laser to the right to lift it out as otherwise disc platter obstacles it.
 
Is the crack that bad on the other (top) side of the rail too? Underneath doesn’t matter, the laser head puts pressure on top side via gravity. Those rails are molded onto the metal frame of mech, no way to replace.

When you can buy a new mech for £7, I am surprised you have not ordered a new one :)

Hiya dowser,

yes is the answer.. running a cocktail stick (useful tool) along the topside of my crack, if you'll excuse the pun, I can feel a similar tiny step as below. I understand your gravity info along the optical block 'runner' etc.

Right. I've got the bar out, optical block lifted away, but not yet untethered: I'll see if I can do my track repair without the solder addition & smaller ribbon disconnect (so fiddly a numnum this looks).

The big underside pcb here, is not possible to separate as its fixed to the motors. So I'm always hampered getting to the important topside of rail. Hmm.

A sony genuine mech.. for £7? I don't think so, surely. You mean a replacement optical block I think? Its only the placcy bit of the mech, which seems suspect you see. So I may need a whole mech. Unless I'm mistaken.

Thanks chaps, Capt
 
Well, they’re sold as genuine…but I doubt there are many genuine Sony mechs left. The £7 was for entire mech, I gave you a link to it in your last thread (but with a different disc platter). To be fair, I normally pay a whopping £11 for them - they’ve all worked fine. Search for threads on Densen from me, there’s one I document mech replacement on, uses same mech as you.
 
Well, they’re sold as genuine…but I doubt there are many genuine Sony mechs left. The £7 was for entire mech, I gave you a link to it in your last thread (but with a different disc platter). To be fair, I normally pay a whopping £11 for them - they’ve all worked fine. Search for threads on Densen from me, there’s one I document mech replacement on, uses same mech as you.

Great to know this, although I can't comprehend a cost of only £7-11, for even a non-genuine mech!

Fwiw mine does say sony on, & if my glue fix idea no good.. I'll swat up on your info back on the other thread.

Progress though- I've IPA cleaned, & gel-glued the crack both sides. Gonna need a mighty careful hand to sand the area super flat.

If I can fix this cdp for 99p.. it'll be such a result!!

Thanks Capt
 
@Craig B your 'referral images' btw were spot on: identical (looking at least) mech as original planet, exactly as you thought.. so I could follow what to do perfectly. Couldn't have got this far without them. Major thanks indeed.
 
The big underside pcb here, is not possible to separate as its fixed to the motors. So I'm always hampered getting to the important topside of rail. Hmm.

A sony genuine mech.. for £7? I don't think so, surely. You mean a replacement optical block I think? Its only the placcy bit of the mech, which seems suspect you see. So I may need a whole mech. Unless I'm mistaken.

It's even simpler than I tought, there's only one screw (green). And just desolder motors (red), then board pops out.

Re genuine Sony mechs don't be that naive, they don't produce them for at least 15 years, and if there's some new old stock prices will be from 30 and upwards. For 7 you can get chinese knockoff laser assemblies, 10 pieces so you can select one from them which works somewhat acceptable.

A730153-A-14-F9-4-DEC-A3-C4-B8-DB7-CF39152.jpg


advertisement


Back
Top