
You are using an out of date browser. It may not display this or other websites correctly.
You should upgrade or use an alternative browser.
You should upgrade or use an alternative browser.
Pass Aleph 3
- Thread starter Tony L
- Start date
S-Man
StrivingON
They exist and are called valve amplifiers!
I'm surprised Nelson hasn't done a transformer coupled FET amp (running several million small JFETs in parallel).
Yank
Bulbous Also Tapered
I'm surprised Nelson hasn't done a transformer coupled FET amp (running several million small JFETs in parallel).
Nelson has put audio transformers in amps, but they were on the front end.
Yank
Bulbous Also Tapered
He also did the 'beast of a thousand JFETs' of whatever it was called.
https://www.firstwatt.com/pdf/art_beast.pdf
Like the F4, the Beast is a unity-gain buffer, so you'll need a preamp that can swing some volts.
I’d be really interested in hearing your long-term opinion on it, Tony. I had the Aleph 3 for a while when it came out, and I still think it’s one of the all-time coolest looking amp ever, especially sitting on top of the similar dimensioned Pass Aleph preamp.
Mine sounded the best, counterintuitively, with the fast-sounding Rega Kyte, and was good enough with the LS3/5a (Spendors), but those were still better with a Naim 110 at that time.
Had several Class A amps at this point, the Aleph, Bedini, Sugden, Aleph J clone, and a Chinese JLH69. I’m not gonna rank them but I would exhort you to also look into a Sugden A51, which is my favorite and still own.
a.palfreyman
pfm Member
CD player with 4V rms balanced output should do it....https://www.firstwatt.com/pdf/art_beast.pdf
Like the F4, the Beast is a unity-gain buffer, so you'll need a preamp that can swing some volts.
")
S-Man
StrivingON
Nelson has put audio transformers in amps, but they were on the front end.
He also did the 'beast of a thousand JFETs' of whatever it was called.
Yes, he has tried most methods of making things difficult
But not o/p transformers TMK.
Tony L
Administrator
I’d be really interested in hearing your long-term opinion on it, Tony. I had the Aleph 3 for a while when it came out, and I still think it’s one of the all-time coolest looking amp ever, especially sitting on top of the similar dimensioned Pass Aleph preamp.
Mine sounded the best, counterintuitively, with the fast-sounding Rega Kyte, and was good enough with the LS3/5a (Spendors), but those were still better with a Naim 110 at that time.
I certainly plan to try it in a variety of contexts. I have a feeling it could work rather well with the JR149s. The Tannoys are more of a ‘broad brush’ speaker and I think like the output impedance of the Quad or a valve amp. I remember trying a Naim 42/110 with my earlier pair years ago and it sounded pretty awful, again small and gutless. They do like the 303 or the valve amps I’ve tried, at least at the levels I listen at. I suspect the Pass would go a lot louder.
Did you find the warm-up thing any issue, e.g. it sounding boring as hell cold? Obviously I may revise my opinion on this once it is rebuilt and in regular use, but that was certainly my initial impression yesterday. It did start to sound pretty good after a while though.
That’s exactly how I remembered mine. It had to be powered up for a while before it gets to that sweet spot. It also needed some gain to get it going. Passive pre’s rendered it lifeless, IME. A CJ pre was a pretty good match. The (dreaded for some folks) NAC102 was not too shabby, either.
Tony L
Administrator
That’s exactly how I remembered mine. It had to be powered up for a while before it gets to that sweet spot. It also needed some gain to get it going. Passive pre’s rendered it lifeless, IME. A CJ pre was a pretty good match. The (dreaded for some folks) NAC102 was not too shabby, either.
Gain certainly isn’t a problem downstairs, the Verdier pre has tons on tap (selectable from 0db to +20db). I had it on the middle of the five settings yesterday, so 10db IIRC, and I’d not want to go higher with the Tannoys. A really loud CD was as loud as I’d ever want to listen to at around 8:30 on the vol knobs, typical vinyl about 9:30-10:30. I could move the internal gain up another notch at least with the inefficient mini-monitors, but it’s just unmanageable with the Tannoys, it leaves no volume adjustment and you start hearing too much valve noise. Without directly comparing my suspicion is the Verdier is pretty similar sonically to the CJ pres, which I’ve always liked a lot.
I’d need to find another option to use it upstairs though as that is just an SACD player and Audio Synthesis passive (then Leak TL12+ and either JR149s or LS3/5As). I’ll give it a test up there with the Verdier though, but I need it downstairs for the phono stage!


dan m
pfm Member
Yes, line only; hence the PS Audio phono below. The dip switches allow you to change the overall gain (hi/low) to match the input or amp.
https://www.passlabs.com/wp-content/uploads/2020/05/apman.pdf
We have set the maximum input so that the circuit will remain linear with balanced input peaks up to about 18 volts. If you are concerned that your source will approach or exceed this level, you may use the internal attenuator switch to reduce the input by 12 dB.
The switch default position is 1,2,7,8 = ON and 3,4,5,6 = OFF. For a 12 dB input attenuation, 1,2,7,8 = OFF and 3,4,5,6 = ON.
This switch can also be used to effectively lower the gain of the preamp by 12 dB. It does not otherwise affect the performance of the preamp.
I’d need to find another option to use it upstairs though as that is just an SACD player and Audio Synthesis passive (then Leak TL12+ and either JR149s or LS3/5As). I’ll give it a test up there with the Verdier though, but I need it downstairs for the phono stage!
A wonderful problem to have.
Tony L
Administrator
Got the cap kit. The Vishays are made in China, which doesn’t inspire much confidence, though I guess being a major brand there will hopefully be quality control. One extra one turned up for some reason, ordered 8, got 9. The Panasonics are Malaysian made. I guess it’s just the way of the world now. I thought Vishay were Philips, so EU.
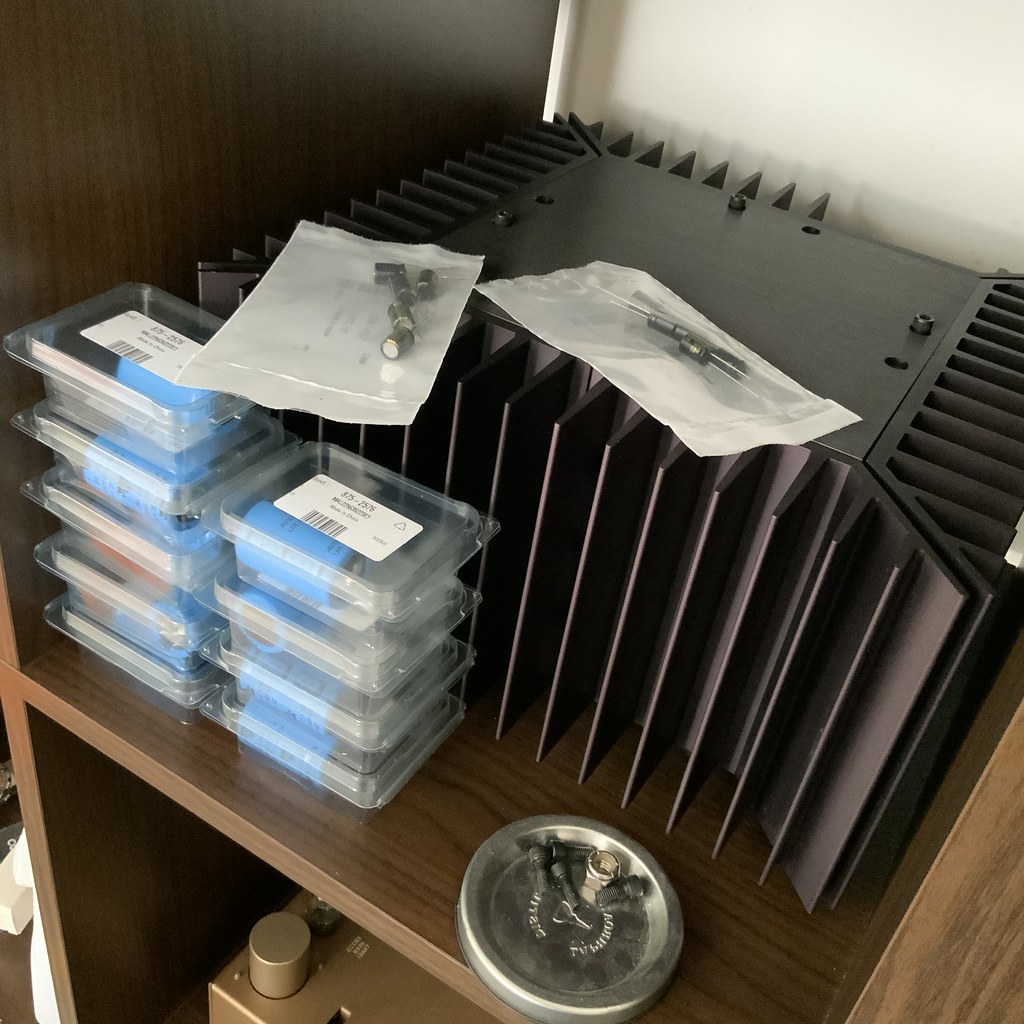
I realised I’m not going to be able to desolder all the wires holding the boards in place with my Hakko FR301’s default 1mm tip so I’ve ordered a couple of larger ones, so work postponed until next week sometime. Disembowelling this thing really looks like a bit of a pain so I don’t want to be stuck with a conventional iron and solder sucker as I’d quickly run out of hands to hold things.
Here’s another view of the insides. Initial plan is to remove all heatsinks aside from back right (which has the terminals). Desolder all white wires from the vertical boards, remove the front and left boards entirely, move the back and right (which have connections to the RCA sockets and speaker terminals) as far out of the way as far as the leads allow, then try to tip the PSU board forwards to get to the underneath to desolder the PSU caps. My main concern is whether there is enough slack on the many wires from the transformer to the PSU board to allow this. I’d really prefer not to have to desolder absolutely everything! The construction, whilst very clever and neat, is actually a total ball ache compared to the stuff I’m used to working on (Quads, Leaks, vintage computers etc).
PS If anyone has actually worked on one of these and spots errors in my logic please let me know!
I would think someone at Pass or even Nelson Pass himself might be willing to provide you assistance. You never know.
Got the cap kit. The Vishays are made in China, which doesn’t inspire much confidence, though I guess being a major brand there will hopefully be quality control. One extra one turned up for some reason, ordered 8, got 9. The Panasonics are Malaysian made. I guess it’s just the way of the world now. I thought Vishay were Philips, so EU.
I realised I’m not going to be able to desolder all the wires holding the boards in place with my Hakko FR301’s default 1mm tip so I’ve ordered a couple of larger ones, so work postponed until next week sometime. Disembowelling this thing really looks like a bit of a pain so I don’t want to be stuck with a conventional iron and solder sucker as I’d quickly run out of hands to hold things.
Here’s another view of the insides. Initial plan is to remove all heatsinks aside from back right (which has the terminals). Desolder all white wires from the vertical boards, remove the front and left boards entirely, move the back and right (which have connections to the RCA sockets and speaker terminals) as far out of the way as far as the leads allow, then try to tip the PSU board forwards to get to the underneath to desolder the PSU caps. My main concern is whether there is enough slack on the many wires from the transformer to the PSU board to allow this. I’d really prefer not to have to desolder absolutely everything! The construction, whilst very clever and neat, is actually a total ball ache compared to the stuff I’m used to working on (Quads, Leaks, vintage computers etc).
PS If anyone has actually worked on one of these and spots errors in my logic please let me know!
Tony L
Administrator
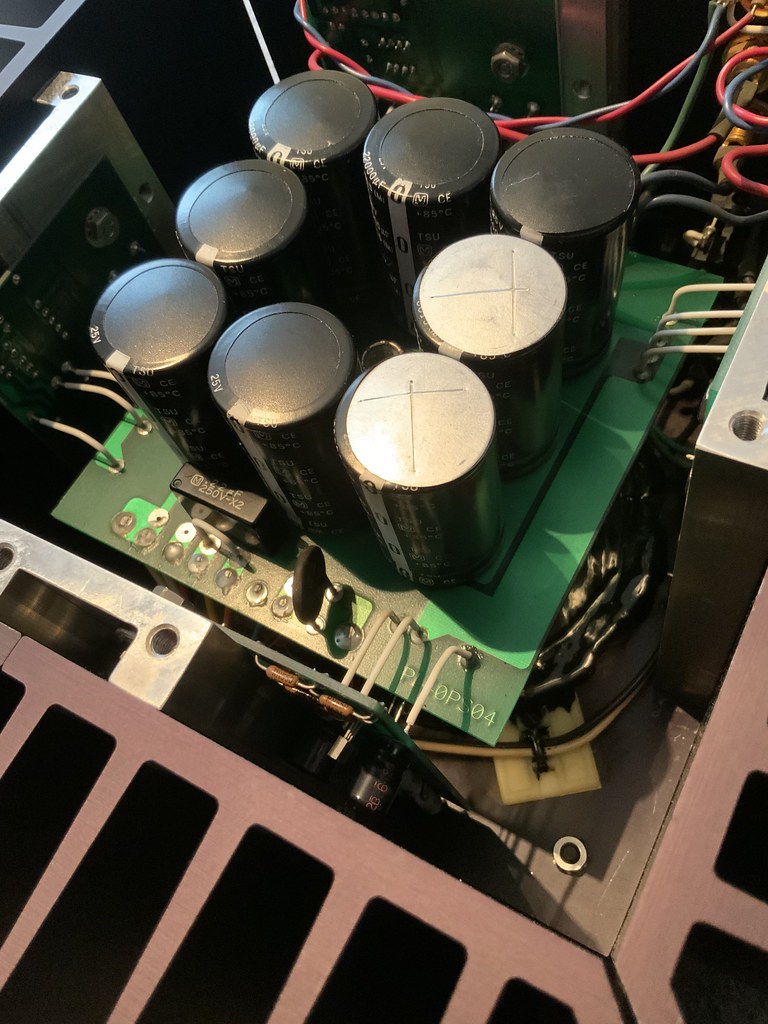
I can’t see any other possible way in other than I describe, there just isn’t one! The extra tips for my desoldering gun land tomorrow so I’ll likely have a crack at it tomorrow afternoon. I’ll take pics as I go. As these things go there is actually very little to do; eight big 22000uF caps, six little 220uF caps and nothing at all to adjust. It would be a half-hour job if access was easier. Even so I’m hoping to have it done in a few hours including giving the casing a thorough cleaning.
a.palfreyman
pfm Member
Tony, I'm not familiar with this amp, but is it possible to remove the incoming AC to the psu board, undo the centre bolt and then replace the top cover (to hold the heatsinks together) whilst you remove the bottom of the case and the transformer from underneath? That way you can access the underside without having to completely disassemble?