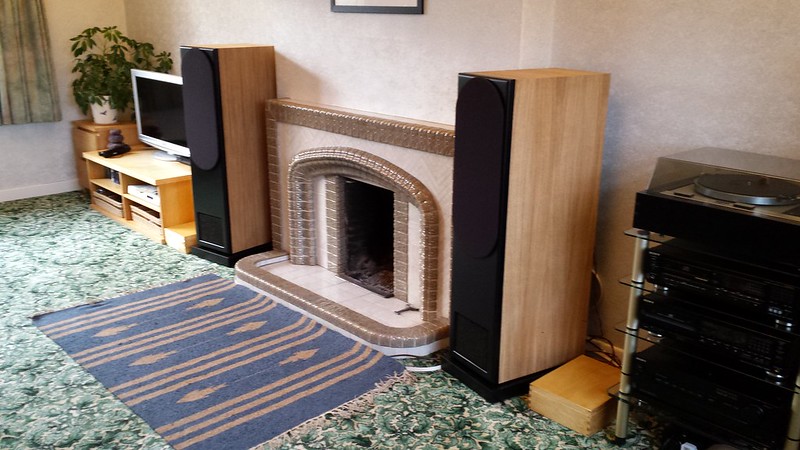
Mike - the cabinets look great - especially the black front. I really need to do something to my ancient Briks. If you have the time, I'd be keen to hear how you went about replacing the veneer - and also perhaps why you decided to do that as opposed to trying to refurb what was there ?
Thanks, Alan
Hi Alan,
Although the original veneer looked OK at a distance it was a bit scruffy and I felt it was letting the speakers down. The main issue with the old veneer is that it was bubbling and cracking in a few places and also the veneer at the base of the speakers looked like it had got damp at some point in the past. Overall I thought it wasn't going to be possible to simply refresh the veneer by doing something like rubbing it down with wire wool and Danish oil.
The veneer I used is this stuff:
http://www.thewoodveneerhub.co.uk/wood-store/innovative-wood-veneers/peel-stick-veneer/
The main attraction for me is that it is available in sheets big enough to cover the whole side of a cabinet in one piece thereby avoiding the complication of having to make a perfect join. Annoyingly my cabinets are 110cm tall so I had to buy four whole sheets which worked out to be more expensive than I'd hoped.
With any veneer the surface preparation is paramount. It is vitally important that you start with a flat and completely smooth surface. Any surface imperfections with show through the final veneer. I now know that veneering a new surface with 'peel and stick' would be child's play compared to dealing with a old and worn surface!
My old veneer had been applied with impact adhesive. The old veneer scraped off easily enough but it left and horrible lumpy sticky mess behind (layer of old glue) which had to be removed. Initial attempts to sand it off proved futile as it just clogged the sand paper immediately. After a bit of experimentation I was able to remove the old glue by softening it with thinners and then scraping it off with a Stanley knife blade held perpendicular to the surface and drawn across the surface like a cabinet scraper. After I managed to remove all traces of the old glue any surface imperfections were filled with car body filler and the whole surface was given a light sanding with 180 grit paper.
The porous MDF surface then needed to be primed and sealed which I did by applying a couple of coats of the sealer recommended to me by the veneer supplier (see earlier in thread).
The peel and stick veneer comes ready coated in a pressure sensitive veneer. As the name suggests the bond is activated by pressure and the more pressure you apply the better the bond. A roller won't give you enough pressure and the correct tool for the job is a veneer hammer. I didn't want to buy and expensive veneer hammer just for one job so I made my own tool by putting a smooth polished edge on a cold chisel.
 20171128_083543
 by
Michael Pickwell, on Flickr
 20171128_083644
 by
Michael Pickwell, on Flickr
Start by choosing which pieces of veneer you want to go where and which orientation you want each piece to go in. My veneer came in two obvious pairs so I chose to make a mirror image.
Next cut the veneer to the approximate size leaving about 2cm extra around the edges. This exception to this is that I used the factory cut straight edge of the veneer against the front baffle as to save me having to trim this edge down later.
Before applying it the veneer should be allowed to rest and relax on a flat surface in the same environment (same temperature and humidity as the cabinets) for 24hrs.
The veneer should be applied from the centre out. Use your chosen applicator/scraper tool to smooth the veneer onto the surface pushing out air bubbles to the outside as you go. Apply FIRM pressure with the scraper tool to ensure a good bond and go over the entire piece several times.
Once you've applied the piece the excess needs to be trimmed. I first tried this with a sharp blade but eventually settled on trimming the excess off SLOWLY with a 32tpi hacksaw blade leaving just 1-2mm overhang. The final excess was then sanded away with 180 grit paper.
I had a few problems with bubbles developing under the veneer even up to several days after applying it. Some of this could be flattened back down just by passing over with the scraper again but some kept reoccurring. For the problem bubbles I went over them a warm iron followed by the scraper again which eventually did the trick.
Once I was happy with the application the veneer was given a very light final sanding (sand with the grain) with 320 grit paper. The veneer came ready sanded so only a very light final finish was needed just to remove a few marks imparted by the scraper tool.
The veneer adhesive was then allowed so cure for a few days before I gave the speakers a first very light coat of Danish oil. Several light coats are better than one heavy one and you should let the previous coat dry fully before applying the next. I applied three coats of Danish oil in total followed by a coat of good quality wax a few days later. Over the next few weeks I will apply another coat of wax or two.
I have quite a lot of veneer left over which I'll be happy to sell to a forum member at a bargain price. There's certainly sufficient for a medium sized pair of speakers.


 20171127_090717
 20171023_133820
 20171110_120756
 20171031_114921
 20171127_090802
 20171127_090622
 20171127_090328
 20171127_090904
 20171110_122450
 20171110_124908
")