advertisement


Leak TL/12 Plus / Point One Plus

51070583916_9b18c3315c_b.jpg


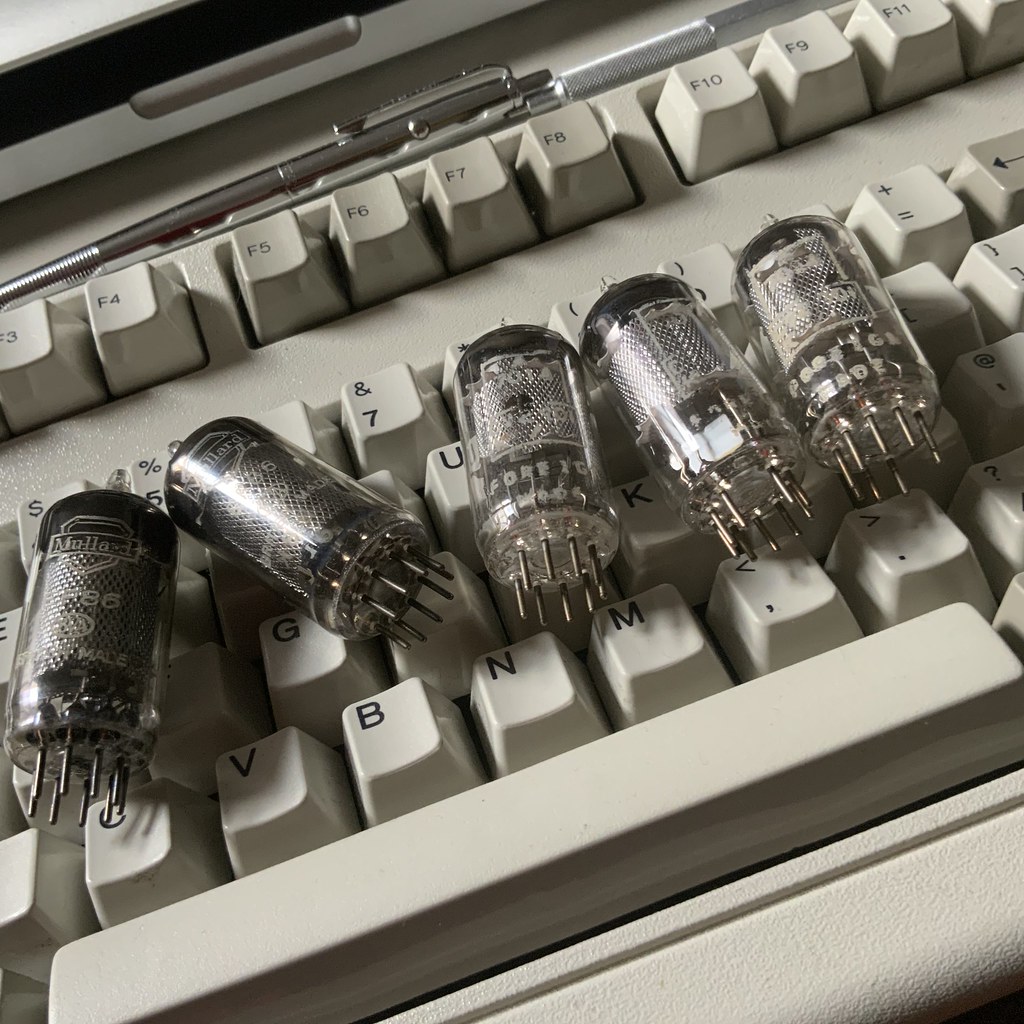
Just figured out I potentially have a rather nice stash of EF86s before amp #2 even lands (later today). I found three 1969 Belgium-made Mazda military CV2901s in my ‘random’ bucket that contains valves that came in when buying a few at the local auction to get one or two I needed. The Mullards are 1958 square getter long mesh types with matching date codes from the Point One preamp. There’s another one in the existing TL12+, so three each of those. There should be another three coming later today (one in the TL12+, two in the Varislope III) when amp #2 is delivered by DPD. I have no way of testing EF86s beyond actually trying them in a live amp, but thankfully this looks like a valve I won’t need to go out and buy a stash of. One would hope most of them still work!
 
Interesting thread, what is a fair price nowadays for a TL12+ and TL12.1?

I get the impression a good cosmetically matched pair is far more valuable than twice the value of one, but beyond that it is hard to know as a) so many are so spectacularly badly restored (I was googling closed eBay listings and spotted one pair that had even had the tag-boards ripped out (link)!). Understandably they didn’t make much.

The annoyance is from a value perspective I’m pretty sure my pair (assuming #2 lands safely) would be worth the most in unrestored condition, e.g. I bet I could turn a £500-700 profit just by relisting as a near-mint unrestored pair (I’m not in deep on amp #1 at all, well under £100). I do however really want to hear them so I’ll try and restore them in the least destructive manner I possibly can, even if that may still reduce their value.

The original TL12.1s are worth *a lot*, I’d have thought >£6k for a really clean matched pair, it wouldn’t surprise me if a really good boxed pair (which you never ever see) went well over £10k. The TL12+ is a far later and cheaper design, so worth nothing like that. My best guess is if I’m able to restore this pair to the standard of say my Stereo 20 they’d be worth £1400 or so as they are a very nice clean pair cosmetically. That’s likely with a nice valve set thrown in. I’d say they roughly track Quad IIs price-wise.
 
This site contains affiliate links for which pink fish media may be compensated.
51071029537_4df5070344_b.jpg


Landed safe and sound and very well packed. It looks decent and seems to colour match my existing one (right) nicely. Certainly close enough to look like a pair. I can’t see anything obviously wrong, modified or damaged anywhere. The supplied GZ34 is a ‘65 or ‘75 Blackburn Mullard badged Tungsram (four digit date code, seven plate notches), so very decent and useful as a spare (it is the same type that I have two Mullard-branded NOS that I will be using for these amps). The EL84s are Holland-made Mullards of a plate pattern I don’t have any others of, so at this point at least of no use. The EF86 is another square getter long mesh-plate Blackburn Mullard with a ‘56 date code, so I suspect this is the only valve that could be original to the amp. The ECC81 is some random Mazda that has nothing to do with anything, but I’ve got absolutely loads of 81s so no issue there. I have some very nice 50s square getter Mullards that I’ll almost certainly end up using, they would be what the amps originally shipped with.

The Varislope III had one ‘59 EF86 of the same square getter type dated 59, so I’m hopefully very well sorted for these now, and one much later type Dutch Mullard that isn’t a lot of use to me as I haven’t a pair for it. The only annoyance was a profound lack of a mains lead. I do have spare Bulgin connectors, but really one has to look at that as a £30 expense as that’s what they cost these days. Overall happy so far. Hopefully I’ll end up with a very nice restored and working pair of TL12+ along with a few bits and bobs to sell on (e.g. if anyone is interested in the mono preamps (Varislope III & Point One Plus) just PM me!).
 
I discovered a couple of weeks ago, thanks to Fran Blanch’s YouTube channel, that
the ‘WD’ stands for ‘water displacement’, and it was actually designed as part of the NASA Apollo-era in order to stop ice sticking to low-temperature fuel cells! It should never be used as an oil, though sadly many people do. Thankfully I now no longer expect to be dissolving wax!
It's true that it's not a very good lubricant, but the fact that it is 20% light oil means that it can't fail to be reasonably effective. On a dried up hinge nothing else comes close, and it's great on bikes even if it's only because it dissolves any dried up lubricant and dirt.
 
Be interesting to hear if you feel there's any difference in performance as compared to your ST20.

Yes, curiosity about that is mainly why I’m doing it! I’d expect there to be some as there are actually quite a few differences; EF86 & ECC81 in place of ECC83s in the input and phase-splitter positions, different output transformers (my Stereo 20 has the later 8778) plus different mains transformer(s).

I’d expect to be able to hear some of that, though there doesn’t seem to be any consensus as to which is ‘best’ with each amp having their fans and detractors. I just hope these TL12+ end up sounding like a matched pair! As far as I can tell without pulling them to bits the transformers are identical and I’ll be changing out everything else. I’m also making some assumptions about my existing one working at all, though I’ve no reason to suspect either transformer is blown (no signs of heat anywhere and the crusty little 2A fuse in the top mains selection plug is still intact).

PS I do realise you know all this, I’m just listing the differences as documentation for other folk who may not!
 
Anyone know much about paint? One thing I’ve noticed about these TL12+ is the chassis paintwork lacks the beautiful deep shine of the bronze Stereo 20 and they are slightly patchy in sheen, some areas being shinier than others. Would it be a good or bad idea to try a very light treatment with a traditional car wax? I’m thinking both aesthetically and from a preservation perspective. I’m toying with the idea of trying a light coat of carnauba wax which seems pretty benign and has a far higher melting point than any heat the amp would ever kick out. Any reason not to include this as part of the restoration?
 
51073187801_81289014d2_b.jpg


A capacitor mount dry-run. I’ve stuck a couple of nuts between the two brackets so the bolt runs reasonably straight and to shunt the new cap over a bit closer to the leads.

51072492303_0e50a087d6_b.jpg


Here’s where it will end up. It does ‘pivot’ on the bolt, but can’t possibly come into contact with anything live. The very top of the new cap just lands safely on an insulated part of the output transformer if pushed down, nowhere near any terminals, and it is very rigid with regards to side to side movement. No risk there at all. This is obviously a test run, I will be using properly insulated new caps when it comes to doing it properly.

The wires on amp #2 (pictured) are far shorter than on amp #1, so this is tighter than I’d like. It does reach, just, but requires the cap to be rotated as pictured for the wires to reach the terminals. The other amp has plenty of slack.
 
Looks good. You can always put some heatshrink around the cap to make absolutely 100% sure there’s no way it could short to anything. I’d still be inclined to use a couple of higher temp individual caps instead if mounting inside, you could then wire them directly to their connection points in the circuit. But either will work fine of course.

As for the wax I’d use Simoniz Quickshine Detailer. Really gentle so won’t harm the paint work, but leaves a slight shine. Was pleased with how it freshen up my Stereo 20 chassis, without suddenly turning it into a car showroom gloss type of change.
 
Plus one for the Simoniz. Very dilute car wash, then gentle buff up and polish with their silicon or detailer. (You can see the results in the Stereo 20 thread. https://photos.app.goo.gl/zwnk5A1D7YpCd19p7 ) The Bronze or Charcoal versions have a very thin lacquer coating over the paint which adds the 'shine', but I cannot remember any champagne chassis versions having that look? Not that I have seen many.

Re the caps, if you move the original cap up so it is level with the clamp face, will the replacement have room to pass over the face further and bring the tabs closer to the wires? At least when the right way up gravity will keep it in place away from the output transformer. I see it suits your requirements, but would not go that way myself.
 
Re the caps, if you move the original cap up so it is level with the clamp face, will the replacement have room to pass over the face further and bring the tabs closer to the wires? At least when the right way up gravity will keep it in place away from the output transformer. I see it suits your requirements, but would not go that way myself.

Annoyingly there is a clamp mark on the can which would then be visible from the top. How would you do it? If I could absolutely guarantee gutting the can caps without any damage to them or the paint I’d do that, but I have absolutely weapons-grade OCD when it comes to this stuff of the level that if I messed it up I’d likely have to hunt another amp down and start again! It’s almost debilitating at times, but it is also why I’m good at the things I’m good at, so I don’t fight it!

51004234110_c176f2a5cb_b.jpg


These Bulgin octal plugs landed today so I have inputs! I’ll go murder a pair of Gotham CAK cables at some point as I’ve loads of those knocking around and they are good quality. Pin #1 & #8 IIRC. Cable exit is at the left side when plugged in (I obviously checked before buying!), so they look neater than the type that points straight up IMO.

I’ll go grab some Simoniz wax, though I’m more tempted by their carnauba wax than a more modern chemical affair. I’m very aware this is 60+ year old paint and I don’t want to use anything harsh at all. Just the lightest possible application on the actual chassis will likely do what I want, I’ll probably leave the transformer shells and cap alone as they are obviously matt (and a lower quality finish as is the Leak way).
 
51073091063_3c73bfe5a1_b.jpg


Leads done! The Gotham GAC-1 fits well, its a reasonably tight fit through the cable entry and the screen and inner core are narrow enough to fit down the hollow pins (with inner insulation in the case of the signal) to solder at the pin-end as one does with these ancient connectors. I’d have preferred a proper cable-clamp, but they should still be pretty robust given the flexible wire right down to the pin-end. You’d certainly not get away with any fat audiophile stuff with this particular style of Bulgin plug.

PS For those playing along at home pin #1 is ground and pin #8 signal. The pins are thankfully labelled on the Bulgin plugs.
 
For the sake of documentation/future reference I’ll post the starting point:

51076665012_84f49b8958_b.jpg


Amp #1. This one has I assume had a little work as I don’t think the yellow capacitor is original.

51076565751_f1193e43f0_b.jpg


Amp #2. Obviously the smoothing caps are disconnected, but other than that I think it is original, but I’m curious about R19 & R20 which are 5 Watt 300 Ohm, which doesn’t match the schematic (my colour ability isn’t good enough to ascertain what is in #1).

I was really confused with a rattle in #2 from the point it landed. When flipped over something small was obviously loose and rattled audibly, kind of like a loose screw in a conventional hi-fi component. This didn’t seem possible given the thing hasn’t even got a bottom! I eventually tracked it down by listening to coming from within the output transformer, which worried me somewhat. I carefully took the side cowling off (you don’t need to actually remove the transformer to do this) and found a star-washer identical to the ones on the two long bolts that hold the cowlings on inside! It must have been there since the mid-50s when it was made!

PS Doorbell just rang, I now have enough wax to do about 7400 Leaks.
 
I love this thread. You guys playing with an amp I would love to have between my 1957 Trough-Line and 1957 ESL!

Nice reading in these still uncertain times!
 
Amp #1 has a replacement 50uF cathode bypass cap, yes the yellow Dubilier one.
Amp #2 has replacement EL84 cathode bypass resistors, the grey Radio Spares 300Ω wire wound ones. They were originally 2 Watt 270Ω carbon (Red, Violet, Brown, Gold or Silver) exactly like Amp #1. Suspect they failed due to the 0.25uF caps going leaky causing the EL84s to pass more current and burning the original cathode resistors. Look at the green 100Ω resistor, it looks a little discoloured in the middle. Another sign the amp has been drawing excess current. You will fix the problem when you replace the TCC Metalpack / Metalmite caps. Use the same as you did on your Stereo 20 re-build post #225. "https://pinkfishmedia.net/forum/threads/leak-stereo-20.113461/page-12#post-2621437
Both your amps still have the early version 0.02uF Metalmite C9. That changed to 0.1uF shortly after and would suggest you change them to the later value too. As the Stereo 20 again.

Re; the smother caps, I would cut the crimp off and re-stuff the originals. If you are going to use the method you suggest, why are you not using 50+50uF caps? No risk at all for the GZ34, the TL12+ only draws 80ish mA at 340 volts.

PS: Why do you specify 5 watt resistors for the 470KΩ R16/17? They only need to be 1/2 watt, but 1 or 2 watt will look better.
 
Thanks for that, very useful info and I was confused by the white wire-wound 300 Ohm jobs. Is the Wattage right at 5? I need to find some nice resistors for this location as Takman don’t come in 5 Watt. Good news about C9 as I have four spare K40-Y9s in 0.22uF and 0.1uF, so I’ll fling them all into this build.

I’m undecided by the value of the smoothing caps. Given a 32/32uF does the job so well in a Stereo 20, which is twice the size in most respects, I don’t really understand the argument to go any higher. It is already ‘more’ by virtue of the amp it’s feeding being half the size! I’m very conscious that NOS Mullard GZ34s are heading over £150 these days (I thought mine were expensive at about £70-75 each!) I’m tempted to give them the easiest life! I realise they are a robust valve, I have a fat-base one that I’m pretty sure is original to my Bronze Stereo 20and it still works (I have no ability to test rectifiers, annoyingly the Orange tester I have can’t do them (it can’t do EF86s either)).
 
What did you use on the Stereo 20 build I referred to?

47568743462_0a268f2871_b.jpg


I forgot what they are, but something nice @Chops54 had in his stash and let me have (he gave huge assistance in the S20 build, no way would I have had confidence to do this sort of work without a mentor at that stage). I’ll likely use Kiwame 5 Watt as I can get them from HiFi Collective where I plan to buy the bulk of this stuff. I can get all the other resistor values as Takman 1 Watt, which will span the long gaps, though I’ll likely go smaller on the couple on the EF86 valve base just for ease of positioning. I assume half Watt is fine there? I’m now at the stage I think I’ve got most of the capacitance and resistance values I need for a final bill of materials, I’m just lacking the voltage and Watt ratings.

I’m in doubt about C15, which is the odd looking flat one under R5, and also C7, which is the polyester one and seems to have different values (0.0002uF and 0.00002uF) between the two schematics I have. I’d leave the latter be, but annoyingly they are different brands between the amps and I’m way too obsessive to have any differences at all! I’ll also need to hunt down the tiny little K40-Y9s that I have in the S20 at what I assume is C1 in the TL12+. I only have spares of the big chunky 0.1 and 0.22uF ones.
 
C15 is a mica cap and very unlikely to be faulty. I would leave them alone.
C7 is 200pF or 0.0002uF (the 0.00002uF is a typo.) C7 is often 220pF by the way. Again what you have will be fine, I would leave them as part of their history. Or perhaps put some coloured shrink wrap over them to make them look 'the same'?
C1 is 0.001uF on both the 12+ and 20 (same as 1000pF or 1nF). It will need replacement, but only needs to be low voltage 50 volts is plenty.

Interesting looking at the 2 amp pictures, R5 is 82KΩ on amp #2, what you would expect, and 68KΩ on amp #1?


advertisement


Back
Top