
You are using an out of date browser. It may not display this or other websites correctly.
You should upgrade or use an alternative browser.
You should upgrade or use an alternative browser.
Leak TL/12 Plus / Point One Plus
George J
Herefordshire member
Lovely thread to read! I have aspired to a TL12 [Plus or Point One], and got fairly close to pulling the trigger last year. Thank goodness I did not the way things have gone!
Change of ownerships of my work place with my hours now reduced to my original contract minimum and absolutely no chance of casual work with lock-down, I am glad of every penny I still have.
Of the moderns of the type [single channel low powered valve power amps], I suspect that I might like the current Quad II amplifier for my ESL. I'd like to try one at least. I have a Quad II Forty, which is good, but my experience tells me that smaller amps, if not over-driven, are usually nicer. I don't exactly shake the cobwebs with my ESL.
Best wishes from George
PS: These days I would have to buy two Quad IIs as they don't selling them as single spies, BUT that would have the advantage that there would always be one ready to go if the other needed servicing or repair. ...
Tony L
Administrator
You might ask on the UK vintage radio forum - they do a lot of cap restuffing there.
https://www.vintage-radio.net/forum/
Good call. Thread here which suggests WD40 works well on the black tar kind of gunk. I’ll grab some at some point.
Tony L
Administrator
Hot water didn't work at all. Will give it a go with the heat gun on the minimum setting later today, or tomorrow.
I’ve still got the original can caps for my Stereo 20. They are not in the best condition, e.g. have a ding or two and the odd scratch. I think I’ll practice on them before going anywhere near the TL12+.
One thing I’d like to establish is roughly what temperature the paint can withstand, e.g. is it safe to boil them in a pan of water? Is it safe to cook them on a fairly low heat in the oven? I’m sure the wax will be way easier to deal with in melted form, but how will the paint hold up? The oven worries me as I can see the wax melting and then staining the paint!
Alternatively drilling some holes in the hard wax and filling them with WD40 and leaving the cap standing up for a few days might do it chemically without any heat.
I’ll let you do what you are trying first and then continue from what you have learned.
John_73
pfm Member
Tried the hot air gun on the lower setting (was worried the higher setting would likely strip the paint, as leak didn't use an undercoat/primer!) for 5minutes and that didn't work. Tried WD40, and after leaving it for 10 mins that didn't work either, so now leaving it for an hour with more WD40 to see if it loosens up. If no luck with cut the three metal connectors that connect up to the solder tabs, take that off and will have to try and drill and pull the insides out. I think I'm just going to go the F&T route and spray paint those instead however.
Tony L
Administrator
I think the process is to drill a few holes on the wax, flood it with WD40, and leave it for a day or two, basically until it softens up. I read somewhere else that once the bulk is out filling it up with petrol, turps or whatever and leaving that for several days will get it properly clean. Time doesn’t worry me, I’d prefer to spend a week or two and end up with a perfect job than having to paint-match or knock out dings or dents I’d caused. The advantage we have is it is basically a metal cup so it will hold any substance as long as it takes to work. As long as we don’t spill noxious chemicals onto the paint it can take as long as it takes.
PS I thought on last night and ordered a big can of WD40 with my Asda delivery today, so I’m sorted there.
PS I thought on last night and ordered a big can of WD40 with my Asda delivery today, so I’m sorted there.
Tony L
Administrator
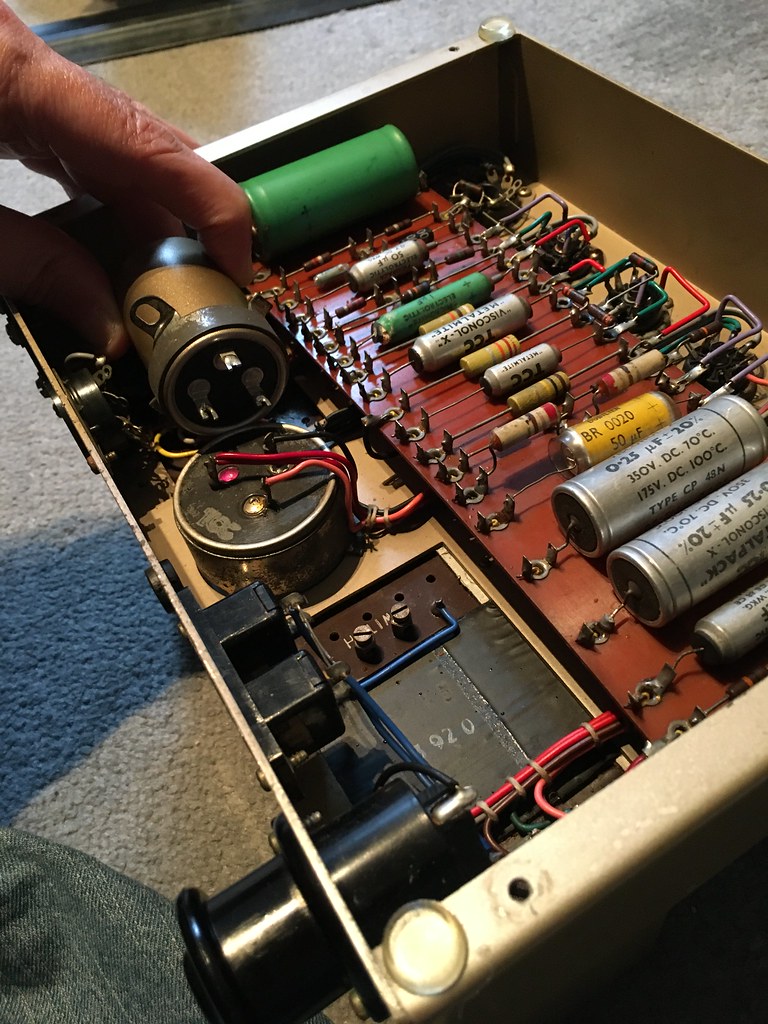
I might just have found a work-around! This is a ‘reject’ F&T cap from when I was working out how to paint-match on the Stereo 20 plus a suitable clamp. The tensioning bolts of both clamps align in this position (i.e. I could use one bolt to hold both) so I think this could work as a totally non-destructive no-risk solution. Obviously I’ll buy fresh F&T caps so they are properly insulated with plastic, maybe use additional tape over that, but it doesn’t position them over anything much, just the output transformer, plus the existing wiring will reach easily. Once I’ve cut the unused lugs off the mount nothing hangs below the chassis either. It’s certainly not pretty, but it is probably better from an archival perspective as it is entirely non-destructive. If I can get away with not having to risk damaging the cans I think that is the route I’ll take.
snowman_al
pfm Member
Tony,
I mentioned before, the original reservoir caps might still be okay. There is no sign of leaking or bulging in the picture. You might try re-forming them (or testing them) before committing to replacement. The other electrolytics and Metalmites / Metalpacks will be toast no doubt...
I mentioned before, the original reservoir caps might still be okay. There is no sign of leaking or bulging in the picture. You might try re-forming them (or testing them) before committing to replacement. The other electrolytics and Metalmites / Metalpacks will be toast no doubt...
John_73
pfm Member
If you decide to go for underside mounted caps Tony, then have a look at the Kemet (used to be Rifa) PEG124 types. High voltage & temp versions available and you can easily fit them in there neatly.
I’m definitely going the spray painted F&T route now. As my transformer cowls were in bad condition I (eventually) got a paint match done (there’s a saga!) and a couple of cans made up, so should just about some left over to do the caps with.
I’m definitely going the spray painted F&T route now. As my transformer cowls were in bad condition I (eventually) got a paint match done (there’s a saga!) and a couple of cans made up, so should just about some left over to do the caps with.
Tony L
Administrator
I mentioned before, the original reservoir caps might still be okay. There is no sign of leaking or bulging in the picture. You might try re-forming them (or testing them) before committing to replacement.
I’ve no credible way of either testing or reforming (I don’t have an ESR meter or variac). I’m astonished they could be ok, given the colour of the amp chassis they have to be 61 years old! I don’t think I’d trust them and I tend to run nice valves so I really want to end up with a stable amp.
If you decide to go for underside mounted caps Tony, then have a look at the Kemet (used to be Rifa) PEG124 types.
Do they come in dual 32uF form? I can’t seem to google any up. I’m perfectly happy with F&T, they seem the goto for vintage guitar and audio amps. I don’t think heat will be an issue down there, it’s a lot further away from the mains transformer or power valves so will have a far cooler life than say the one right by the EL84s in a Stereo 20. All the hot stuff is above it and at the other end of the amp.
PS The more I think about it the more certain I am this is the route I’ll take. It looks like the cap will bolt nice and solidly in place and in a way it can’t short anything. It is a good simple solution to a problem that could be a right PITA and even cause real damage if I screwed it up.
Tony L
Administrator
Starting to think about resistors. The temptation is to use Takman carbon film again from HiFi Collective as my Stereo 20 sounds great and the 1W ones span all the long gaps on the tag-board. Maybe use half or quarter Watt on the EF86 valve base just to keep the size down. IIRC the 470K R16 & R17 ones need to be 5 Watt, but they are available as a Kiwame carbon film. The only value not available is the 3.3m R14. I’ll obviously retain Harold’s magic green resistor (R22).
Ideally I’d like to just bang one big order in at HiFi Collective rather than pay postage at multiple suppliers and if I can find the 3.3m they have all the resistors and the F&T. I have Russian K40-Y9s in 0.22uF and 0.1uF, so I’ll need to spec some more caps. Ideally radial F&T for the electrolytics as I trust those in valve kit and HFC seem to have quite a collection. There is one polystyrene cap that I’ll leave be if it is identical on both amps (no idea when amp #2 will land).
Ideally I’d like to just bang one big order in at HiFi Collective rather than pay postage at multiple suppliers and if I can find the 3.3m they have all the resistors and the F&T. I have Russian K40-Y9s in 0.22uF and 0.1uF, so I’ll need to spec some more caps. Ideally radial F&T for the electrolytics as I trust those in valve kit and HFC seem to have quite a collection. There is one polystyrene cap that I’ll leave be if it is identical on both amps (no idea when amp #2 will land).
Radford Revival
Trade: Radford Revival
FWIW the RS PRO 2W carbon film ones have nice long leads that can bridge the gap, despite being 2W don't look disproportionately huge compared to the originals. They're also under 10p each!
Despite being cheap they can take an absolute hammering and even smoke without drifting in value much as I've found.
Despite being cheap they can take an absolute hammering and even smoke without drifting in value much as I've found.
John_73
pfm Member
Do they come in dual 32uF form? I can’t seem to google any up. I’m perfectly happy with F&T, they seem the goto for vintage guitar and audio amps.
No they don't. I thought as you were considering mounting the caps underneath the chassis then it wouldn't matter if it was a dual section cap or two individual ones. In fact two individual ones might allow for better selection of appropriate uF values for each section too. I'd still be inclined to replace entirely with two new F&T caps and get a paint match from one of the original can caps (can highly recommend paints4u if so).
P.S. Have a near complete 'kit' of Kiwame resistors from when I was buying in different types for my Stereo 20 project. If the circuit values are the same or similar you'd be welcome to them all gratis as I went a different route in the end.
Tony L
Administrator
No they don't. I thought as you were considering mounting the caps underneath the chassis then it wouldn't matter if it was a dual section cap or two individual ones. In fact two individual ones might allow for better selection of appropriate uF values for each section too. I'd still be inclined to replace entirely with two new F&T caps and get a paint match from one of the original can caps (can highly recommend paints4u if so).
The picture may not make it obvious, but I can get a really solid and secure mount of an F&T cap in the position I’m holding it in the picture. It will physically bolt onto the lug holding the existing large cap can. I lopped off the surplus mounting eyelets last night and it will look nice and neat, and it will be solid enough not to move, and it doesn’t hang down below at all. I’m actually really pleased with this, it is a really good solid yet totally non-destructive solution to a problem that to be honest was really worrying me. I’d need to find a whole different solution to mount a pair of caps, so I’ll go with the F&T as it simply bolts into place.
P.S. Have a near complete 'kit' of Kiwame resistors from when I was buying in different types for my Stereo 20 project. If the circuit values are the same or similar you'd be welcome to them all gratis as I went a different route in the end.
That is very kind, thank you. I’d certainly like them if possible. Just have a quick skim of the second column of the component list on page #2 and I’ll take any that match!
John_73
pfm Member
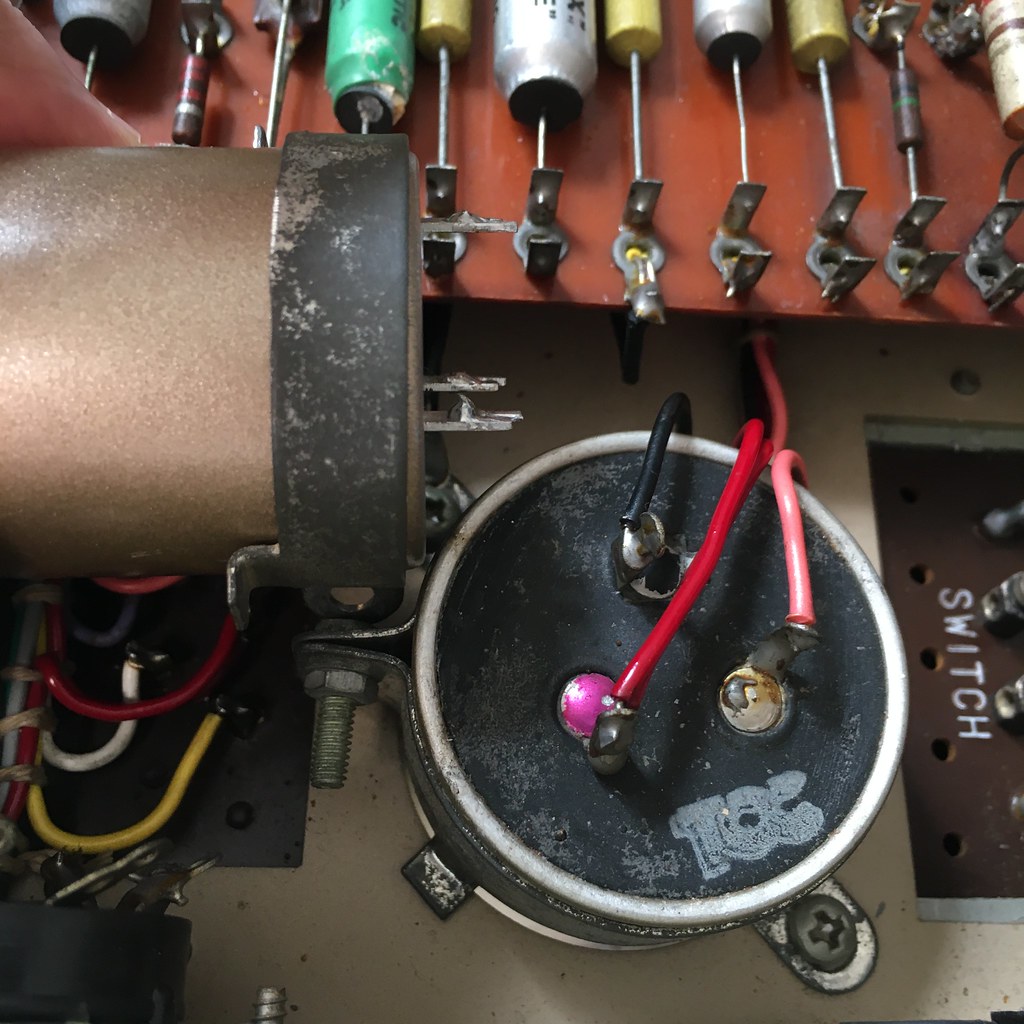
Here’s a better illustration of what I have in mind. The one bolt will fix the two caps together and by pure luck holds the replacement at a nice safe distance from anything nearby.
I can see how that’d work very well, so long as the capacitor case doesn’t stand a chance of touching & shorting any of the transformer terminals.
Tony L
Administrator
It is a fair distance away, it will be covered in insulating plastic (I’ll be buying new ones), plus it’s only the output transformer, not the mains. It is well away from the board tags too, over a cm, and couldn’t possibly hit the live voltage outs of the back panel octal (too short). Until I actually assemble it I’ll not know if it locks rigidly or whether it will pivot on the bolt, but I suspect the former. If there is the slightest risk of it hitting anything electrical I’ll just stick a thick plastic cable-tie around it at that point, bu my guess is it is fine.
If you are dissolving wax, WD40 will indeed work. It is basically a mixture of ~80% naptha and 20% light oil. Naptha is the volatile end of petrol, it's a good non polar solvent. So is petrol. Anything that can be cleaned out with WD40 can be cleaned with petrol, WD40 has the benefit of being easier to dispense. Paraffin is slower to act but has the benefit of being less flammable than either. I use petrol to clean everything that needs degreasing - bike chains, bearings, etc. Just be careful, it's toxic, carcinogenic (contains benzene) and of course flammable.
Tony L
Administrator
I discovered a couple of weeks ago, thanks to Fran Blanch’s YouTube channel, that
the ‘WD’ stands for ‘water displacement’, and it was actually designed as part of the NASA Apollo-era in order to stop ice sticking to low-temperature fuel cells! It should never be used as an oil, though sadly many people do. Thankfully I now no longer expect to be dissolving wax!
the ‘WD’ stands for ‘water displacement’, and it was actually designed as part of the NASA Apollo-era in order to stop ice sticking to low-temperature fuel cells! It should never be used as an oil, though sadly many people do. Thankfully I now no longer expect to be dissolving wax!
Stuart Frazer
pfm Member
I discovered a couple of weeks ago, thanks to Fran Blanch’s YouTube channel, that
the ‘WD’ stands for ‘water displacement’, and it was actually designed as part of the NASA Apollo-era in order to stop ice sticking to low-temperature fuel cells! It should never be used as an oil, though sadly many people do. Thankfully I now no longer expect to be dissolving wax!
Yes, it was never patented either so that they didn’t have to fully disclose the recipe of its makeup.