advertisement


How to Split Naim Nait 3

nimsterov

New Member
I recently did a partial recap of my Nait 3 and split the integrated amp for future upgrades and flexibility. I thought to share how the splitting was done since not much information is available nowadays. By the way this is my first post here.

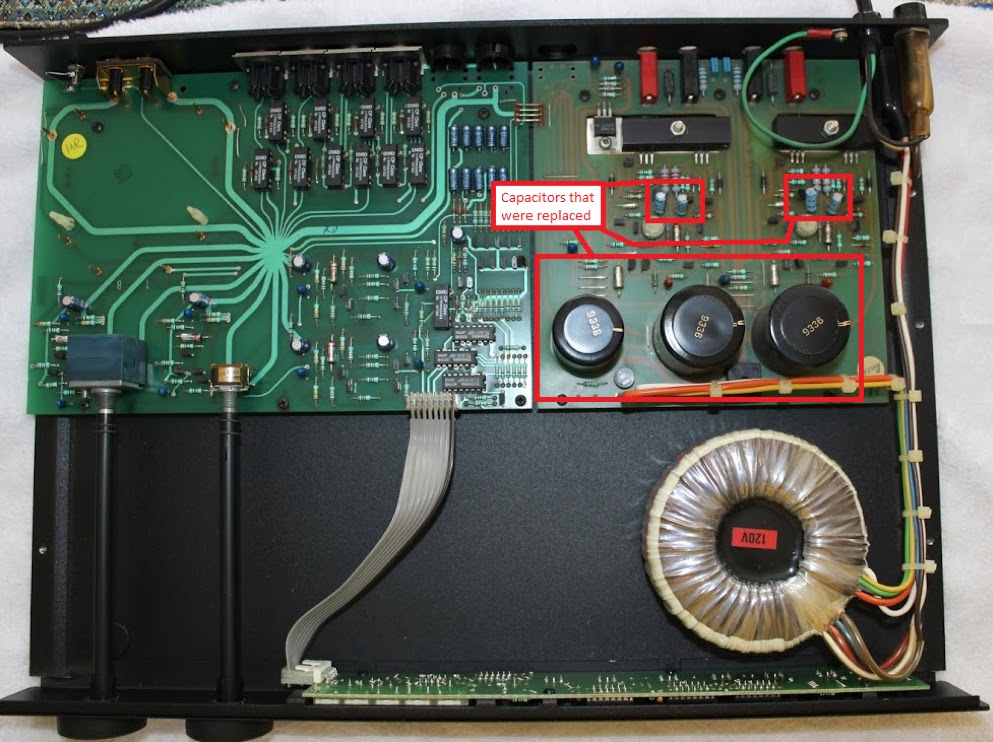
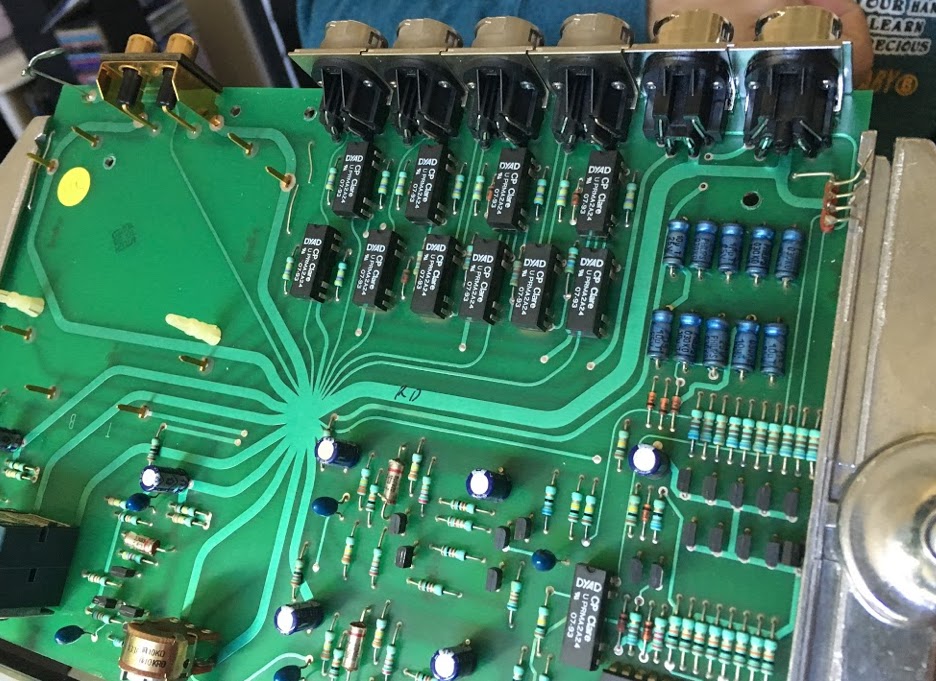
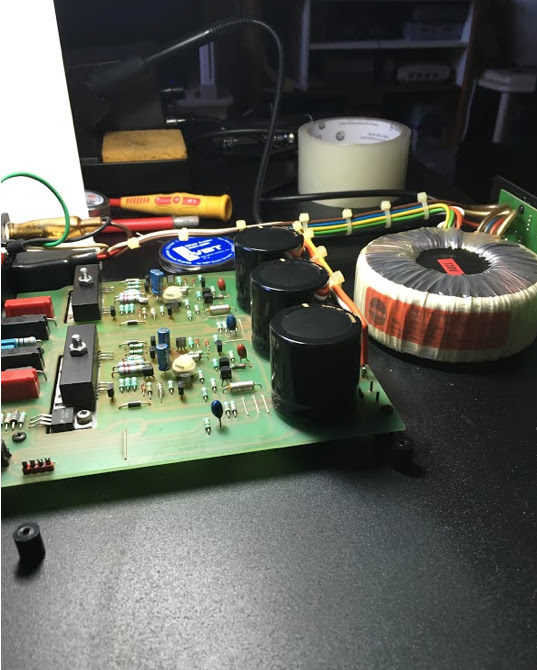
I purchased a 1993 Nait 3 earlier this year and it seemed it was never recapped in its prior life. By visually inspecting the capacitors, I found two leaking 10uF capacitors on the power amp board. I also saw a small dent on top of one of the large 10,000uF smoothing capacitors which bothered me. All other capacitors on the preamp and the power amp looked aesthetically in good condition. So, I decided to do a partial recap by replacing the two leaking capacitors (actually replaced four; two per channel), two 10,000uF BHC smoothing capacitors, and the 4,700uF BHC smoothing capacitor for the preamp. Since I was going to break the four jumper links between the preamp and power amp boards, I started thinking of permanently splitting the Nait 3. However, my main objective was to preserve the Nait 3 as an integrated amplifier with the capability to use each component (the preamp and poweramp) separately for future upgrades. This is different than what is shown in Nait 3’s instructions manual. The splitting of Nait 3 as it is shown in the manual will make the power amp useless, I wanted to avoid it. I’m planning to get an external power supply (Hicap, flatcap, or other alternatives) in near future to power up the preamp section separately. Therefore, I decided to figure out the process of splitting the Nait 3 and buy the necessary parts for my project. I need to mention that a friend of mine who got me into the Naim game was my consultant to accomplish this project.

Replacing the capacitors was relatively a simple job. Finding the replacement for the 4,700uF BHC capacitor was somewhat challenging. I found the right size and right spec 4,700uF capacitors but decided to replace the 4,700uF capacitor with a Kemet 10,000uF capacitor which slightly changed the sound (depending on your personal taste you may or may not like it as the bass slightly changes. The sound stage changed a little bit and the Nait 3 doesn’t sound as forward and shallow as it was before). After taking the old caps out, I noticed the 4,700uF capacitor was leaking as well. Below are the capacitor part numbers I used:

• Nichicon 10uF capacitors (4) -- Part # UKT1H100MDD
• Kemet 10,000uF capacitors (3) – Part # ALC10A103DC040

• Replacement options for the 4700uF capacitor:

1. Vishay 4,700uF part # MAL205657472E3

2. Epcos/TDK 4,700uF part #B41303B7478M


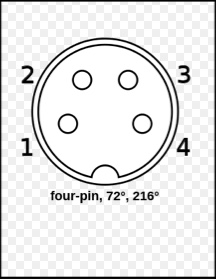
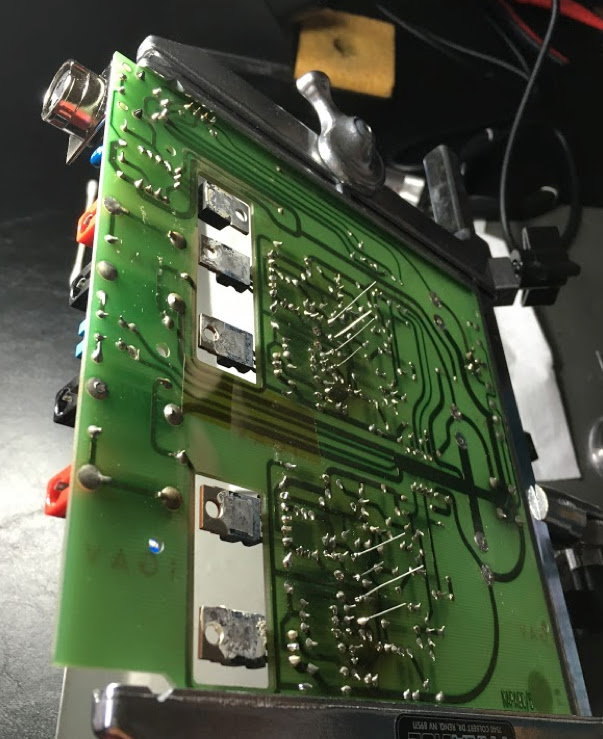
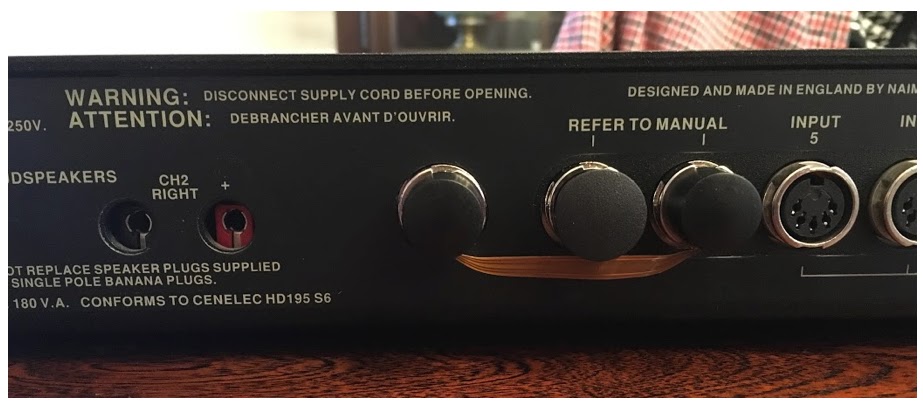
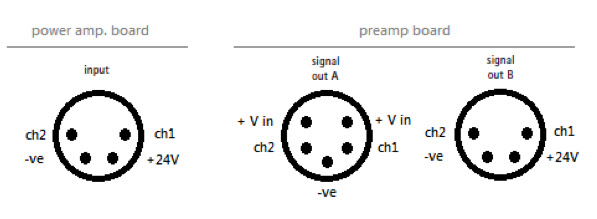
To split the Nait 3, I had a hard time finding information about the kits that were previously available by the dealers. I contacted Naim and they referred me to AVOptions and AVOptions said they do not have the kits to split the Nait 3. A simple tracing of the pins for the additional DIN connectors was helpful to determine how the split Nait 3 is supposed to work. The preamp board has two available DIN connector positions (4-pin and 5 –pin), and the power amp board has one 4 contact DIN connector position. I tried to make my Nait 3 operate in the same manner as a Nait 5 with similar DIN connections and jumpers (reading Nait 5’s manual will be helpful). To operate the Nait 3 as an integrated amp, instead of using a SNIAC4 cable, I purchased a Nait 5 “Link Plug Flexi 4 Way” and it perfectly fits the split Nait 3. Below are the parts that I needed for splitting the Nait 3:

• 5-DIN connector for the preamp (1): PREHKEYTEC 71251-250/0800
• 4-DIN connector for preamp and power amp boards (2): PREHKEYTEC 71251-040/0800
• Heat paste
• Link plug between the preamp and power amp: LINK PLUG, FLEXI, 4-WAY, NAIT-5
• 5-pin Link plug for the preamp.

To split the Nait 3, the following steps are needed:

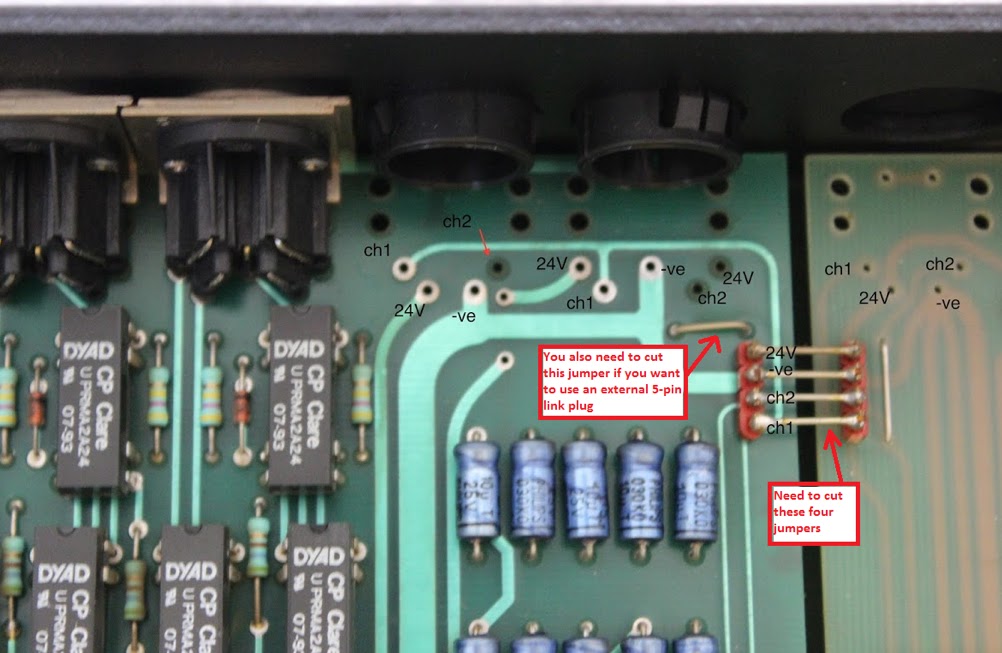
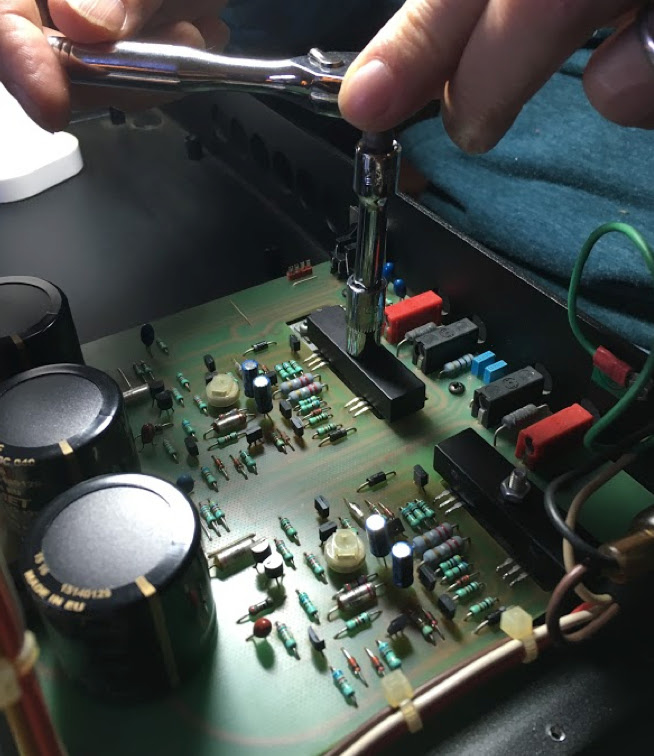
1) The four internal jumpers need to be cut.

2) The preamp needs to be taken out which is relatively easy, and a 4-pin and a 5-pin DIN connector need to be soldered in place. In addition, if you would like to use an external power supply for the pre-amp, you need to cut another jumper on the board just to the left of the four main jumpers that were cut (see picture). This jumper in Nait 3 provides the 24V supply to both channels from power amp via one of the jumpers that were cut. With external power supply such as flatcap or hicap, this jumper is not needed as the power supply will have two separate 24V supplies for each channel. To power up the preamp after splitting the Nait 3 from the power amp board, an exrernal 5-pin DIN plug is needed.

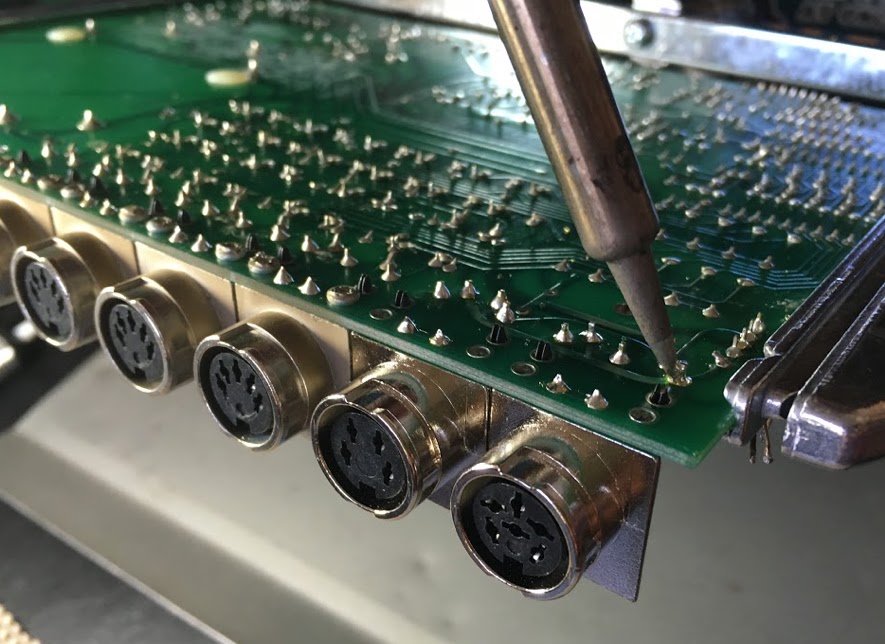
3) Take out the power amp and solder the 4-in DIN connector. This is more time-consuming as you have to unscrew additional bolts and nuts that connect the LM317 and four output transistors to the case. There are clear insulator films between the LM317/output transistors and the case. Make sure to save them as you will need them when you re-install the power amp, otherwise you will create a short to the case and damage to your lovely Nait 3 components is possible if the fuse doesn’t blow just in time. You also will need new heat paste to apply between LM317/transistors and the case when you re-install the power amp board.

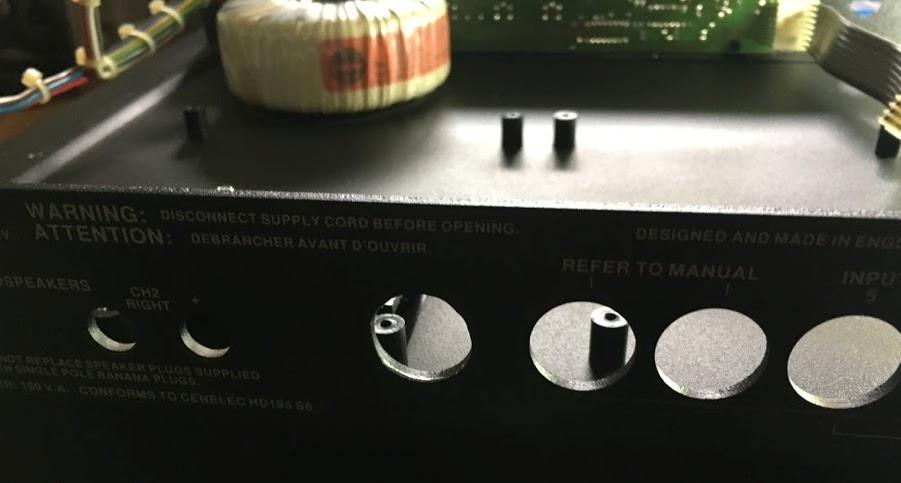
4) Cut a hole in the back the case where the 4-pin DIN plug of the power amp is supposed to go through the case. This is very easy and an X-Acto knife will be handy.

5) Install the preamp and power amp and you’re done.

I worked with a friend who is very good in soldering. We used WBT Silver solder (WBT-0800) for this job.

Thank you for reading.

Nait 3 in original state
fBmTphN1uXOsWl0TvrNX-FycrZfuS_HX1riv58T6lro3gTmfNKnR123DTFoDsDEFB6PhSi3VJ-RAcO0tHu5q_ReG6-RGJ6BqHSWY4Qhw-HYIOp5HMuOq4fBQr9nOlFA0X1RyMd1XQYH2ko7MAUNye7PRhSpAc5yirgPS6PfKYKv-3F5opUXYmGoUAG3OnwUrZC2rgBUuWbDh2o11SRjBDLrqjm7OMePIBN9JnPZIqDsfvl2NFSucDgs6Y0LArnXXgmkbe522fZ9KlDXUq3hCbEL7VXnpJdtYZSJJ7IEjXBuES0kqEgWnQQOASaV2NN1kQcyRXkE5oqSSbhmG9h1koekWfRuG7L2gdaVUuaxgSYz_1y2P9NUCnV4PTCV6hb151YAX7kOHXbbFspyMb6GqSq9U8yrjt0vDoqlPCfuAAIQ_hcnkPk5z3l0fkaODsgfspBGK0BMzbtDEidlODUoU_akZ7ySZW9AGQDDG99TgW8fyVBH_rEkcCMOXgeV0MXgN2r8K98yHvi0OEsRZUfhao5FJjiKPZooUgL8ZtNiAA-nuh2NELtk2oQAfFp5bDKkLp7g4LJSokvmJJL2bjw93dGXsR9M-oSW2=w993-h742-no


QQNXLcJLFFXsf1dcvRERmN0W57qhMiKvg7WZdjRVAOiithLRL5M3gxNUYfNSA5S0A-zR3Fiv9ZJP_wV-OXfgjM0rL1r4AayHefpCo1qw3yJO1vZlcsCP9K4QFXW7T7FjMQtdJCULmtFv_erCTh55bDdG4Lm3fr9GuipyMDPToL0_Uf97t06MzarE7uYqqIEGQgEWCE3CoJAhGN8Dc2-q3Yxi6I_zq7nX-RjwTvbyB3ebeBNcHW_gxjV-dvu0cBgYyXkFqnZndi94VKTqNWGIVmkvAVmB4Z5TaJhXkbYB94nvE28xTsjtkMe9cUN3PD_wyoh_ECCWTG54GKnY8hZCdmw_NjIxltz8dnDpQ5uawciyRl1NJpqZAlCUcETNGOxhcwdQZkKSc_e5vnrZEfQNWvbGNRDaFuxxSptoFZwLQbfeO3Su7Tn1NkzgESjqsUgea3AyqiojG9Gh-XZqrNi2TdfJmGVb0hAzznkrb5MAT3ZHoewMltU_yl7riXcz6NZli7B4tkZmr6OF68DMY-C5FA4EVPHxTg8I5rUKvj5M-fsIbwOd5lTBW75BCPafosicQsvFjgGZvl-jmkQ_nrJPrfUEvacimxAx=w1002-h653-no


v5v4LkoRvowHiFwmVsJ125OMyak4QjUI9uiNLJ13ZjXPYx-sctHJs4erz2AX8CuMAOVkAYcaYxW8K0xmijEhV9-h_HL4YC7qEE35fGE5KljKKdSeY2IBZrYRXcP5w88Lm1eH21ehHBIrcgtu2_P0BdZXCspKbUs9Xb0vkEkclqWbG2w3VvNvmI5EllnX-WrQLA6qyW6otPVsDGIpfuQoCE8vV77VPw9ofDEREHr81qFfYLJCg4mGvbX6UUTJG-wnKRG7UHx6obT6BVQMtXOgw3qMZqOckkNzaxRbJ_FRWZOcGCaA8GxHd9DBZiA8ZGY9mdQNGknAV8y_vFwKSMJBt3_u4sw7xjtHvJ7WCB3BTq-9mRaNsYu-LAOOBtQyuZGRfJt4-bnBetlbpdEpNR0s9w7V4GBkgpnmLx2yWb9H9DXqPlU1nX-Os1C-sCpwcAEWj8gr8S8-yCv7OwHwh6ZEjXGROcdScpk-nv4ZFjCyZmZmdOs5R5FdB8PrSSVGK9b85QHljT-4ZUB7LHdKf4JQqjlZy2koNcte3Sj7FW3O1BAfRvZaKBYraD7VIqP3DoiI9X9axPN3LukaKBAn2c4uFsRYnRtv6Dop=w926-h663-no


tT84MK-goWA-zdbeHlvnXWF_3CGh8KDcWlrHDKxk89o9--c27P0d5VJPgZ_4s9DUkJkAJE6nxEXib2_WkR4KdaK4F8JR8fp1mhKQG0JBKj-HbrdWMzv1aP8-eQwJVEiVvQvNOgz8vVlmyJrhOROA1-c0e13oGBH6gT196chvetwmEYS6I3Z9gRAAA4xqO2SZQA3FR3a0_GV_11a3ueiNiIjvui4-ZpYLTs0qdEiMOqBcdXeu6QOGSZbO9jk2cuM6cTP8pjFnXJtEu3miBoOMT85bNUiROf-hvcgwhOPsZLfj4qOuay4VcKmLYWXpCpFXxas0BoVbTxlVdw3lQzNzF_9NWQFbPvlaMoZfZtYjwdl3AnHBXQjL3eEjTQxz0eysD-WZ3i7ttmZS0w6DsylSvuGpnVtZ0idCJwcP7Eeldrp_MN6s_qpyFOePydz1pYnrRpsUo5O5koAwFgotwG5bJKK7XW2mnBdb3Pake_fIfMJTdA4pZTua-iYk3mBjDHkMtzoJoeihZie-PR4YcjaY-aGq3A1edZvYHNVEDP46hAYF317Q-jIQAo0rfnrKDtA4liej1mKSmpDT2WUdYnRt3ovyyASEfbCZ=w885-h644-no


wtWIEUG9K7Y3Q4Z2ue6yZnbn9FoWig7iWhBFrr-JPKYdMfqZ3fK8dveoxyCG94iCSwcz5q7-qEK0tvKNTCJ1rQYAeMj8eA6eRxAzxWSYAfbDWkJzg0T0t_Du6Ry2DaMKe7jBQXrY4_2t5K3C6e2DPl1bCA7DwZzvhwLTFaCPM-tmrTgq9oi1HXs3GlPPU672T5s798ueDq8x-vzOIHhpauf0LAkUdtJIW0sqN35TEg2n5Qht16ZBQ8IEPZgxjXD2JI8TahaMheuWzrx75wWitAM2zEwSKxyllbYtFzWRJiU4dojaeIH_GyKoTkAz8OvCmjBipCuCDnr7gdPch2KaMxIAGlUcLLsl5W-iwUOL05E07310qNuxvUs7_Muc6lCtjPYhmghKJsw8kyPtO6EpGN5yat5QPXVmueaEBj6OgUaHQRtUp5AuFYVaNo8yo8AzuvEd5Y9ZAIQZbL6Fk3gRMbvle81B_qDGSORPlXTXFrXgBoT_UqUznArrsvP2lK4du6FNXpjYCicto5LsEjyY3Wglhjbzk79EvFDSaMTqe0J4omJGl-2hl4PsKr1pk9D6fJnceowPAUB2t90xsNyTSxNWyVcWoaPN=w936-h681-no


SytfshAiJSYqcX16cTU2XmPHCjlw3vhCSjgpBvnIXLl5qqROINnQkNLzgf6tpyQO9gBjMN5XuTSvvFWbnrmiLlcAL9hzCudIKjJNbsjx5Kacxfy6cQvaOvlk7SPDAL_bqiSUG_RMdlkURsEKmJ9EqqDs_u95ha1zookNf7j6-EECltW_H7BRqQymblU7ogtCB3EyrTIKSx-QtqNwvDIktqk3mz8WC96nkPdDZe1Tfpn4KdfyLhcyhyQhOHHp7iJK9ViEkBBb7uhRg1iylKRgoUpKu20gVxrEO9ivLfsJQx_9Jh_-ecRycXtqcBQ3aka9nwCCy4w8RElemOeplejYw0wljgfdCo0S1-xc4VI38n-PZxrSPSDMrmzT6DOGOw2TSXSSN6WkqhmcqQwRCcviuR2fIzHKGshfbcn_Z0dgZMV79x_ttor-dsLZllgbFCs_ek200HtQdDS7LB67xuy2B95kZusTXoIrLcBCztlVVKlKvVp-LYGwG3EN7el-g_P8q-QKutjfAxOJ2TcidRMeFvc5tp3MNd6gpN4MG5EfCWMCF40Vdn9x5XTQh3ZLxeor1HmuhA4ww_aqgo2f5Rqud4F5IQq9uccu=w603-h739-no


rK34mYuzpVGsIxnhROaoHLKPYRX-us44ykmn48wxOd1JFk1QYJnAwfe6IMY6YJ4iaoxqc0pQ-rq6HwtN-o5amnrzfVm4QUE9h5MkmtTIREtlzpQJk-Y6kXZmoZX4TFuY8SXc645WwBjVwTJrDV0Vhwb2p1e1VpbqWGRDqvI6YKZNfXE8E9JCA0v9hK2P6lYNnMaVrNxcGWSnQ4vR1T2kCGilk8koLSBB5oD1m9HlNSA97_USfTM9v8vscZidZ1-4wr0JrRyfXUlPmj4Bt1I3fBP8dpc8RGE9NzuHrNnc6MtEyczdTTfUJ7qmBmwaNNYGPnTH6L6IQH4Y2h_fZMozdWE6Oc3I66SCFEDq5PmkWC1LcNGmD6k39CVwBaiICzWBVN-Bh1H1p95O5DpOF7C325MIn94DHrg7fSW3_CrTuMtA6FetxybwrWFuVOHC6WYjRStArdiP3sw_EZsm5Lit9v_Hb4sO7tmsOTWvvjHBYA9UV2iMNKd4Agx2_rfC3sbIPSLjK-arxeUOwN4UZhUXhSx_I3yXyzV6tG_ibxM0m0Sl0vb4o0NhZHnyQ-DtYxR7420JiNGVLXuzPNOl8UYyeIBEWD98Vr6r=w901-h483-no


dDUqMIAIFRbKFbzCmR8nHWzTdtU0_sH4hl8vn_K8amu0H7QnB7WF5cTsbVL1NnPQpPTvlkB2kDUr7KzutwTuP4t47AvYHlQmmpbqCd6dQaSnZrCUev5qBIoImxuPpWdsf_CTF0hXgf8OFc3waMFr2KfUpIi8VkP6e3kPYGDGgHHqVElyHzTjVcfh2RMmFwMzSFV4AqY7CE9DdPeJkoO3_74IfsmOLwoSwOmI32A8_3-i37RuRdHTueuo-xpbdlHc8z-CFnbNxHnjilfsvjSOhTy3R8J8RPBW-oNU08xmk-LxKoix1UJ4yo7e0YYQXRcGmQdhZfYMmzssoqEl9KX2CM1zu6_TuLUUrKw1v4zkM5TdJNR6-ahsUQSLDFqpEtzesSbLlvN71Vduemx6mK75iaKPN3-0q2ynVRSVixTCJefwta5_2Js49nf0EwEVZKVBcv5mOgs_-e_K8s6PIgM7FVkxmdty4kqoFL8f30_s25f9eFhhJ6SzJhyMI5EeAJSzwR3-n9wZpneyMJROYAT3UM1HCNR9hbBN4-tM1yzIfFCwt-2s1YfUFaCI5c6Gf1pwyCoK0iOAxKTlcGGs6Q6N9JUcxTcUbEtI=w654-h756-no


VpQmCpZNB7Co4XkgcmTgECsdBSCQwCd6uVOLr7x9wFIlWjUKwscUoKWVuB6OM8YAcj46ZNClGPPetWFemv3EkoHteUqx8Dh3i83fnEcQkdPhirFowHB3VFyXLqC0oC9TiY9f5p_qI098PhnhjigjT1LM9f2_-FWjp7E03hKcEF5h0VfkNxswBC35OpZBuu5Tg-VRDs1NsJOxQALfyX6Bp-qMGUMFhscyABLORa7gmtaPggpQAHkxxxd-jKgf7GofnHWVvtRZgJdZmULOi3AzqfWqg-rgjVvb9eNV0n0W_7H-9cKwIqq2NykbDyuyAmQHeYOs0m--BgDyX-HzHebsinDGZXOjkln0VOYEv6BBUEJP6EC3qsJFxfuGo9mD3ueEsJhtLtOvTx4mi2U7GZNAkwSUh_xT_bN5MG3o_QxN-nzgfzaMvJJL6R0ruRqN9NkRNAiHSPfbC9q1OqOITeU6rluCzSitxZQsv-x0tqpGde-eJD2kITV3PsFIWPhQIrfTbFKM32VUR02eIpCXGIP23rMImnKg9fLw_CBzMbfR6yhhkufNL08XuJ8pWzwMgEIfcimN6YXyiM-X1Yj1m1OSfN-iqOWPEubZ=w537-h670-no


Link plugs installed to operate the split Nait 3 as an integrated amp
jMnJHXoLCZkO6msXBjVGts7pZ7MWe_2dud8Sln7_FqdJs4b_ilp9CsuayiopT08rRewjKd0jeL0bf9XoF3wQtAqiogiNYvGfhI9ZF5PB0ReOEy0Qrkl_YlJIEc46l90PgRewx9HWHKUOnQV0cNVgxSe6KbMKm33HN1XwakweBin93f_eekR9ezDVEt5y0kKnuS2eTSXfSUWHkGF9pZPIuJffkGMPCJR3ruTlivpLzBxenxDu82219xpFWmc7eykT8mNo9CC36jYyj1s6tcEEoVA7PXCkx2xgdcUFCX-ki5MpmsdSn4CzuI8Bd1UpVjjG0Fkt4kgsV1fIBjcgXkS7JlvERYjz1lMPKX9UhEhlLtAxnPpEya4Ijy9S8zzul-B4JzGpdKQynjR2bCj_szj2bC1nlUDD0zorNlxVM_KanljOJHpHutUsMhIDihxORAzjP8k_3xBoAmXsAR9snVD2o2pEG48NXwf28u3CkLzd_Rv4C1cFA63o142zjM0imr5MMzJLfLEpWJp6pL9Gc_6Esc6aUIow8Rv88ze5-8-bh5nXmPNL9C0HPkuv92bvAOutbTlm82468pWyHVZCmZeg2f-zdQxjvEL4=w923-h406-no


r2S7GNtJrCG7A3I0v1kG8LXl_NTvEDRlpndLvI0VHMkc2h47Y3sCVvZJTDN7Hi4LCJ2-YZEDZ6MuTJP1Sd8Ob4i4iChHhPhxGxvbTs3EpP9jQEd8N883Lok8hH0jgXlG18Fi6rSxTOJmk0Xz2d0PAy_tBYGGflvNi9JR_Knj2cy6BcTzqfbqzFB-Fk445x5Nki-WGNp79EKk0R7JgoBty4kgcr5MneeSTyYnt1zpSXj7m4btio6RL9ZmZSKd85_I2CrIwI6wrIvSxx74jiT_BxXu1sxPK9QTXoJ-ralKsAbTkbGX_rdqZmeHQ9k9dZXGtLcwwSiW4Qtk4hmVUf3Cpo_BGibOg5CyrcCe-ZzfC-DaxPPRT2ain-7zRU83PoouIrOYVL-u1JN3ogyle3dZcyNbdwaLnF4dQrA1k7ENhiHVzSsuoigGYX7TBe96UOKVpancF3xfEI9y8dZERl3CxEyAiUTpGDc0xSbK6SCFN-ZnoqYz3jXibQz0VTHPKCkdnbSWyfEHTSGh-2ODpa8FeGmBN6CQ5VOAz87lou4n60hw0s1TQObDVLqZwP1UX_Gz8533W7xRM6de4O9do0JDT_jf4zpr8UmZ=w597-h219-no
 
Excellent work! This should be a sticky in the DIY room.

One small point, the four devices alongside the LM317 are the output transistors (NA005?) not ICs.
 
The Kendeil 4700uF/50v works very well in the pre-amp supply. You may want to change the tantalum beads whilst there too.
 
Hi nimsterov, thanks for this incredible, so usefull information.
I ordered the 3 pin plugs.
If I understood well, we can connect a naim psu to the nait 3 and then we can connect the power section of the nait 3 to the power supply, so we have a preamp powered by the psu and we have one amp. In other words, with two boxes, (psu and nait3, we can "make" one Nan92, nap90 and psu. I am right ? Thank you again, I am very excited with this project.

What I intend to do, if this is correct, is to solder the three din plugs to the boards and use the Nait 3 as a Nait 3, without cutting any link. Later, when I have a psu, I cut the four wires plus the litle wire near the plugs and make all the necessary connections between the psu and nait3, to "make" the 3 combo boxes out of two boxes.
The combination of "LINK PLUG, FLEXI, 4-WAY, NAIT-5" and a regular 5-pin link plug will allow a fully split (i.e. all 5 x internal links cut) NAIT3 to continue functioning as integrated amp. No need to leave the internal links in place, on the contrary, it would be much safer to break these links if installing the 3 x PREH sockets, as accidentially plugging a FLATCAP in, for example, could be disastrous.

A fully split NAIT3 is even more flexible than one might expect. With both "LINK PLUG, FLEXI, 4-WAY, NAIT-5" and a 5-pin link plug for the NAC side on hand there are multiple configuration possibilities (sticking with 3 Series components for simplicity sake).

1) NAIT 3 (via all link plugs fitted, aka NAC92/3 -> NAP90/3 in one box)
2) NAC92/3 -> FLATCAP -> NAP90/3 in two boxes
3) NAC92/3 usage only
4) NAP90/3 usage only
5) Full active 3 Series minus 1 box via NAC92/3 -> FLATCAP -> IXO -> 2 x NAP90/3 (1 x internal and 1 x stand alone)*​

* Although IXO is self-powered it doesn't pass +24V to NAC, hence FLATCAP required.
 
Last edited:
Hi Craig, There's a very interesting path for upgrading.
I'm waiting for parts from Mouser to finish my recap.

So far I installed Silmics all over, all lytics were replaced.
I was afraid to use these Elna caps that are so wonderful,
because Naim devices are vey picky, but it works very well.
Better parts doesn't mean better sound, not allways...
I also washed the boards, all parts, all contacts , this is important.
...cleaned the transistors and regulator, new paste and new insulators.

The funny thing is that now the circuit gets a litle bit warm, not hot, just a litle bit warm.
I guess that there is a better overall electric transmission.
The resul is more clarity and I think that it has a better control of bass, much less boomy...
Silmics take a lot time to improve, until they lose their astringent sound,
but after that it produces that tactile effect, that physical presence that Olive Naims do so well.

I'll post some photos in the end, and I hope it will help someone like me.
Thanks for all the information.
I'll report about all the next steps and sonic results.
 
The LM317 reg near the output transistors is important, right ? I read somewhere that Naim choosed the ones that output less noise, that's why they are so good, I guess. I believe that in the end a reulator is better if it has less noise... I bet that a Belleson or Dexa, for exemple, would improve the sound. Bellesons have incredible low noise. Well, sure it does no harm. Mine outputs 11,9 volts. Is this ok? I'd order one at 12 volt out.
 
The LM317 reg near the output transistors is important, right ? I read somewhere that Naim choosed the ones that output less noise, that's why they are so good, I guess. I believe that in the end a reulator is better if it has less noise... I bet that a Belleson or Dexa, for exemple, would improve the sound. Bellesons have incredible low noise. Well, sure it does no harm. Mine outputs 11,9 volts. Is this ok? I'd order one at 12 volt out.
All beyond my skill level. With both NAIT 3 and NAP90, I have learnt to be aware of the bias transistors that are located next to the bias trim pots. According to ex-Naim employee MJS on here, Naim eventually took to mounting these on the underside of the board to prevent thermal runaway. Looking at photos of some of the cooked brown boards out there would suggest this to be the most critical update as part of a service, if not already in place. Details here...
 
I can't understand what could be wrong replacing the lm317 by another reg, with the same pin diagram and much less noise. Perhaps I am not following the idea.
 
I can't understand what could be wrong replacing the lm317 by another reg, with the same pin diagram and much less noise. Perhaps I am not following the idea.
Suggest starting a new thread on the subject in order to attract the attentions of the pfm Naim Bodger Contingent.
 
I found a good deal for a Flatcap 2X and I just bought it, but I'm having a hard time to find the 5 DIN plug and the Flexi Plug. I live in France and can't find them here. Lots of Naims but no plugs. I can understand that this is not a very interesting business... How many plugs one must sell to make a living ? Tom Tom Audio, sadly, (for me), doesn't send their products to France. These two items are not easy to find. Can someone here give me a tip ? Heeeelp... Thank you !
 
Well, I can buy two 4din plugs and solder the four pins, 4pins A plug to 4pins B plug. Can also solder the pins of 5din plug, but don't know each one to solder to wich one...
 
Assuming a fully split NAIT 3, use of FLATCAP2X negates the need for any link plugs. SNAIC5 connects between FLATCAP2X and NAC92/3 side via the DIN5 240° socket, with SNAIC4 going between FLATCAP2X and NAP90/3 side.

If you wish to run the split NAIT 3 as integrated amp again then the DIN5 240° link plug has the two 24V pins bridged such that a single rail supply (such as that from the NAP90/3 side) can be used via the DIN4 socket. LINK PLUG, FLEXI, 4-WAY, NAIT-5 isn't strictly necessary if you have a SNAIC 4 on hand, simply connect between the NAC and NAP side DIN4 sockets (i.e. along with the DIN5 link plug for single rail power).
 
Uff... I don't know if I told you, but I worked with Naim Olive a long time ago and I was a Naim junkie. Far from being a diyer at that time, I could connect an active system with my eyes closed, but I totally forget the logic of it. I wish I could help you in some way... Well, thank you very much. I'm going to open a topic about installing an ALW reg. In the preamp, of course. I read Mr. Ced Taylor text. Installing it is very easy.What is not so easy is making the reg, because I've never done one, but it will be ok. One more thing to learn !
 
Assuming a fully split NAIT 3, use of FLATCAP2X negates the need for any link plugs. SNAIC5 connects between FLATCAP2X and NAC92/3 side via the DIN5 240° socket, with SNAIC4 going between FLATCAP2X and NAP90/3 side.

Perfectly understood.
However, it must be possible to connect a 4DIN snaic directly between pre amp and amp = IF I cut the +24v of the snaic.
It can do any harm, but one must be VERY CAREFUL : Be sure that you cut the voltage wire. ;):)
But this is easy, I cut the two wires that are in the bottom. They are nearest from each other than those that are on top. Or, I can measure then, if I really feel insecur, using two wires coming from the two holes.

Thanks again, Mr. Ced Taylor.
I am not clear as to what you are suggesting here.

Assuming NAIT 3 has been fully split (i.e. all 5 links cut within plus 2 x DIN4 plus 1 x DIN5 sockets installed), should one subsequently wish to use in 'NAIT 3 integrated amp mode' (let's call it) then there need be a 24V feed from NAP side to NAC side else the pre-amp has no power. LINK PLUG, FLEXI, 4-WAY, NAIT-5 connects all four pins from NAP DIN4 to NAC DIN4, same as SNAIC4 between physically separate NAP and NAC, only in a nice neat 'integrated' form (albeit somewhat vulnerable). The DIN5 link plug need be fitted to NAC here else the pre-amp only receives 24V on one power rail.

Should one wish to power NAC via CAP and continue using the internal NAP then SNAIC5 goes between NAC and CAP, with SNAIC4 between CAP and NAP. With CAP there is no direct connection of 24V power on SNAIC4 (as there exists when directly connecting between NAP and NAC) due to CAP lacking a 24V connection on pin 2 of all DIN4 sockets (the exceptions being original NAPS and SNAPS single rail DIN4 only).

Keep in mind that the intention with NAIT 3 having two extra socket holes with plastic plugs in round back was strictly for conversion to NAC92/3 (leaving a redundant NAP90/3 within). It was starting with NAIT 5 that Naim fully intended to provide a full NAC/NAP split option whereby both NAC and NAP could be used with CAP on NAP, etc. It is just fortunate for NAIT 3 owners (at least those who wish to dabble) that both boards accommodate conversion*, as well there being a pre-drilled chassis hole beneath the rear plastic label on NAP side (i.e. an unintentional benefit of Naim having made a "one case fits all" chassis for the whole 3 series).

* By virtue of these being the exact same boards as those within NAC92/3 and NAP90/3 only sans interconnection sockets having been fitted.

But this is easy, I cut the two wires that are in the bottom. They are nearest from each other than those that are on top. Or, I can measure then, if I really feel insecur, using two wires coming from the two holes.
One of those wires (specifically that which is connected to DIN pin 3) is shared -ve , i.e. shared between 24V and ch1/ch2 signal, hence you'll have no audio signal should this be cut.

DIN4 216º (front side on socket (female)/solder side on plug (male)
DIN4-72-216-pin-numbering.jpg
 
Last edited:
One of those wires (specifically that which is connected to DIN pin 3) is shared -ve , i.e. shared between 24V and ch1/ch2 signal, hence you'll have no audio signal should this be cut.

Yes, you're right.
Hence, one should cut just the PIN2, 24V.

I cut the two wires that are in the bottom.

No, I can't cut them both, my mistake. I should cut only the 24V wire. PIN2
It makes sense for me. The earth wire is the same for voltage and signal, naim uses star earth.


http://www.acoustica.org.uk/t/naim/powersupplies.html

"Rerouting the signal path


You can only do if you have an external PSU for the preamp. Use your 4 pin snaic to connect from preamp direct to poweramp. However you must desolder the +ve line on the din socket within the preamp (see poweramp din socket diagram below) as you don't want 24V coming into the preamp from the poweramp (if you use a nap90/140/150/160/180 etc). Then use your 5pin hicap snaic to connect directly between preamp and psu."


advertisement


Back
Top