advertisement


Measuring the effect of acoustic treatments in the room

I have not been able to follow all you have done and said, and admire the time and energy you are putting into this. This caught my eye:Are you not meant to first find the optimum spot through placement of speakers, then add appropriate treatments, only only when these give you the best then you add EQ / DSP?

Yes, before resorting to EQ I try to find the best placement for the speakers to minimise frequency response issues. However, the Ditton's non-linearities exist to a greater or lesser extent no matter where they are placed, and I find it incredibly difficult to let myself suspend my disbelief and focus on the other aspects of the presentation like imaging and soundstaging if there are distracting peaks in the frequency response. TBH I should probably be using a speaker like my JR149mk2 for these tests as they require far less EQ to sound transparent, however they also produce far less bass and so won't reveal the true extent of my room's low frequency issues.
 
I think I'll swap my Dittons out for my JR149 mk2s tomorrow because it would be useful to have another and perhaps more accurate reference for what effect the treatments are having on the upper bass / lower mids. I don't want to end up with a room treatment solution that's been entirely tailored to the Dittons, I want the treatments to work well regardless of what wide-dispersion box speaker I use in this room. The only drawback of the JR149 is they roll-off quite early in the bass (-3dB @ 70Hz) so they won't excite my room modes as much. The Dittons and JR149s are both wide-dispersion designs, but the JR149's front baffle is significantly narrower so I'm not sure how much difference this will make to the first reflection points...
 
I don’t know why I didn’t think of trying this before but I today I turned the GIK corner traps into each other, creating a 40cm x 40cm rectangle, so that the porous side was facing into the other trap and the reflective sides facing out into the room. This reduced absorption of the lower mids but didn't stop it completely (looking at the FR I'd say it reduced the level of absorption between 150Hz-350Hz by around half). It improved the absorption rate at 85Hz by much more than I expected given that I didn't add any more treatment to the room.

1021617d1655218472-room-treatment-advice-help-interpreting-giks-published-lab-results-138cmfw-138cmrw-8x-gik-tritraps-cubed-reflective-side-out.jpg


1021634d1655219728-room-treatment-advice-help-interpreting-giks-published-lab-results-fr-no-treatment-vs-8-absorbent-tritraps-floor-wall-vs-8-reflective-tritraps-corner-cubes.jpg


1021635d1655219780-room-treatment-advice-help-interpreting-giks-published-lab-results-rt60-no-treatment-vs-8-absorbent-tritraps-floor-wall-vs-8-reflective-tritraps-corner-cubes.jpg


1021638d1655219782-room-treatment-advice-help-interpreting-giks-published-lab-results-waterfall-no-treatment.jpg


1021636d1655219780-room-treatment-advice-help-interpreting-giks-published-lab-results-waterfall-8-absorbent-tritraps-floor-wall.jpg


1021637d1655219782-room-treatment-advice-help-interpreting-giks-published-lab-results-waterfall-8-reflective-tritraps-corner-cubes.jpg


I then tried stacking the TriTraps on top of each other, still keeping the reflective sides facing into the room. The frequency response got worse but only slightly, while the RT60 above 100Hz smoothed out considerably thanks to the increased surface area of the room’s corners covered. I'm concerned that I'm already down to reverb times of just 350ms at 10kHz with such little treatment in the room, it was already fairly low to begin with at 400ms without any treatments, I'd be interested to know how that compares to other untreated rooms?

1021618d1655218472-room-treatment-advice-help-interpreting-giks-published-lab-results-138cmfw-138cmrw-8x-gik-tritraps-stacked-reflective-side-out.jpg


1021639d1655219889-room-treatment-advice-help-interpreting-giks-published-lab-results-fr-8-reflective-tritraps-corner-cubes-vs-8-reflective-tritraps-corner-stacks.jpg


1021640d1655219889-room-treatment-advice-help-interpreting-giks-published-lab-results-rt60-8-reflective-tritraps-corner-cubes-vs-8-reflective-tritraps-corner-stacks.jpg


1021641d1655219891-room-treatment-advice-help-interpreting-giks-published-lab-results-waterfall-8-reflective-tritraps-corner-stacks.jpg
 
Quick O/T question: those who have Roger Waters' 'Amused To Death', is the distant dog barking at the very beginning of 'The Ballad of Bill Hubbard' supposed to come from the 4 o'clock or 3 o'clock direction in the soundfield? (4 o'clock being to the right and slightly behind the listening seat, 3 o'clock being to the right and in-line with the listening seat). When I stacked the TriTraps in the corners the barking moved from the former position to latter.
 
Where s the membrane traps going this time ?. Remember mine, strangely placed at 1st reflection point lol
 
Quick O/T question: those who have Roger Waters' 'Amused To Death', is the distant dog barking at the very beginning of 'The Ballad of Bill Hubbard' supposed to come from the 4 o'clock or 3 o'clock direction in the soundfield? (4 o'clock being to the right and slightly behind the listening seat, 3 o'clock being to the right and in-line with the listening seat). When I stacked the TriTraps in the corners the barking moved from the former position to latter.

There is literally no way the studio engineer made any such specification so the answer is "wherever you like it".
 
There is literally no way the studio engineer made any such specification

The dog is a QSound effect, so it could well have been. However, while some individual listeners perceived sound coming from the back, QSound themselves admitted as late as 1995 that they were - by design - only controlling the front half of the sound field: there was no 'rear' knob.
 
The dog is a QSound effect, so it could well have been. However, while some individual listeners perceived sound coming from the back, QSound themselves admitted as late as 1995 that they were - by design - only controlling the front half of the sound field: there was no 'rear' knob.

Thanks for the clarification. I retract a bit of my stridency. But I would be shocked if any company had a means to accurately position sounds behind the listener from a stereo loudspeaker system. To the best of my understanding, it depends entirely on spatial cues from the room.
 
42Hz Tuned Traps - Part 1 of 2 (I exceeded the maximum number of 20 images permitted per post! :D)

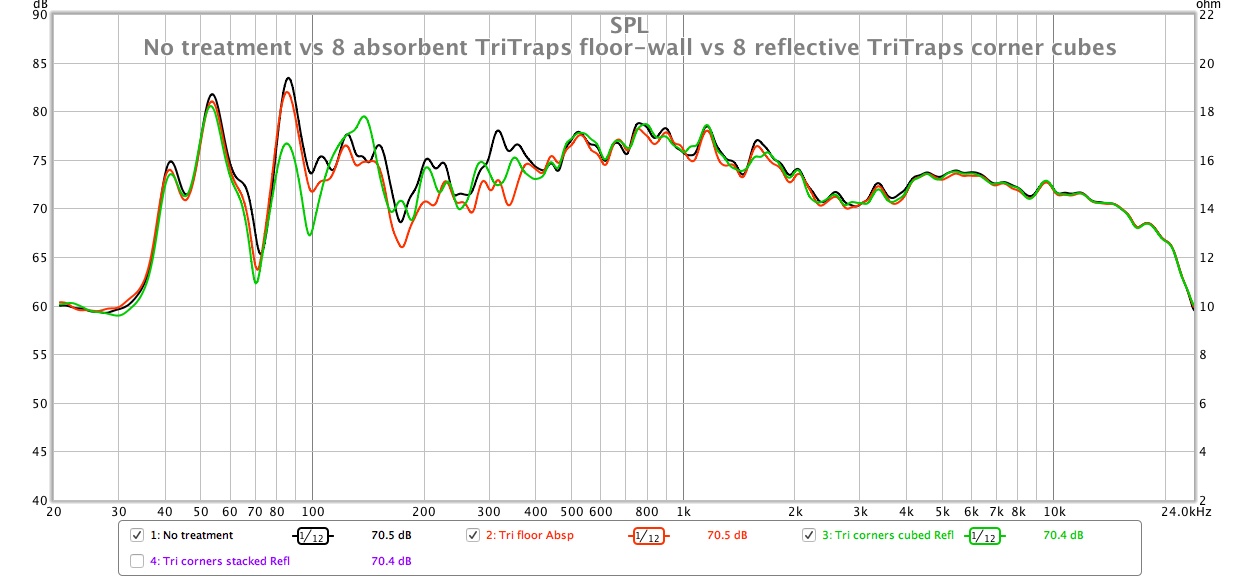
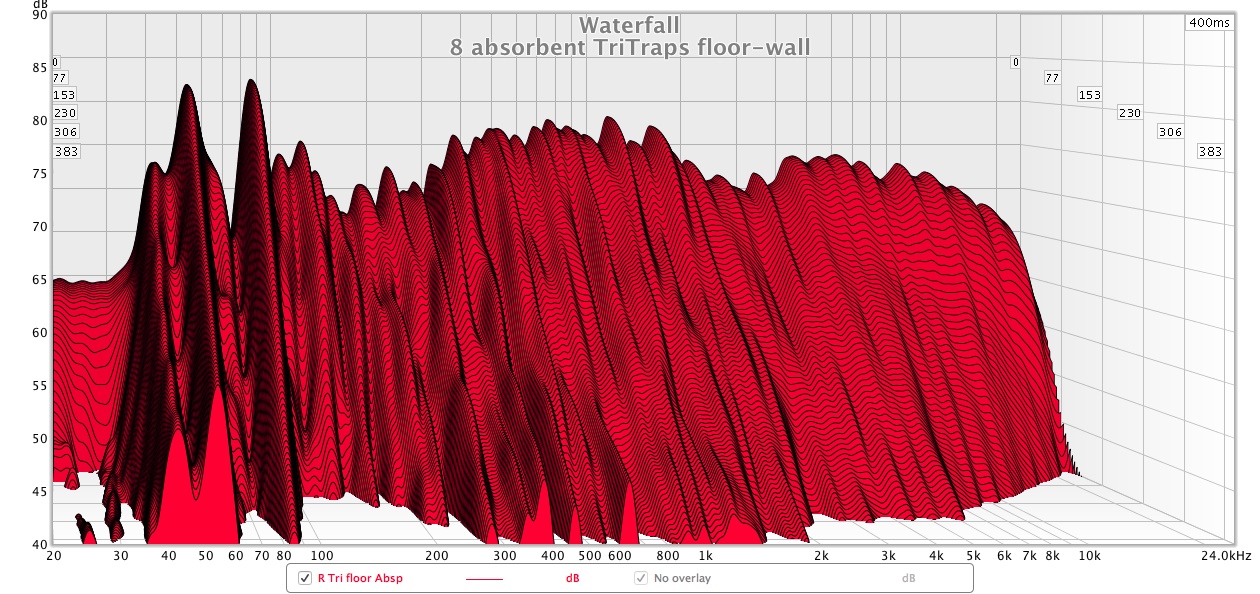
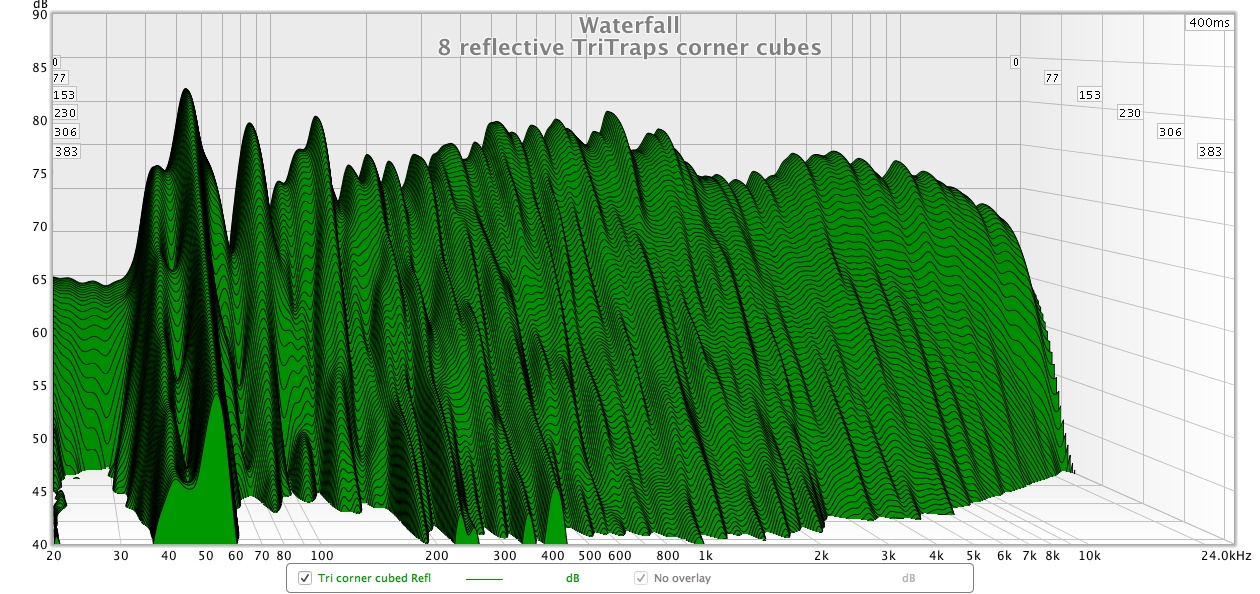
My experiences with GIK Scopus 42Hz tuned traps last year were a mixed bag. When I arranged them in a low 4x1 run or 2x2 square stack on the rear wall behind my listening seat they completely messed up my speakers’ response between 100Hz-200Hz. I assume this is because they are a solid structure and adding them to a room effectively changes the shape of the room and causes LF waves to reflect/diffract differently. I found the most benign place for them was straddling the rear corners behind my listening seat, there they were effective at reducing my 42Hz axial mode ringing without affecting 100Hz-200Hz.

Yesterday I re-introduced the Scopus to my room one at a time, trying them on the rear wall behind the listening seat and then on the front wall behind the speakers. The results were interesting. On the ‘new’ rear wall they didn’t completely screw up 100Hz-200Hz like before, but they did affect the left and right speakers differently in the lower mids. There are too many graphs to post to show how each speaker’s FR was affected by each Scopus configuration, so I’ve cherry-picked what I see are the best- and worst-measuring FRs:

attachment.php


attachment.php


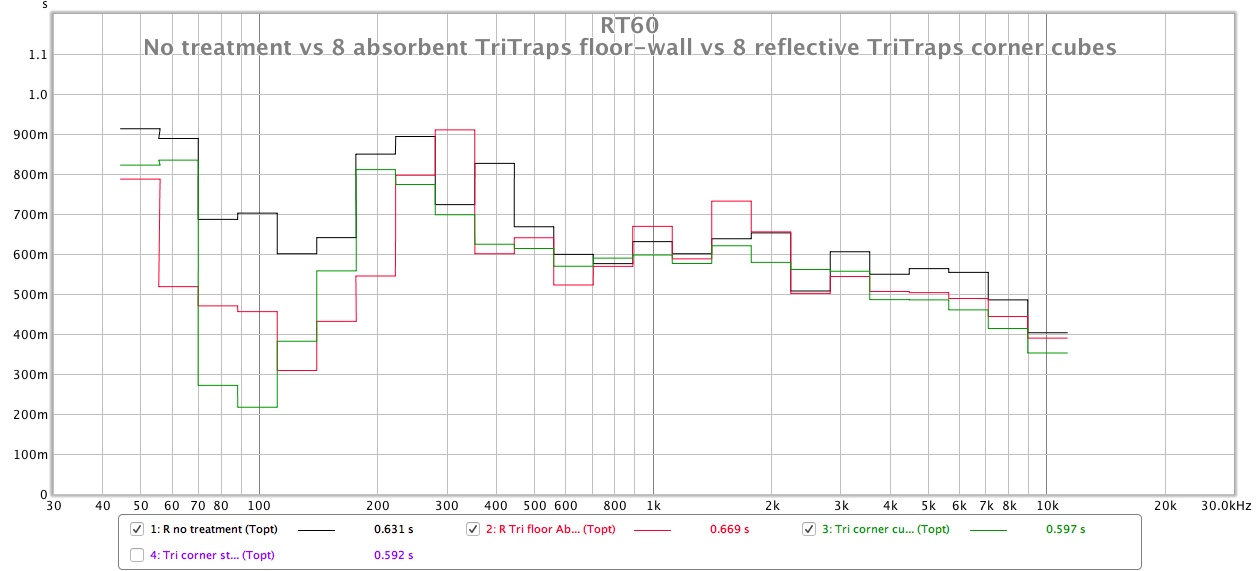
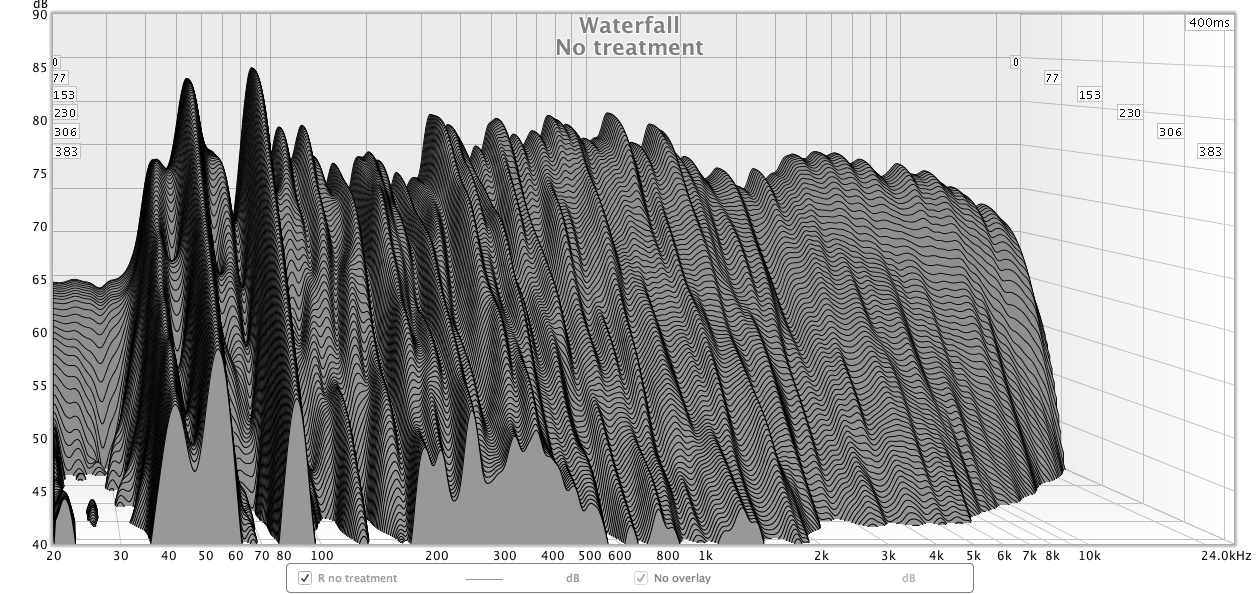
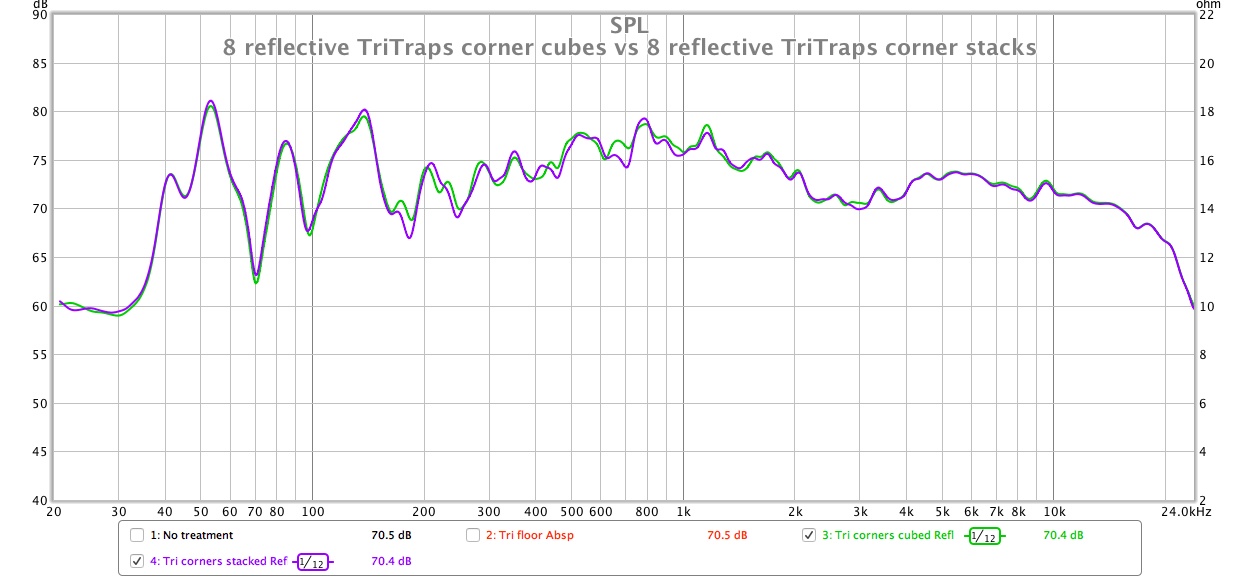
With regards to modal activity, strongest absorption at 42Hz was of course achieved with the maximum number of units possible. I’d caution against judging their effectiveness using only the waterfalls and RT60 due to the margin of error / variance in ringing at low frequencies from one measurement to the next. If you look at the FR graphs below of the averaged L&R spkr responses, the SPL at 42Hz is reduced the most when the units are placed behind the speakers on the front wall in two stacks of two. This appears to support the argument for treating bass as close to the source as possible, or perhaps it shows that my rear wall has less modal activity because of the door.

It goes without saying that these measurements are relevant only for when the speakers and listening position are both 138cm from the front and rear walls. The FR could change completely when I move the speakers closer to the front wall, but that’s an experiment for another day!

Keeping the Scopus on the front will prevent me from positioning my speakers close to the wall, so if I do decide to move my speakers the Scopus will likely need to go on the rear wall. However, having a square stack of 4 Scopus on the rear wall causes the early reflection to arrive 2ms sooner (6ms vs 8ms at the moment with the listening position 138cm from the rear wall) so would need to be treated with either absorption or diffusion.

My original plan was to put Q7D diffusors in the middle of the back wall. I could put these in front of the Scopus, but that means the diffusors will be 25cm closer to my listening seat and will make the minimum recommended listening distance harder to achieve. A better option would perhaps be to put two Scopus low down in the middle of the rear wall and the other two on the front wall (one unit under each corner trap). This would then allow me to stack the Q7Ds on top of the Scopus on the rear wall. Looks like I’ll be running lots more measurements to find out what's best!


attachment.php


attachment.php


attachment.php


attachment.php


attachment.php


attachment.php


attachment.php


attachment.php


attachment.php


attachment.php


attachment.php


attachment.php


attachment.php


attachment.php


attachment.php


attachment.php


attachment.php
 
Last edited:
I'm curious why you point the mic forwards at 0 degrees and not at 45 or even 90 degrees. By doing so, you de-emphasize rear-wall reflections. I was under the impression (but happy to be corrected) that 0 degrees is more suitable for measuring on-axis speaker response, but 45 or 90 is better for measuring the room.
 
I'm curious why you point the mic forwards at 0 degrees and not at 45 or even 90 degrees. By doing so, you de-emphasize rear-wall reflections. I was under the impression (but happy to be corrected) that 0 degrees is more suitable for measuring on-axis speaker response, but 45 or 90 is better for measuring the room.
I don't know for sure, but I thought pointing the mic forwards was more appropriate for 2-channel systems and pointing the mic upwards was more appropriate for surround sound systems. Pointing it upwards would give equal emphasis to front, rear and side reflections but stronger emphasis to ceiling reflections. I'm not sure how much this matters in practice though as the mic has an omnidirectional response so I suspect there is very little difference in the strength of reflections it picks up apart from in the high frequencies.

PS - Doesn't the shape of the human pinnae de-emphasise rear reflections anyway? ;)
There are two different calibration files supplied with the UMIK M1 microphone. One is for using the microphone vertically, in which case you don’t need to change orientation when measuring L and R speakers, and one for using the microphone pointing at the speaker, in which case you obviously need to move it. Which calibration file are you using?

see here: https://www.minidsp.com/applications/acoustic-measurements/umik-1-setup-with-rew
 
I don't know for sure, but I thought pointing the mic forwards was more appropriate for 2-channel systems and pointing the mic upwards was more appropriate for surround sound systems. Pointing it upwards would give equal emphasis to front, rear and side reflections but stronger emphasis to ceiling reflections. I'm not sure how much this matters in practice though as the mic has an omnidirectional response so I suspect there is very little difference in the strength of reflections it picks up apart from in the high frequencies.

PS - Doesn't the shape of the human pinnae de-emphasise rear reflections anyway? ;)

You're probably right. Any liow frequency modes should be picked up regardless of the orientation.

I know you've been putting in a ton of work on this and that you wouldn't want to move the mic during the process, but perhaps when you're ready to wrap up it might be interesting to compare the effect of mic orientation for curiosity's sake.
 
There are two different calibration files supplied with the UMIK M1 microphone. One is for using the microphone vertically, in which case you don’t need to change orientation when measuring L and R speakers, and one for using the microphone pointing at the speaker, in which case you obviously need to move it. Which calibration file are you using?

see here: https://www.minidsp.com/applications/acoustic-measurements/umik-1-setup-with-rew
Why would you need to move the mic when measuring the L and R speakers when the mic is pointing forwards but not when it's pointing upwards? I don't move it, I keep it pointing straight ahead between the speakers. Have I been doing it wrong for the past 9 years?!

I'm using the on-axis calibration file, which is the correct one to use when pointing the mic forwards.
 
I'm curious why you point the mic forwards at 0 degrees and not at 45 or even 90 degrees. By doing so, you de-emphasize rear-wall reflections. I was under the impression (but happy to be corrected) that 0 degrees is more suitable for measuring on-axis speaker response, but 45 or 90 is better for measuring the room.

That’s an interesting point and one I’ve thought about myself. I certainly came to the conclusion that if trying to do anything technical, e.g. aligning Tannoy compression drivers, adjusting tweeter level on 149s etc then you obviously need to aim it at the speaker in a very, very precise way as even a couple of mm difference in position will alter the reading.

For room response really one is looking for the opposite and the rear-wall is a huge factor in most typical (i.e. small) rooms. That said I’d be reluctant to point it at the ceiling, especially in a properly damped room (i.e. one with a good carpet & underlay) as you’ll likely exaggerate that reflection, important though it is. As such I think I’d be inclined to point the mic straight down at the carpet at ear height. The home cinema crowd seem to point it up at the ceiling, though so many I’ve seen using REW on YouTube are in awfully reflective rooms with bare-wood floors etc it’s going to sound like a spring reverb wherever its pointed!
 
Have I been doing it wrong for the past 9 years?!

By the sound of it, yes. Read the set up instructions for the mic. Here's a relevant extract:

"Go to the UMIK-1 or UMIK-2 page and enter your microphone's serial number. It is in the form xxx-yyyy and labeled on the microphone. Two calibration files are downloaded:

  1. The regular or "on axis" calibration file has a name that is the same as the serial number e.g. "8100002.txt". Use this file when pointing the microphone towards the speakers.

  2. The 90-degree calibration file has "_90deg" in the name e.g. "8100002_90deg.txt." Use this file when pointing the microphone towards the ceiling.
The calibration files ensure that your microphone is as accurate as possible. Each UMIK has its own unique calibration files, which is why the serial number must be entered."

I am not an expert, but that seems pretty clear. No doubt there is more information online.
 
I don't know for sure, but I thought pointing the mic forwards was more appropriate for 2-channel systems and pointing the mic upwards was more appropriate for surround sound systems. Pointing it upwards would give equal emphasis to front, rear and side reflections but stronger emphasis to ceiling reflections. I'm not sure how much this matters in practice though as the mic has an omnidirectional response so I suspect there is very little difference in the strength of reflections it picks up apart from in the high frequencies.

PS - Doesn't the shape of the human pinnae de-emphasise rear reflections anyway? ;)
When I started measuring my room I asked myself the "which microphone orientation?" question. On-line I could find no good consensus. I did find a site that compared horizontal and vertical but the test conclusion was rather inconclusive.

Sometimes specific statements are made (e.g. as you write above, or as made in the Dirac manual) but they may get made just to settle the issue in a perfectly satisfactory way when it may not really matter that much in practice. I suspect consistency in all testing aspects is more important than microphone orientation - but I am open to being corrected.

BTW bravo for the thread. I find it fascinating.
 
By the sound of it, yes. Read the set up instructions for the mic. Here's a relevant extract:

"Go to the UMIK-1 or UMIK-2 page and enter your microphone's serial number. It is in the form xxx-yyyy and labeled on the microphone. Two calibration files are downloaded:

  1. The regular or "on axis" calibration file has a name that is the same as the serial number e.g. "8100002.txt". Use this file when pointing the microphone towards the speakers.

  2. The 90-degree calibration file has "_90deg" in the name e.g. "8100002_90deg.txt." Use this file when pointing the microphone towards the ceiling.
The calibration files ensure that your microphone is as accurate as possible. Each UMIK has its own unique calibration files, which is why the serial number must be entered."

I am not an expert, but that seems pretty clear. No doubt there is more information online.

As I stated in my previous post, I am using the correct calibration file for my mic and the axis it is pointing in. I very rarely use the off-axis cal. file because I vary rarely point the mic towards the ceiling. The off-axis cal. file boosts the treble to compensate for the roll-off that occurs when pointing the tip of the mic away from the speaker.

My question was why I need to move the mic when measuring the L and R speakers, which your previous post seemed to imply (maybe I misinterpreted what you wrote?):

and one for using the microphone pointing at the speaker, in which case you obviously need to move it.
 
My question was why I need to move the mic when measuring the L and R speakers, which your previous post seemed to imply (maybe I misinterpreted what you wrote?):

I haven’t followed the detail of all your posts. Here is what UMIK say. Are you following their recommendations?


5.1 FREE-FIELD MEASUREMENT

Free-field measurements are commonly used for measuring and designing speakers. For this type of measurement, always point the microphone directly at the sound source and use the normal (0-degree) calibration file.

For this purpose, the sound received by the microphone would ideally be free of any reflections – that is, only the direct sound from the speaker being measured without any reflections of influence from the room. In practice, free-field measurements of a speaker often have to be done in a room, so various techniques are used to remove or mitigate the effect of the room. For more information, see our app note Loudspeaker measurement with UMIK-1 and REW.

5.2 IN-ROOM MEASUREMENT FOR SPEAKERS

In-room measurements are used to measure the combined effect of a speaker (or subwoofer) and the room in which it’s located. The sound measured by the microphone consists of the direct sound from the speaker and the sound caused in the room by reflections and resonance (modes).

For measurements of this kind, the microphone is typically placed at and around the center of the listening area. If the goal is to capture the signal from the speaker most accurately with the effects of the room added, point the microphone towards the speaker and use the normal (0 degree) calibration file.

If the goal is to try and capture as much of the room as possible, point the microphone towards the ceiling and use the 90-degree calibration file. If there are multiple speakers, such as in a multichannel/surround system, then always use the 90-degree orientation to ensure consistent measurement.

https://manuals.plus/m/a12551a697caff78f0ee7b09b899ae8f99463fbc5962634641bba4f60e60848b_optim.pdf


advertisement


Back
Top