advertisement


Radford STA15 Restoration

I have pictures of the wiring coming out of ears. My approach is going to be is to check each wire to see if it is "green" and replace if necessary one at a time. I'm not going to say remove all the wires and then re-wire, confusion and mis-wiring hides there :)

I have ten colour 22AWG and 24AWG wires on their way.

The "green" appears to be leaching out of the wire's plastic sheaf, and in a couple of places it is a liquid dripping on to other wires, green and goopy.

For me the STA15 is a step up in wiring complexity from the ST20. I am really enjoying it. The more I read the more I'm looking forward to enjoying music through it. Though the ST20 will take some beating now the NOS caps and new valves are bedding in. My new miniDSP Flex is wonderful too...

And of course the big question is which way around does the cover go, Radford label to the input output panel, or the other way around...

Gonna need a new label too...
 
You mentioned drilling rivets out earlier. Small 'button cap' head machine screws may be a sympathetic replacement, although not period correct. A dome head slotted machine screw would be more period accurate.
 
And of course the big question is which way around does the cover go, Radford label to the input output panel, or the other way around...
After many years of having the inputs and outputs at the front I decided that was it was ludicrous and just part of the ingrained ‘show us yer knobs’ hifi mentality. Why have all those leads snaking round to the front unnecessarily? So I have the serial no. plate and the Radford badge facing out, with (downside) the mains switch at the back. Of course, it was never designed to be on show as a trophy amp anyway, and the SC22 was supposed to do the switching duties.
 
I managed to put a couple of hours in in the STA15 this weekend.

I realised early on in stripping the amp down that I would have to rewire it. Quite daunting as I've never stripped anything apart that was as valuable as this Radford, but I was finding the wiring around the valves quite brittle in places and plenty of green goo leaking out of the wire's PVC coating, really quite disgusting... The wires to the choke where truly disgusting, like dipped in oil.
PXL_20220521_181201293 by Garf Arf, on Flickr
Where it had coated the wires the wires were very sticky and covered in grime. They had to go...

Heaters and PSU wiring in progress.

PXL_20220521_121715663 by Garf Arf, on Flickr

Output transformers replumbed with new PSU cap too.

PXL_20220522_090330976 by Garf Arf, on Flickr

RHS PCB rebuilt, a couple of new parts.
PXL_20220519_164303560~2 by Garf Arf, on Flickr

And fitted, nearly ..it was a faff.
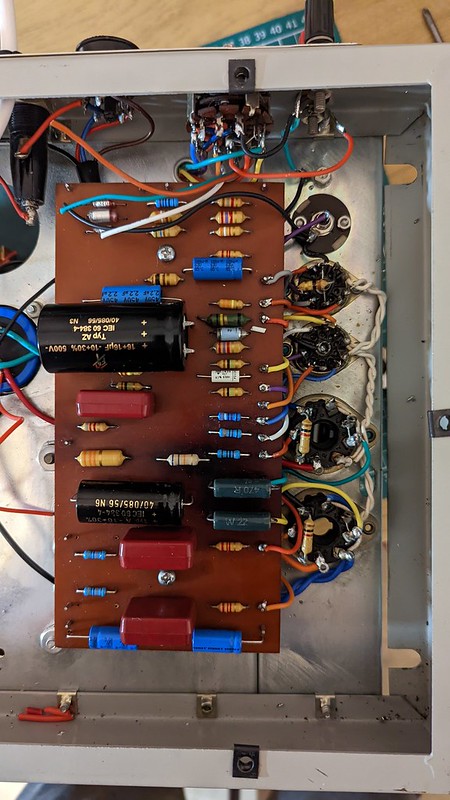
PXL_20220522_211831550~2 by Garf Arf, on Flickr

Power and earth to board still needs attaching.

The only bit of original wiring is the mains fuse, switch, voltage selector and the mains side of the PSU transformer.
 
You mentioned drilling rivets out earlier. Small 'button cap' head machine screws may be a sympathetic replacement, although not period correct. A dome head slotted machine screw would be more period accurate.
The amp has a curious mixture of slotted and crosshead screws. At the moment I've replaced the two rivets around the phono connectors with M3 cross head screws atm and they don't look out of place.
 
Last edited:
Very well done Garf.

I also had to replace quite a lot of wiring when I did my STA25. To make matters worse, a considerable amount of wiring was missing from mine, so I had nothing to copy.

So nice to see that you're keeping all the colour coding for the wiring original too.

Really nice job.
 
There's a rather good explanation of the cause of wire rot here:
https://www.effectrode.com/knowledge-base/echorec-rewiring-procedure/
Nasty, and terminal.
I really admire the patience of you guys!
That's interesting and fatal. Looks like I'll have to take the mains side wiring out, including the switch, fuse and transformer wiring.

And it has tested my patience at times.

I have all the original components in a bag just in case the next owner (will there be one?) Wants to swap them back. I think I'll bag all the original wiring up too, just in case someone wants to use it, errr no!
 
Last edited:
Thankfully it doesn’t seem to apply to vintage Leak. The wiring looms are beautiful and would be very challenging to recreate. The plastic coating has a low melt temperature, so you need to be very careful with the iron, but I’ve not seen any green ooze or other reactions or degradation with my Stereo 20 or either TL12 Plus. Not even the slightest hint.
 
Very well done Garf.

I also had to replace quite a lot of wiring when I did my STA25. To make matters worse, a considerable amount of wiring was missing from mine, so I had nothing to copy.

So nice to see that you're keeping all the colour coding for the wiring original too.

Really nice job.
Thank you Mike. :). I am missing some pink wire, had to substitute brown, but it does look good and colourful.

The heater wires are not the right colours, they are hidden. :)

I'm just hoping that I have wired it all up correctly.
 
Thankfully it doesn’t seem to apply to vintage Leak. The wiring looms are beautiful and would be very challenging to recreate. The plastic coating has a low melt temperature, so you need to be very careful with the iron, but I’ve not seen any green ooze or other reactions or degradation with my Stereo 20 or either TL12 Plus. Not even the slightest hint.

Alas I saw a few signs of green goo when the transformer shrouds were removed on my Stereo 20. Confined to the areas of wiring soldered to the impedence tap selection points. Hoping they last for a while longer yet before I have to think about replacing the wiring.
 
Alas I saw a few signs of green goo when the transformer shrouds were removed on my Stereo 20. Confined to the areas of wiring soldered to the impedence tap selection points. Hoping they last for a while longer yet before I have to think about replacing the wiring.

Thankfully I didn’t, though I only took the case off one output transformer. I’ve just rechecked my pictures now (on Flickr or my rebuild thread rather than spamming up this one). There was certainly a lot of grime and dirt as one would expect from something so old, e.g. the yellowed white wire in the transformer housing did largely clean up with some isopropyl, I suspect it may have picked up some varnish, but given these TL12 Plus have to be around 64 years old any decay is remarkably slow. I suspect the Leak wiring being single-core may help as there is less prospect of moisture wicking in under the coating.
 
I removed the few areas of the green goo as best I could with Isopropyl and a brush, and carefully used a scalpel blade to scrape any away from bare wiring. Hopefully OK for a while now.

Loving the work on this STA15! My favourite threads are almost solely these vintage audio restorations these days :)
 
I removed the few areas of the green goo as best I could with Isopropyl and a brush, and carefully used a scalpel blade to scrape any away from bare wiring. Hopefully OK for a while now.

It wouldn’t surprise me if this wasn’t largely storage related. These are all very old amps and may have been sitting unused in a cellar, loft or whatever for decades and in less than perfectly dry conditions. My guess is the green goo is a reaction from tarnishing wiring and the sleeve, copper certainly goes green when it corrodes. As such an amp that is dry and ideally in regular use may not deteriorate any further as being a hot-running thing it should dry out any cabling. It would be interesting to hear from someone with some chemistry knowledge to establish what exactly is happening, and also if it alters the electrical parameters at all if caught early.

Loving the work on this STA15! My favourite threads are almost solely these vintage audio restorations these days :)

Likewise. Finding the confidence to take a soldering iron to kit I really like and don’t want to harm in any way has been the big audio ‘game change’ for me over the past 20 years or so. It is 100% down to public domain information sharing and the help and generosity of others far more knowledgeable on the internet. It has totally changed the way I approach audio buying.
 
Yes, if there is no 'green goo' by now in other parts of the wiring, that should be fine. The article mentions something about stiffer sheathing not having the same problem. Just shows what changing the plastciser can cause....
 
All the wiring I'm doing in this STA15 is silicone coated. Hopefully it will last a few years.

I have to thank Al for his fabulous STA15 restoration a while ago, some very useful pictures and great advice. And of course Will for his informative website and other restorations that he has described on AoS (I think it was there). Without their guiding hands I wouldn't have contemplated restoring a Radford - I mean look at all the different colours of wires, it has to be complicated.

The vintage restoration stuff I read avidly. I must have read Tony's Leak restoration cover to cover at least four times and Al's STA15 restoration and pictures, well I've lost count.

One thing I don't know how to fix and I would appreciate some advice. The chrome "handles" are in great condition, a buff with a metal cleaner has really brought them up. However, both are twisted. How the original owner managed to get them twisted I have no idea, but I can't twist them back, certainly not with out a good vice bolted to a heavy work bench (neither of which I have). Is there a simple, easy way of untwisting these handles, or am I going to have to seek out a proper engineer?


advertisement


Back
Top