advertisement


Sansui AU-717 overhaul

booja30

pfm Member
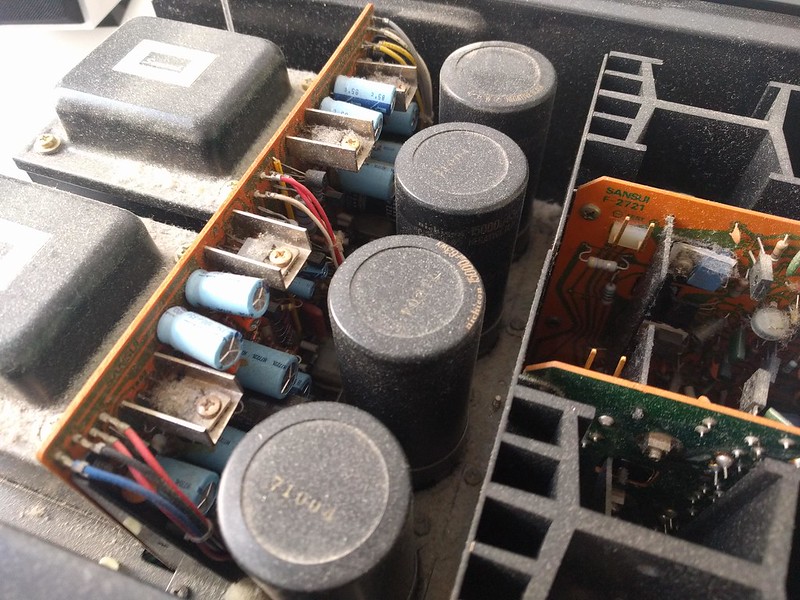
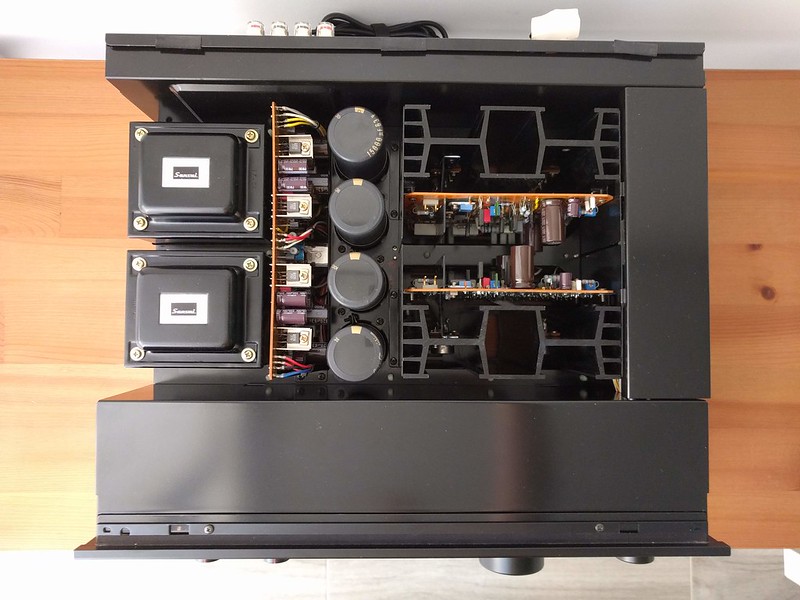
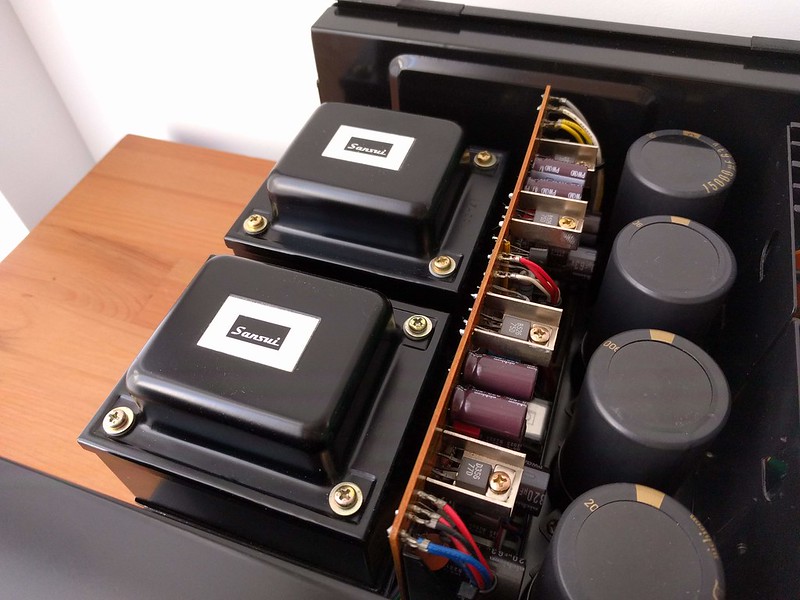
About 2 months ago I bought a beautiful but barely working Sansui AU-717 integrated. It took a long time to come out of protection mode, and the right channel would fluctuate between the set volume to nothing on its own. The controls were noisy, and the boards were covered in the infamous corrosive glue that Sansui used during that era. The biases and offsets was pretty far from the service manual specs. The 15000uF 63V reservoir caps weren't great -- one was measured just over 6000uF while the rest were closer to 9000-10000uF.

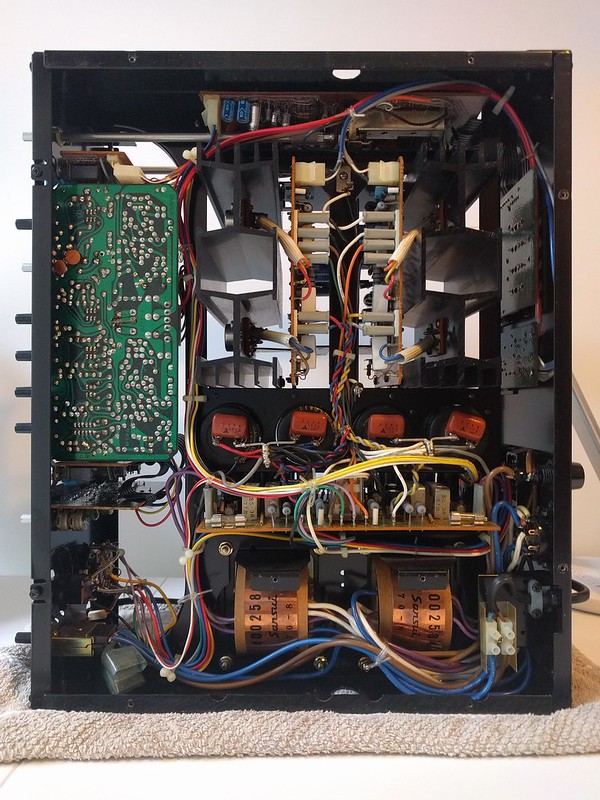
I took it apart, did some cleaning, took lots of photos and marked some wire positions. I removed all of the electrolytic caps, some film caps, some diodes, thermal fuses, trim pots, and a bunch of resistors that the glue had reached. Also, the speaker relay (delay and protection) was removed. It was clear where the glue was touching component leads -- it had turned bright red in those areas as opposed to the normal cloudy yellow. The affected component leads were dark and corroded. I used a pin vise and micro bits to clean out the rubbery glue that was still in some of the through holes. The entire back side of each PCB was covered in a thick, tacky, clear film of flux. Each board was scrubbed and washed with IPA several times until clean.

New parts went in easily, and I desoldered and straightened some components that were at odd angles and close to touching other parts (mostly transistors, caps, and vertically oriented resistors). I did more dust/grime cleaning as it went back together. All the switches and pots were flushed/cleaned with Servisol.

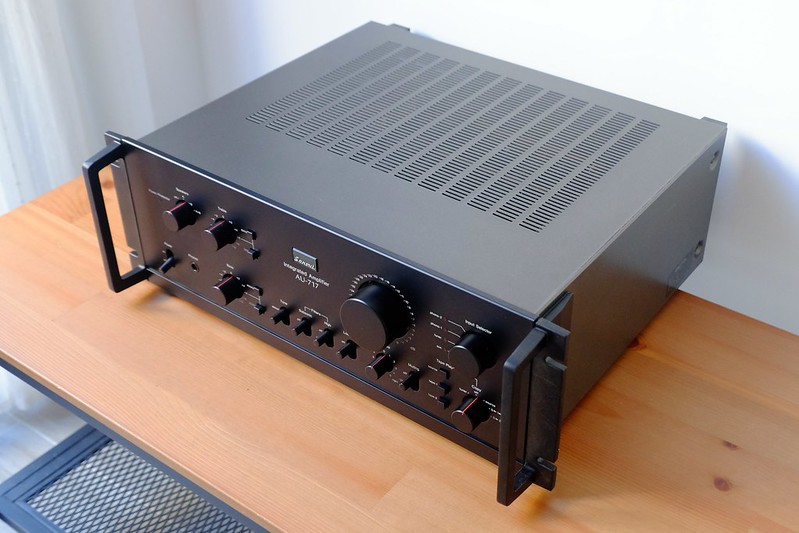
It now sounds excellent. Amazingly, while the carton wasn't original (it was for a TU-517), the original foam pieces contained never installed rack handles and rear bumpers. I don't have a rack, and don't really want to, but it does look pretty nifty with the handles installed.

43 years of dust and filth:
50632735543_fbaa27beda_c.jpg


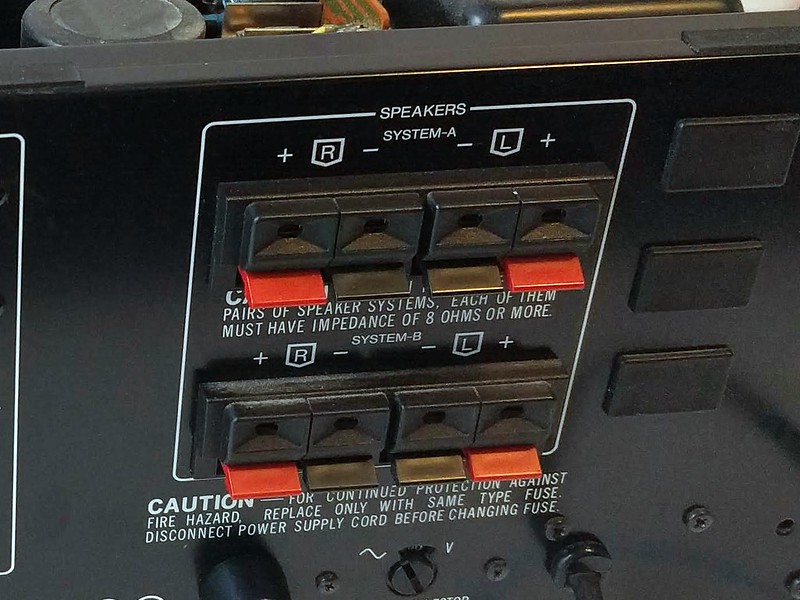
Old spring clip terminals (one broken):
50597391202_9d77337896_c.jpg


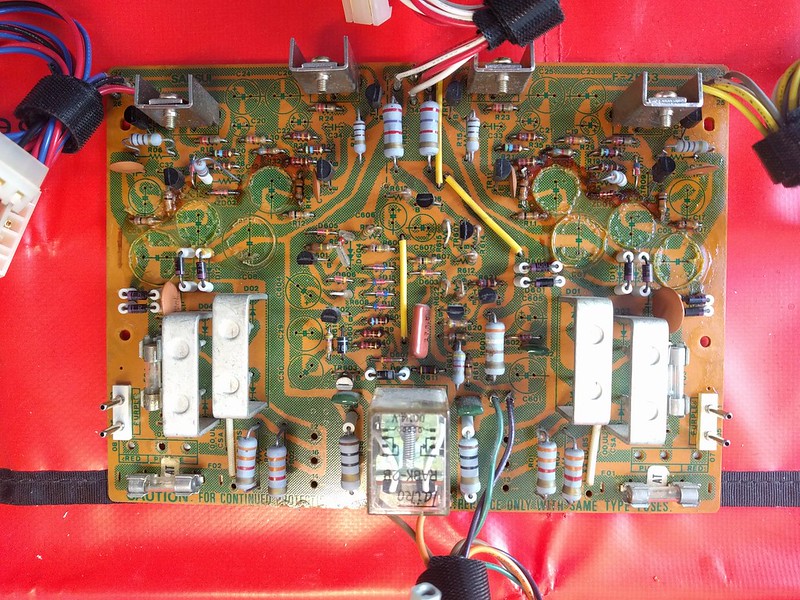
PSU board with caps removed, showing red glue where component leads were corroding:
50632741313_40f2161a48_c.jpg


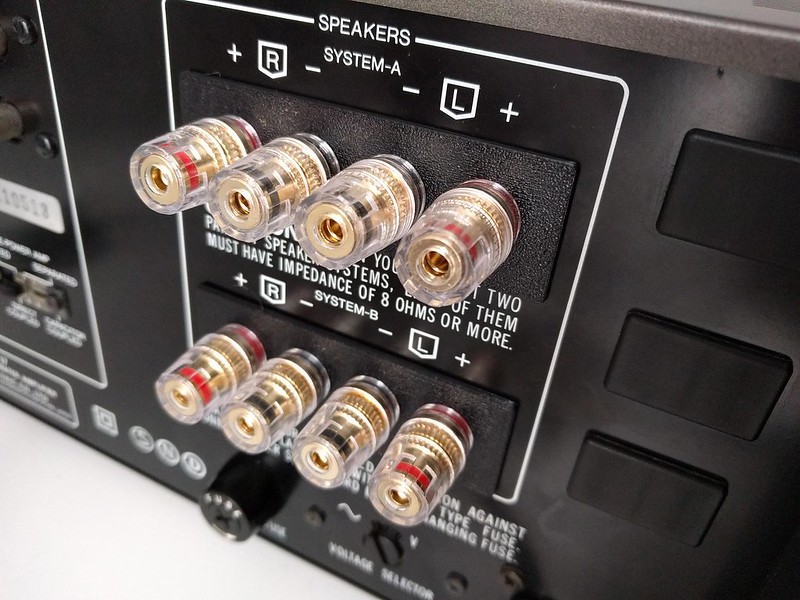
New binding posts with adapter plates I designed and 3D printed:
50596931661_5b2a3ab005_c.jpg


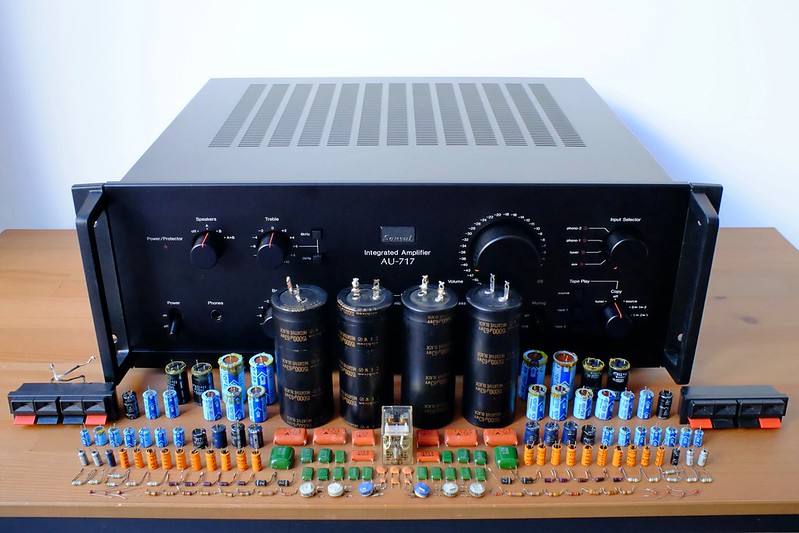
All the old parts out (lined up like the Ummagumma cover):
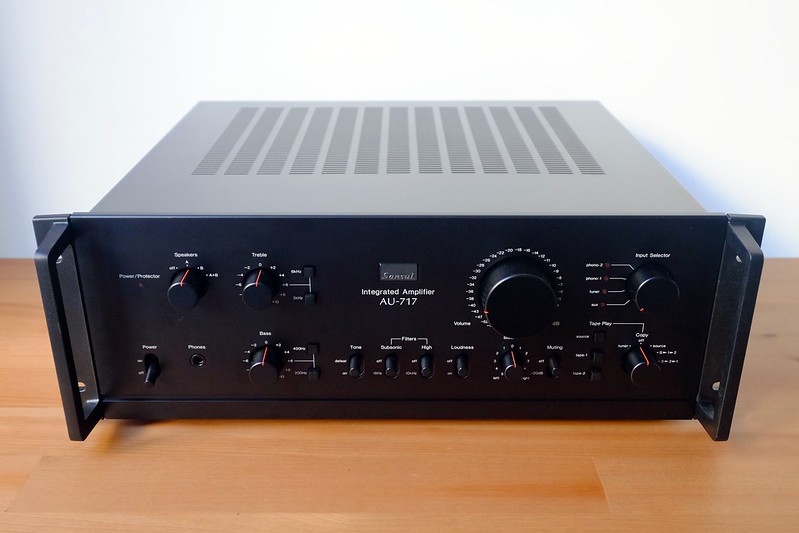
50632735153_a0aa757475_c.jpg


Result!:
50633605312_58aa51f8c3_c.jpg

50633515541_517bc8f071_c.jpg

50633606932_8d7141db4a_c.jpg

50632768098_49f24cf3b5_c.jpg
50633517666_7531f8feca_c.jpg


More photos here.
 
Last edited:
I’m not a fan of the Japs but this one is the exception to the rules.

Wonderful machine, upgraded with higher quality parts obviously and this really makes me wander if it’s worth it to buy new.....

It would take an Accuphase or a Luxman integrated to better that at more than 5 times the price obviously.

A few questions if I may :

The large reservoir capacitors, are they Nichicon KG Super Through ?

The brownish 105c caps on the boards, what brand and model are they ?

And personally, for the large resistors, I usually use these ones :

https://www.partsconnexion.com/media/pdfs/mills_MRA.pdf


Did you have to replace a few of them and if yes, what did you use ?

Oh, and the side handles are OUTSTANDING !
 
The large reservoir capacitors, are they Nichicon KG Super Through ?

The brownish 105c caps on the boards, what brand and model are they ?

And personally, for the large resistors, I usually use these ones :
https://www.partsconnexion.com/media/pdfs/mills_MRA.pdf

Did you have to replace a few of them and if yes, what did you use ?

Oh, and the side handles are OUTSTANDING !

The reservoir caps are LKG Nichicon Gold Tune (LKG1J153MKN).

The brownish caps are Nichicon PW.

The replacement resistors are KOA Speer. I didn't actually need to replace any large ones.

I totally agree about the handles. It was pretty amazing to come across a pair that had never been used. I plan to leave them on if only to protect the faceplate and knobs!

The box also had the original manual, warranty card, phono shorting plugs, and even a set of (junk by today's standards) Sansui RCA cables!
 
Last edited:
A funny thing happened after I took the parts photo (with the OCD arrangement). I noticed that of the six ceramic caps, two pairs matched each other, but two were slightly different sizes. Looking at the caps through a loupe (they're tiny!) confirmed that one pair didn't match in value (100pF and 47pF). It took me a while to track down the issue, and involved looking at my BOMs, photos, and finally looking at the PCBs. I found that on the equalizer board I had replaced the wrong cap on one channel. Fortunately, having not thrown out the old parts yet, I was able to move the new film cap to the correct position, and reinstall the cap that was accidentally removed. Even more fortunately, both part locations were the top of the board. Otherwise I would have been looking at an hour or more of dis/reassembly since the EQ board has lots of plugs, connects via shafts to knobs on the front panel, and has 4 large ribbon cables connecting to the phono in/out boards on the rear panel. Phew!
 
That is a beautiful piece of gear, and great job on the refurb. Love to see these old pieces keep rolling along!
 
At a glance I make it around 166 components, now that’s what I call a refurb! Beautiful amp though, always had a soft spot for the old Sansui amps.

This one looks particularly neat but I guess there’s additional boards under the black shielding covers.
 
At a glance I make it around 166 components, now that’s what I call a refurb! Beautiful amp though, always had a soft spot for the old Sansui amps.

This one looks particularly neat but I guess there’s additional boards under the black shielding covers.
Yep, only the PSU and amp boards are exposed. In the front there's the tone control board(s), and on the right side are the input/tape controls and phono stage. The back only has input/output boards and a board that couples/decouples the pre and amp for inserting an EQ (or miniDSP!).

I didn't manage to upload one with all the covers off, but the view from below gives a more honest impression of the complexity:

50633575747_de93c72689_c.jpg


But to be honest it's actually pretty well laid out and organized, and most boards use connectors and can be removed without desoldering. The PSU board is the exception!
 
Why the coloured paper over the phono inputs?
It's a (really faded) warning tag that says not to put the shorting plugs on one of the inputs. IIRC if you put it on one of the phono inputs it short/silence both.

It was there when I bought the amp (from a heir of the original owner). They're usually removed and thrown away, but I put it back on because it is so unusual. The amp also came with the original (never installed) rack handles, manual, warranty, and even an original Sansui interconnect!
 
@booja30 Just seen this brilliant and entertaining job- how does she sound after the re -build?:)
I actually don't have it hooked up in the main system yet because it's too deep for the TV shelf it's supposed to go in. I need to take the shelf apart and cut a hole in the back for all the cables to fit through. And as always I've got higher priority things going on, but hopefully it'll be hooked up again before it needs its next recap. ;)
 
I heard this Sansui integrated a few times and best description I can give is that it sounds like a pure class a amplifier without all the heat, it’s really that good.
 
Just a heads up -- I am considering selling this because we may need to relocate back to the US soon (family health issue). I have put an IC listing in the classifieds, but we're weighing options at the moment.


advertisement


Back
Top