advertisement


Thorens TD-124/II restoration / upgrade

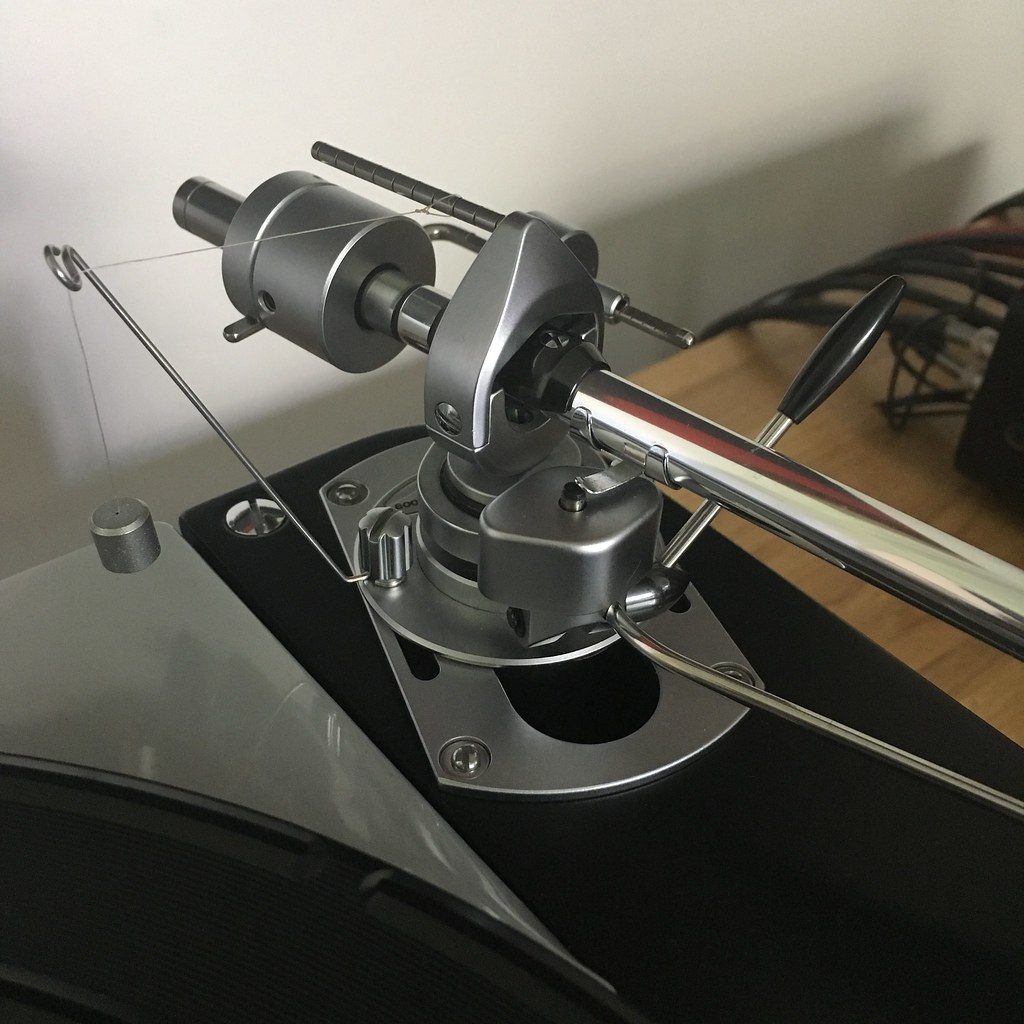
I bought a set of these AudioSilente sintered bronze motor bushings something over a year ago now, but until today hadn’t got around to fitting them due to quite exceptional laziness. They are, as ever, very nicely made and went in without any issue, though I have for the time being stuck with my little machine screws rather than use the supplied rivets as I don’t have a tool, plus I found a lazy way of doing the top bearing without desoldering all the motor leads (there is just enough slack!) and I’d have had to do it properly if I was going to start hitting things with hammers or however one rivets stuff. That aside it all went together fine and I don’t have much to report as it is too freshly done to really have any opinion. My 124 now has every bronze bushing replaced.

My feeling is the motor went together a bit easier than normal, i.e. it was marginally less of a faff to align the casing for quiet running. I suspect my original bushings were just a little worn/lose as, at this stage as unloaded motor spin-down speed is a little less, but it was exceptionally good/long previous at about 35 seconds or so. I think it is about 15-20 at present, but I’ll check that again when it has bedded in for a week or so under normal use. It is certainly running quietly and to speed at present.

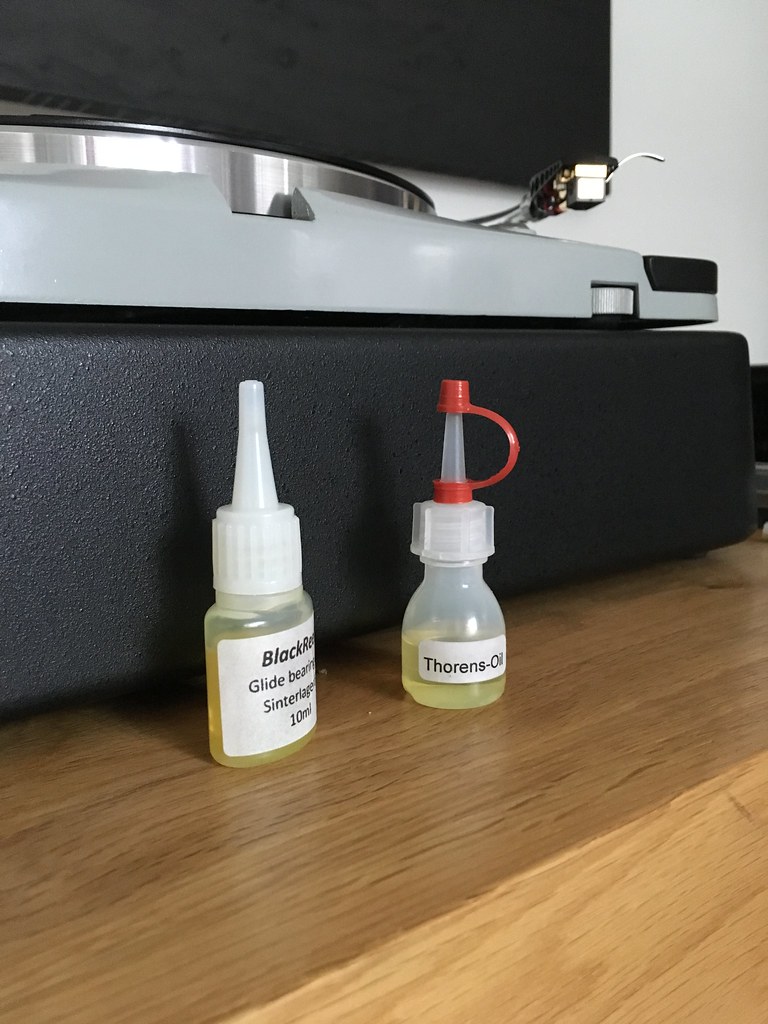
The main reason in writing this at this point is to mention that my top bearing was pretty much dry which really surprised me as I’d presure loaded the old bushings with oil and totally saturated the felts at the last total rebuild which was only a few years back. The bottom bearing was still very well lubed and they both started out the same. This is all the more surprising as I don’t actually play much vinyl these days (too many bargain CDs around!) so it is not from heavy usage. As such I suspect an annual lube is probably a good thing. I suspect this can be done with a syringe from the top just by removing the motor pulley rather than decapitating the whole deck. Something to bare in mind if you haven’t popped the motor open for a while anyway.
 
This site contains affiliate links for which pink fish media may be compensated.
Interesting write up, thanks. I have a set waiting to go in which I got last July so I'm glad it isn't just me that takes an age to do things, I've been trying to stump up courage to get on and refurb my 124 and the motor removal disassembly/removal/rebuild is the bit I am dreading most. Is it difficult? My one still has the original unmolested motor and I fear doing damage to the motor and/or chassis when taking a drill to it so reassurance that it is relatively straightforward would be appreciated.
 
Drilling the original rivets out is actually a lot easier than it sounds. I just went slowly with my vari-speed Bosch battery drill - the drill bit stays centred in the recess in the rivet and the rivet material is pretty soft so it doesn’t take too long. After you get to a certain depth the head just pops off and you can push the remaining part through. I actually managed to do the top ones without even desoldering the motor from the deck! Just be careful everything is really clean afterwards, i.e. ensure no swarf from the rivet can end up in the motor. I have to admit this is another reason I stuck with screws rather than try and fit the AudioSilente rivets, it just makes future motor servicing so much easier. I understand the theoretical advantage of rivets (more capable of coping with the thermal expansion of the motor which does run pretty hot), but my machine screws were still as tight as I remember leaving them after a few years so I think it is fine.
 
Many thanks for the reply and advice, Tony. Doesn't sound too bad as you describe it. One other thing I'm not sure of is when you actually have the motor disassembled and have replaced the bushings/added lubrication, and are preparing to put it all back together again, is the replacing of rivets/doing up of machine screws the very last stage so you do all motor alignment without those fixings in place?
 
Yes, replacing the bushings and replacing the rivets/using machine screws in their place is one step, reassembling the motor and repositioning it in the deck the next. Finally with the deck the right way up and the underside accessible (I stand it out of the plinth on four full baked bean cans which gives plenty of access), and four long bolts that hold the motor together fairly loose you can align the motor casing for quietest possible running. Take your time with this as real gains can be had at this stage, the difference between ‘right’, ‘kind of ok’ and ‘wrong’ are very significant. Also remember the old electric motor servicing technique of giving the spinning spindle a few (gentle) sideways taps with the handle of a screwdriver to help seat the bushings which are fairly tightly held but can rotate in their fittings. Finally gently tighten the bolts and prepare for the disappointment when the motor gets noisier. It will take a few alignment attempts before you get there and do the bolts up the way you’d tune a drum, i.e. work on opposing sides a a gentle nip tighter at a time listening all the while. This alignment step tends to take me quite a while and I’ve usually had the motor running for a good hour or two before I’m really happy I’ve nailed it. Finally replace the pulley and check all is good and then try it with the belt on.

PS I suspect this final step is easier with the new fresh bushings, I certainly felt I got to a very nice quietly running motor rather faster than usual, but I may just be getting better at it as this must be the forth time I’ve done it.
 
Many thanks for that great explanation, Tony, I've bookmarked the page for when I do the job so I can refer back to it.
 
Thanks for the great thread. I am rebuilding my E-50 motor and notice the coils are quite loose in their housing. Does anyone know about shimming the coils so they are held tightly in the case? If so, what did you use as material? Nylon tie strap material seems about the right thickness but I'm sort of concerned with the heat.

Also, if I want to change the voltage do I just remove that screw in the bakelite block and move it to the hole that more closely corresponds with my wall voltage?
The screw is currently in the 100-120 hole but my wall voltage is in the 120-125 range. I thought it might quiet the motor down.

Thanks in advance.
Dave
 
I’ve never removed the coils so can’t really comment about that, but if you do need to shim them you’ll need something that can take a fair bit of heat. You also need to be careful not to puncture the now probably quite fragile coating as you obviously don’t want any shorts. AudioSilente do make replacement coils which are reputedly very good indeed, though mine are still originals.

The voltage selector works as you describe. That in combination with the 50/60 Hz pulley is all that is required to migrate a TD-124. I’d certainly try it on the 120-150 setting as you’ll likely find you need a fair bit less eddy-brake to get correct pitch, and that certainly translates to less noise in the drive system.
 
This site contains affiliate links for which pink fish media may be compensated.
Thanks. When I assemble the motor, I'm going to try some teflon insulation in the corners. I'm hoping to decrease the noise. I'll post pictures as it is going together. Hopefully Wednesday as I'm waiting on some #3 nylocks.
 
Thanks for the great thread. I am rebuilding my E-50 motor and notice the coils are quite loose in their housing. Does anyone know about shimming the coils so they are held tightly in the case? If so, what did you use as material? Nylon tie strap material seems about the right thickness but I'm sort of concerned with the heat.

Also, if I want to change the voltage do I just remove that screw in the bakelite block and move it to the hole that more closely corresponds with my wall voltage?
The screw is currently in the 100-120 hole but my wall voltage is in the 120-125 range. I thought it might quiet the motor down.

Thanks in advance.
Dave

Martin Bastin's trick to secure the coils, which otherwise rattle around, is to set them carefully in silicone sealant (sparingly).
 
The voltage selector... in combination with the 50/60 Hz pulley is all that is required to migrate a TD-124.

Hi Tony,

At some point, I plan to give an idler deck a try and the TD-124 is quite the sweet-looking machine. If I understand you correctly, it appears that it's relatively easy to change over a Euro/UK deck to USA specs. Is this correct? (If so, I'll start keeping my eyes peeled.)

Thanks!
Joe
 
At some point, I plan to give an idler deck a try and the TD-124 is quite the sweet-looking machine. If I understand you correctly, it appears that it's relatively easy to change over a Euro/UK deck to USA specs. Is this correct? (If so, I'll start keeping my eyes peeled.)

Yes, that is correct. IIRC some 124s exist in the US market that don’t have a voltage selector, but all others have one. All have the dual motor pulley which can be fliped over between 50Hz and 60Hz. It is just a matter of setting the voltage tap and using the motor pulley the right way up. Yet another area the TD-124 just nails the user experience, it is an amazingly well designed deck with every imaginable feature present and correct; all four speeds, built-in strobe/fine pitch adjust, clutch, pop-up ‘dinked’ 45 adapter, spirit level, level adjustable from above, arm-board removable from above (you can swap arms in minutes), suitable for both 9” & 12” arms, international voltage compensation etc etc. Makes just about every other turntable look part finished!
 
43951816345_052e958cc8_b.jpg


When looking through one of my 3009 boxes recently I realised I had some of the hard-mounting washers that can be used to replace the four rubber grommets. I’ve toyed with trying this for years as I know most folk consider it an improvement, and realising I had the parts all along left no excuse not to!

Not a night and day difference, but it does seem to clean/tighten the bass a little and give a rather crisper mid-band, i.e. a little less of the rather warm and recessed 3009 character, though without adding obvious brightness or glare, which is a good thing. In my system it is a win for sure as the turntable was a little over-warm and needed a bit more in the presence area, and this goes some way to address it. Worth a go if you have an old SME. The rubber grommets were SME’s attempt at reducing rumble breakthrough, though I can’t notice any difference. My deck remains noisier than a modern belt drive deck, as it would being a vintage idler deck in a lightweight plinth, but it is not in any way intrusive and doesn’t seem any higher or lower in level than it was previously.

PS I ended up stripping and rebuilding the motor yet again yesterday as I wasn’t entirely convinced it had stayed set since the last rebuild. I was right, the top bushing and felt reservoirs were dry despite being flooded in oil 6 months ago. I was using Schopper oil, which I’ve always suspected was a bit too thin, so I’ve binned that and rebuilt it with some oil that came with a rebuild kit for my Akai open reel recorder. It is designed for sintered bearings so will be safe and is very slightly more viscous. I’ll be interested to see if it stays around for longer (I sincerely hope it does!). I vacuum-loaded the oil into the sintered bushings using a syringe plus absolutely flooded new felt reservoirs with oil, so there really is plenty in there (as there was before). After the rebuild the deck is no longer doing the ‘start fast and slowing down after an hour or so’ thing, it seems to hit pitch and stay there, though the motor spin-down is far faster than it was with the original tired Thorens bushings. I was getting about 25 seconds, now about 10. I assume due to tighter tolerances and a slightly thicker oil. It is running quietly.
 
Martin Bastin does not have a web presence, nor e-mail.

Over the years I have read many references to the excellent work performed by Dr? Martin Bastin, in earlier years it was always with reference to Garrard units, but I notice there are several references within this thread relating to his involvement with TD124's.
I have a TD124-II which I would like 'inspected' with a view to overhauling as necessary. I was seriously considering sending it to Schopper, however, given the difficulty of sending it to Switzerland, and if I have drawn the correct conclusion from reading this thread, the slightly less than expected outcome, I think I would prefer to have the work undertaken elsewhere, preferably in the U.K.
Unfortunately, as from previous references to his work, and from reading the above quote from "Shuggie", it would appear that contacting him may well be beyond the ability of a mere mortal, but I would like to try.
Therefore, might I have the temerity to ask if there is a 'postal' address to which I may send an enquiry?

Regards

Mike Kelshaw
 
re: Dr. Martin Bastin. The only info I have on him, apart from customer testimony is from the book "Swiss Precision" by Joachim Bung. In the book he is said to be located in Ludlow, west of Birmingham, UK. Perhaps he is best known for his "Maxplank" plinths for vintage idlers from Garrard and Thorens. I wonder if he is listed in the Ludlow telephone directory?

JB_TD124IIKopie.jpg

Above. A TD124 mkII in a Bastin "Maxplank" plinth. I've sent an email to one individual that has had work done by the good doctor. Perhaps he will reply to this thread.

-Steve
 
IIRC Dr. Bastin, at least sometimes, did the same trick as JC Verdier with the 124 in that he couples the motor to the plinth itself so it is not in contact with the 124’s metal chassis at all, i.e. no rubber grommets etc. By saying that the above picture doesn’t look like that is the case, as in that situation you’d use the rubber mushrooms between the deck’s chassis and the plinth/motor as isolation. I’m sure this approach would radically drop the noise-floor. It makes a lot of sense, though it too much of a ‘tweak’ for me, my aim has only ever been to restore and enjoy it for what it is.
 
IIRC Dr. Bastin, at least sometimes, did the same trick as JC Verdier with the 124 in that he couples the motor to the plinth itself so it is not in contact with the 124’s metal chassis at all, i.e. no rubber grommets etc. By saying that the above picture doesn’t look like that is the case, as in that situation you’d use the rubber mushrooms between the deck’s chassis and the plinth/motor as isolation. I’m sure this approach would radically drop the noise-floor. It makes a lot of sense, though it too much of a ‘tweak’ for me, my aim has only ever been to restore and enjoy it for what it is.

Actually that rigs owner is Joachim Bung (author of that book)and he's documented the work done on it. Refurbish TD124 by Schopper, plinth by Bastin and that armboard is from a firm in Germany. The board looks like it's tight to the plinth as does the chassis. But I'm not sure what he's got under the adjusters.

It is an interesting idea to separate motor from chassis. (not done to rig in photo)To implement it I'd think there would be a need for greater precision in locating both chassis and motor onto the plinth as opposed to just locating the adjuster studs/mushrooms to the plinth as is normally done. It's possible with good precision work. I've never thought to try that.

-Steve
 
I’m not sure that separating the TD-124 motor from the chassis is a good thing to do except for someone prepared to tinker and adjust ad infinitum. Hanze HiFi motor springs do a great job of decoupling the E50 motor while keeping it in place and with those, motor noise is very low indeed - far lower than with original rubber mounts. Much more noise is generated in the TD-124 by the idler wheel/stepped pulley interface, which takes care and more than a little patience to get as low as practicable.

Martin Bastin refurbished my E50 motor to fine effect, but for general TD-124 work I get the impression that Jaap Pees at Hanze HiFi is now the best man to go to. Hanze’s prices are broadly sensible for the quality of work.
 
Tony,
Studer and Nagra recommend Isoflex PDP_65 oil for sintered bronze bearings in their R2R players
Its horrendously expensive but a little goes a long way, its available from revox online shop.
https://www.revox-online-shop.com/z...sigkeiten/sinterlageroel-r0003?number=R0003.1

http://yairerez.co.il/wp-content/uploads/2015/08/ISOFLEX-PDP-series.pdf
I still drool every time I see a picture of a TD-124 :cool:
Alan

Thanks for that, and its a veritable bargain compared to Schopper oil, which is about £20 for the same amount IIRC!

How is this stuff with heat? The reason I’ve decided to stop using the Schopper oil is the speed in which it vacated the top motor bushing. I last fully rebuilt this deck only 6 months ago with the new Audio Silente bushings and I’d absolutely flooded them and the felt reservoir washers with the Schopper oil. Despite comparatively little use (I play way more CDs than vinyl, plus split my time between two systems, one being CD only) I was shocked to find the upper bearing and its felt reservoir pretty much dry. The bottom bearing was still acceptably lubricated, but it had either fallen out or evaporated from the top one. The motor rotor had no sign of oil on it so it doesn’t look much like the former (i.e just dropping out downwards), so my suspicion is that it evaporated due to heat. A motor rebuild should last years.

31072403428_d36ff8bd8c_b.jpg


This is the belt, pinch-roller, oil kit I got for my Akai 4000DB, though there is no detail on the oil beyond it obviously being for sinter bearings (link). The oil, branded ‘BlackRed’ looks a little yellower than the bottle in your picture and is certainly a bit more viscous than the very light Schopper oil. This has played to my advantage as it means I need a fair bit less eddie-current brake for the 124 to run to speed (I live in a high voltage area and a lot of my long-running issues with this deck have been needing the brake, an inevitable source of vibration, pretty much on full!). I’m working on the assumption this oil is safe and won’t damage anything, so I’ll see where things are in 6 months to a year’s time and then maybe think about another oil change. I want ti find something that stays done!
 
This site contains affiliate links for which pink fish media may be compensated.


advertisement


Back
Top