advertisement


DIY Hicap w Mr Tibbs earthing mod?

Lokidtc99

What does this button do...?
Hi all,

Apologies for the noobie question, but I'm planning a DIY hicap build for my NAC202 but with Sjostrom's SSR01 superregs. I'd also like to incorporate Mr Tibbs' earthing mod, but I don't understand exactly how I'm supposed do that.

I understand that it's about getting rid of the earthing bar on the caps in the Hicap, but it's not clear exactly what changes I'm supposed to make to which cables/sockets/pins to do this?

Any chance someone can explain in detail??

PS I've already built and am using a Les Wolstenholme NAPSC clone ;0)

Thanks
David
 
Seems we are on a similar project! Mine only being a little lower spec ;)
Im planning on `Mr Tibbs Mod`ing my Nac92.

Medium Cap PSU beginings
12415315.1a40d98c.1024.jpg


Transformer spec
12415318.c88328ac.1024.jpg


My work rate rivals most glaciers as you can see by the date I had the transformers wound (Thank you Terry!)

There is a little more involved than first look. You dont really get rid of the Bus bar inside the PSU, only split it to create 2 PSU`s.
Then you have to get serious inside your PreAmp. (Im not 100% on your Pre) It will involve cutting tracks to separate the power feed to the switching circuits(buttons and naim logo) and the PreAmp circuits inside your expensive box!
You then have to figure a way to feed the 2 24v(+) into your preamp. I will ignore the Din plugs in mine and run 4 1.5mm cables out of my 92 into a Speakon connector and then the PSU itself.
Luck would have it that theres a ready and waiting heatsink inside the 92Pre to attach my TeddyRegs. I just need to sort out where to cut the tracks and feed the new power lines to the PCB.

Here on PFM there are other people with ALOT more knowledge than me on the mods we are about to dabble in! (PLEASE FEEL FREE TO CHIME IN!! :) )
 
Hi juz. Good to hear someone's doing something similar to me!

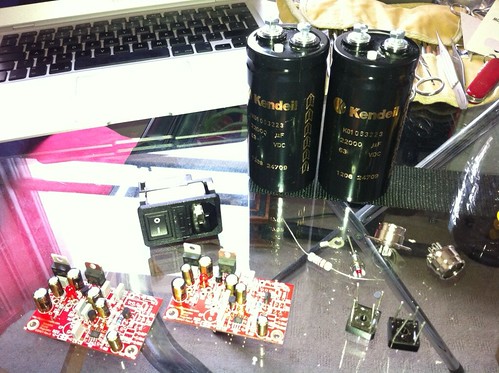
Here are my parts waiting to be wired together:
6869246266_d89eb83954.jpg


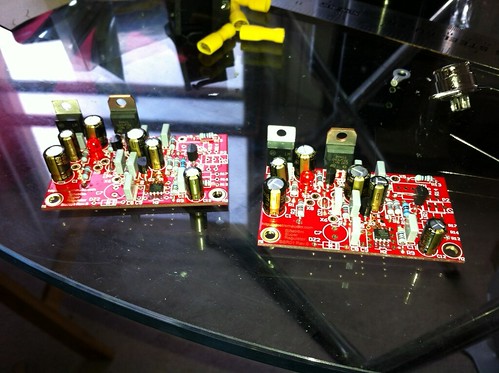
And a closer pick of the superregs:
6869246486_42098bcf62.jpg


I've not got a toroidal yet - just emailed Canterbury (from your photo!) for a quote.

Mr Tibbs - thanks for that link - your schematic diagram makes things much clearer. One thing to check then - if I'm going to take the signal straight from the 202 to the power amp, rather than via the Hicap, do I have to desolder a pin (the +24V) on the interconnect from pre to power? I don't want to blow up my 202 - done that once already!! :)

David
 
David,

Thats a nice collection of parts you have there!
You may want to spec a larger transformer than mine, I had mine made to fit a Nait3 size case and the maximum that would fit was 225VA Im sure the HiCap is 500VA
I also have a small 12v sec to power my MiniDSP`s

Good Luck and keep the pictures flowing!

Mr Tibbs,
Many thanks for your advice and good luck with the planting! I hope the birds are kind!

Justin
 
Appologies for double-posting

David,
While you are at it, why not roll your own snaic? you only need the signal and ground connected, leave the power out completely!

DIY snaic
12426106.e9653661.1024.jpg


This is just some cheap maplins 24/0.2 cable plaited with a bit of braiding over the top, grab a couple `Preh locking din` plugs from fleabay or somewhere and your off!

you could get some nicer cable than mine though! :)

Justin
 
Yeah, make up some of your own pre to power signal cables as above. BTW, once you do the split 0V mod you MUST then take the signal direct from the preamp to power amp.

The next question is how to get two 0V links hooked up to the star 0V point of the preamp. One can go in via the normal path of the 5-pin 'hicap' socket on the preamp. The other can be taken in via the 0V pin of an unused source input socket - this avoids having to modify the preamp in any way.

The power supply lead will consist of two 24V lines and two associated 0V lines. Use heavy gauge wire for the two 0V lines - the heavier the better. At each plug end you can drop the gauge back to something more suitable for soldering onto the din plugs. Be sure though to keep the two 24V and 0V cables wrapped together for most of their length.

Mr Tibbs
 
"The next question is how to get two 0V links hooked up to the star 0V point of the preamp. One can go in via the normal path of the 5-pin 'hicap' socket on the preamp. The other can be taken in via the 0V pin of an unused source input socket - this avoids having to modify the preamp in any way. "

Thanks Mr Tibbs. I think I get it now. Just to check then, in order to do as you say and avoid modding the preamp, I'd be using two sockets on the preamp, and two on the hicap, with different cables:

1) Hicap 240deg 5 pin --> 'hicap' input on preamp, carrying 2x +24V, 1x 0V, no signal connections

2) Hicap 180deg 5 pin --> preamp audio input socket, carrying 1x 0V, no other connections

So if I have this correctly, that means I can use standard cables (ie all pins connected as normal), but just selectively solder individual pins in my diy hicap so that's the only thing in the setup which is 'custom'.

Have I got this correctly? Oh, hold on, I've just re-read your post. So if I'm carrying both +ve and 0V lines in the same cable (so that they can be twisted together) then I'm going to have to terminate one end of the cable in two plugs, one with 2x +24V and 1x 0V (240deg 5pin), and the other with just 0V (180deg 5pin)?

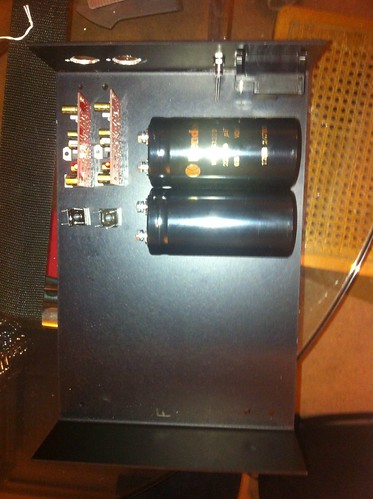
Juz, I've got one of those Tukan shoebox cases off eBay and started working out how I'm going to lay things out:

7020255611_be25368067.jpg
 
Hi,

You need to put your rectifiers as close as possible to the smoothers, right next to the terminals is best.

Pete
 
wouldn't it be nice to get rid of those rects and use Schotky diodes instead? He could get some for free from Q-speed.
Andy
 
hi to all naim(ologen)

my name is jürgen from germany and i loved my naim nait 3-cd 3,5- B&W705

i buy it step by step an the first i buy is in 10.2011:)

now i need a cap and if i can help you please let me know, if you lokking for someone who buy your diy cap please say it:)

nice regards and sorry for my bad english
 
So if I have this correctly, that means I can use standard cables (ie all pins connected as normal), but just selectively solder individual pins in my diy hicap so that's the only thing in the setup which is 'custom'.

Have I got this correctly? Oh, hold on, I've just re-read your post. So if I'm carrying both +ve and 0V lines in the same cable (so that they can be twisted together) then I'm going to have to terminate one end of the cable in two plugs, one with 2x +24V and 1x 0V (240deg 5pin), and the other with just 0V (180deg 5pin)?

That all seems fine. The wires don't actually need to be twisted together as such - simply binding them together with some spiral-wrap (cable tidy) will do fine.

Mr Tibbs
 
Dang it! Hahaha!
Ive been tairing my hair out farting about with microsoft paint for ages to produce this

12431019.c8727b65.1024.jpg


The upper pair twisted, lower just straight.

and Mr Tibbs comes up with the simple answer before I can post! :D

I guess the layout of the heatshrink could be helpful? (I didnt have enough to show what I mean)
As in enough to cover it all from both ends but with a dogleg say 6 or 8" ground lead with a skinny bit of shrink over that. heat that lot up so its neat and then put another bit a couple inches long over where the dogleg sticks out and shrink that too. should look quite good!
 
@juzz400

it is very nice to see your parts, can you help me i don´t know where i can buy it,

how much money did the parts cost complete where you have for this nice cap?

sorry for my english but i learn it like my naim:)
 
@juz400

it is very nice to see your parts, can you help me i don´t know where i can buy it,

how much money did the parts cost complete where you have for this nice cap?

sorry for my english but i learn it like my naim:)

thanks
 
Hi Jürgen,

you will need
1. a large VA transformer with an electrostatic screen and two 26v-0v-26v secondary windings
2. two 10,000uF or higher capacitors (Kendeil BHC ect)
3. two 30A bridge rectifiers or 4 Q-Speed LQA30T300 diodes
4. two regulator boards (teddy/superteddy/avondale/sjostrom)
5. a case (aluminium)
6. heavy gauge wire and Preh connectors/sockets

You will need to check your electronics suppliers for pricing for these parts
The transformer will probably need to be custom made for your needs, maybe you have a
Cologne Windings over there like our Canterbury Windings! :p (Think Cathedral`s or huge church`s)
Regulators you can find by googling or Davids link up the top of this page
Cases you can find on ebay

This wont be a cheap project, it WILL cost a couple hundred euros!
take your time and buy the parts a bit at a time, the advice will still be here in future!

http://www.canterburywindings.co.uk/
http://avondaleaudio.com/store/#ecwid:category=466342&mode=category&offset=0&sort=normal
http://www.teddypardo.com/DIY/SuperTeddyReg.html

Good Luck!

Justin
 
justin did you have a picture for me with all parts:)

please send ist to me if you have time

[email protected]

so it is easier for me to see what i need:)

and with medium cap i don´t lost my naim sound:)
 
Hi Jürgen,

you will need
1. a large VA transformer with an electrostatic screen and two 26v-0v-26v secondary windings
...
http://www.canterburywindings.co.uk/
...
Good Luck!

Justin

Hi Justin,

Is there any chance you could please provide a rough estimate on the price of custom made transformer?

I'm currently using a pair of standard issue Nuvotems I got for free from RS and would like to get the benefit of a dual centre tapped traffo for the better earthing. Not sure how much I should budget.

Kind regards,

D
 
Hi,
Unfortunatly I couldnt give you much of a guide other than they cost more than mass produced ones.
I had mine wound 3 months ago, I ordered them a little while before that as I had to wait for the core to arrive to be wound. Another factor would be the price of copper changing!

The best bet would be to work out exactly what you want,
how much space have you got?
how big a VA?
what secondarys you need
Potted or with a bolt through (Potted you can get a little more height)
Audio grade, electrostatic screen and GOSS band. (help with mains noise and transformer noise)

If your in the UK, maybe give them a bell, quick chat as maybe the core is a stock size for your needs. Jot it all down in an email and the price will come back shortly.
They are freindly and quite reasonable in price as its made JUST for you! (They DO look quite Splendid too! :D)

Justin


advertisement


Back
Top