
1000RPM
pfm Member
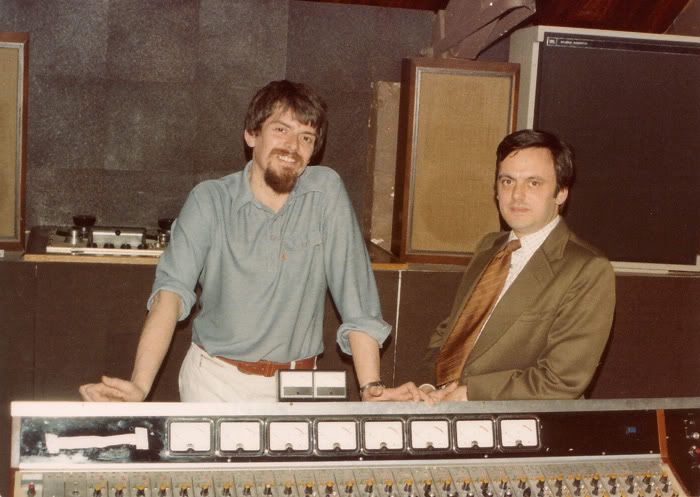
About 18 months ago I came to own a pair of fairly old, very well-travelled speakers. They had seen better days, but for me their history was intriguing. The speakers were KLH 5s, made in the US around 1970. They were owned by John Wood, sound engineer extraordinaire and co-founder with Geoff Frost of Sound Techniques Studio in the 70s.
John Wood used these speakers to record some of the greatest albums to come out of the early 70s (or any other era) including Nick Drake’s Bryter Layter and Pink Moon, and John Martyn’s Solid Air.
pic 1: It was the beige decade…a seventies-tastic John Wood and Geoff Frost in the Sound Techniques control room. KLH 5s on the shelf behind.
pic 2: That’s more like it…monochrome cool as the Johns Wood and Cale work out the next tea round. Brian Eno is lurking somewhere out of frame. KLHs just behind John Cale.

JW was kind enough to write me a letter explaining the history of these speakers – how he had become frustrated mixing Bryter Layter and had imported the KLH 5s from the US in the hope that these would give a more open, natural tone to the recordings. Pleased with the results, John continued to use the KLHs as his personal reference monitors throughout his career. These were the speakers now sitting in my garage, looking most of their 40 years of age. My hope was to return the speakers to as close to their original 1970 state as possible, to maybe capture some of what JW had heard in the studio.
So began what turned out to be, on and off, a year-long restoration project.
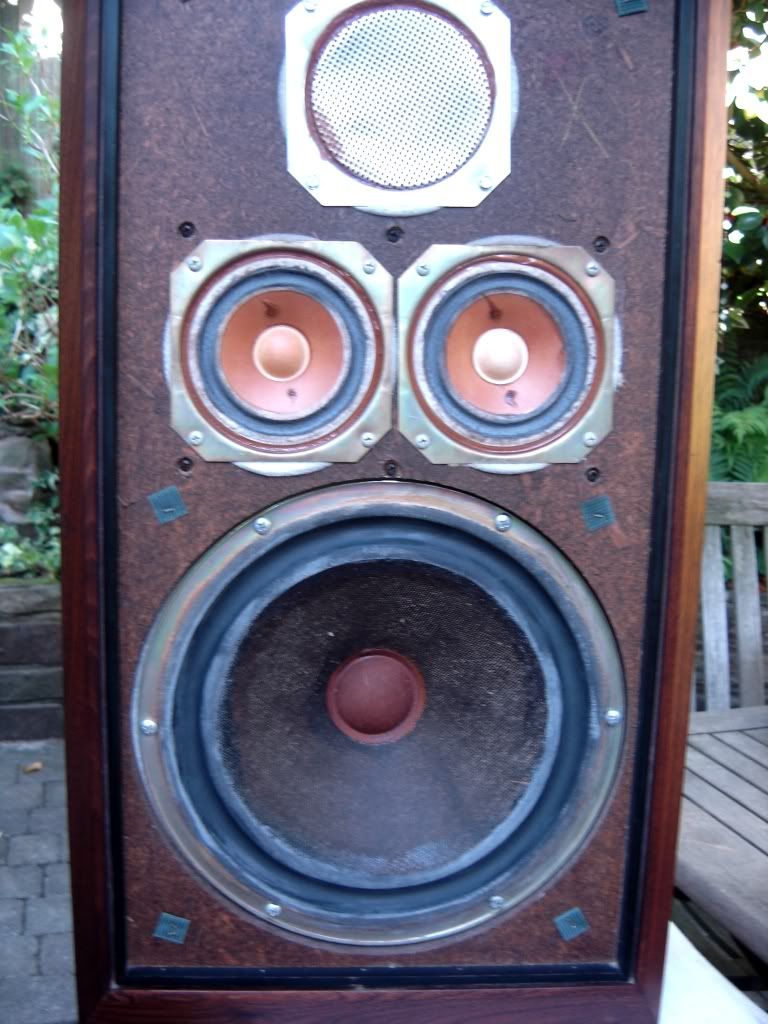
First off, some research. Various vintage speaker sites were visited and views elicited. Audiokarma was especially great, with several KLH owners happy to offer advice. The KLH 5 is a large sealed three-way speaker, with a tweeter, dual mids and a big bass driver. It was apparent that the main issues would be the crossovers (the caps in KLH crossovers do not age well) and the air-suspended bass drivers, which lose their air seal over time.
To rebuild the crossovers I enlisted the help of my mate Will, who knows much more about these things than it is reasonable for a person to know. The KLHs went on a 400 mile round trip to Plymouth, where Will was waiting with a box of replacement components we had ordered in from the US.
The crossover board was interesting; hand built with point-to-point wiring throughout. No PCB trickery here. The rotary controls for the mid / hi switches looked corroded and knackered. We did discuss replacing them, but it turned out that most of the problem could be remedied with switch cleaner applied with a small stiff nylon brush (like those supplied with electric razors). Brushing all of the surfaces carefully, it took one evening per board to restore all contacts to rude health. By the end, the controls were looking almost new. All caps were replaced, although the difference in size caused a few headaches with placement, as the new caps were 2-3 times the size of the originals. Some of the cap values had to built out with 2 components . Will spent one evening working out how to arrange the caps on the first board. Lessons learned, he did the second one in half an hour. The drivers were rewired and new cable binding posts were added. I did think about keeping the original nickel plated binding posts, but as Will pointed out, they were (a) a bit cheap and could be bettered, and (b) the original posts were simply compression fitted to the main board, so new posts and silver solder would give a much better contact. This was the only deviation from the original spec during the restoration.
I did take lots of pics of the crossover rebuild but lost the files. Oh dear. With the crossovers back in place, the KLHs were boxed up ready to return to Surrey for part two of the restoration.
pic 3: The KLH 5s in the garden workshop.

First up, I had to remove four decades of studio residues (pre smoking ban remember!) and a thick yellowing varnish.
The varnish was stubborn stuff. I started with medium gauge wire wool and a bucket of white spirit to get the worst of it off, and then used progressively finer grades of wire wool. Both cabinets needed a day to dry out thoroughly. Then it was on to the sanding – fine and super fine wet & dry paper was used to take off just enough veneer to remove all but the deepest scratches.
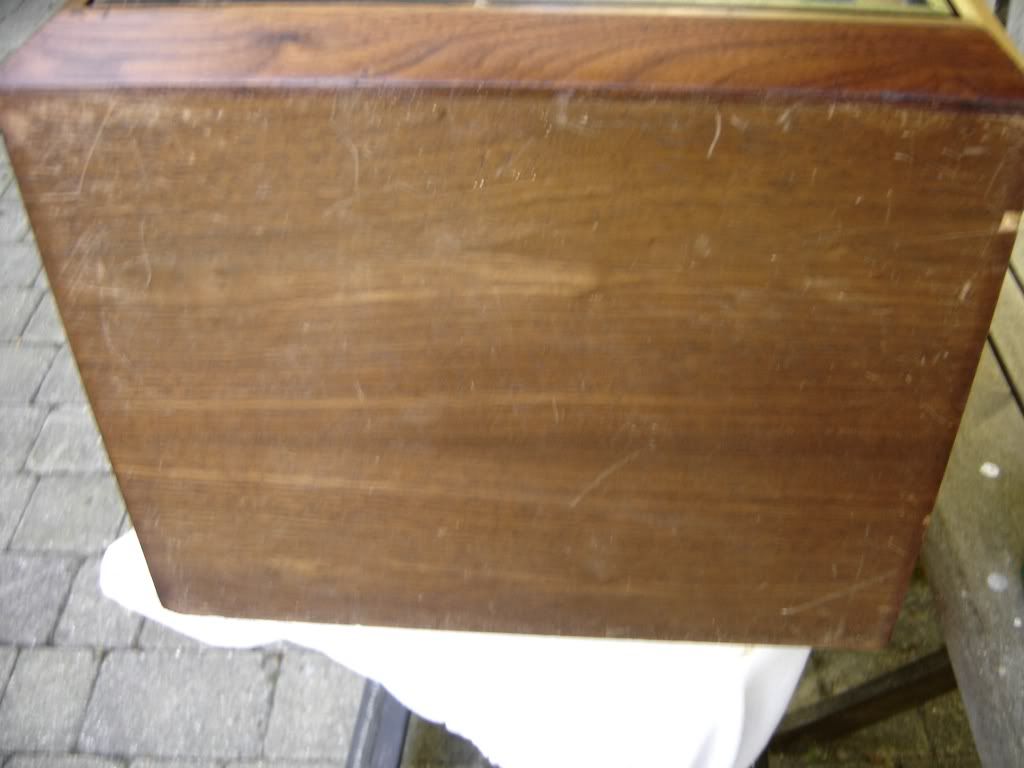
pic 4: Before…
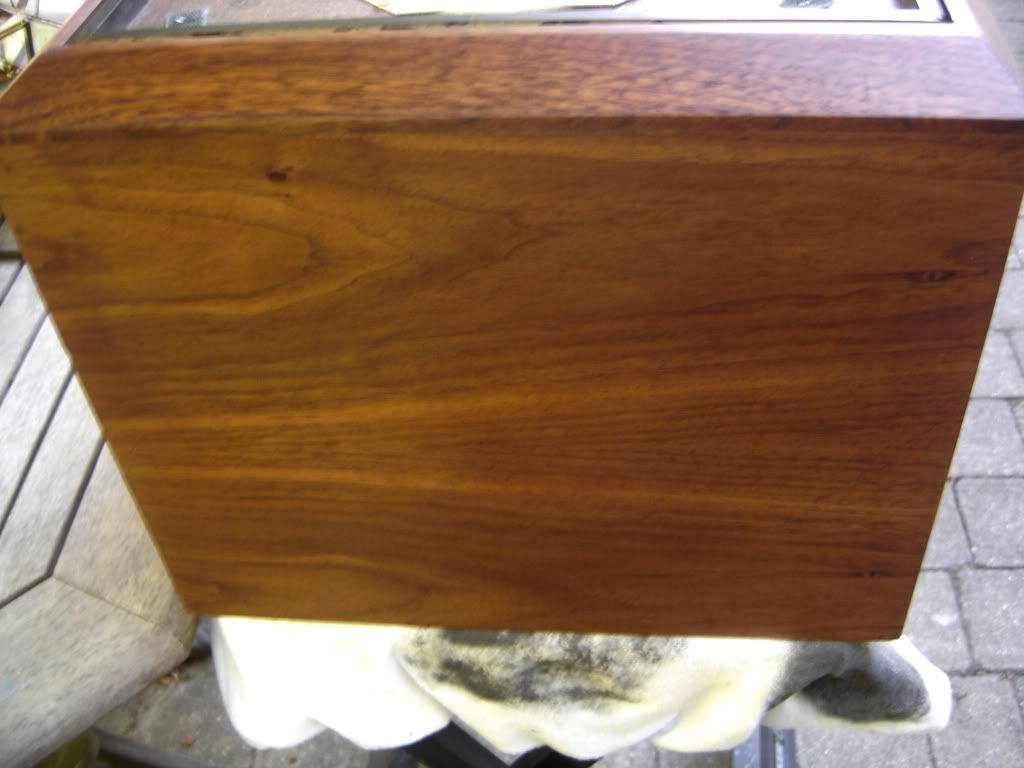
pic 5: After…
Wood filer mixed with paint to achieve a close colour match with the veneer was used to fill deep knocks, especially around the edges. A medium stain was applied to bring the veneers back to life. Two coats of Danish oil revealed the true colour of the wood and gave a lovely warm, satin finish
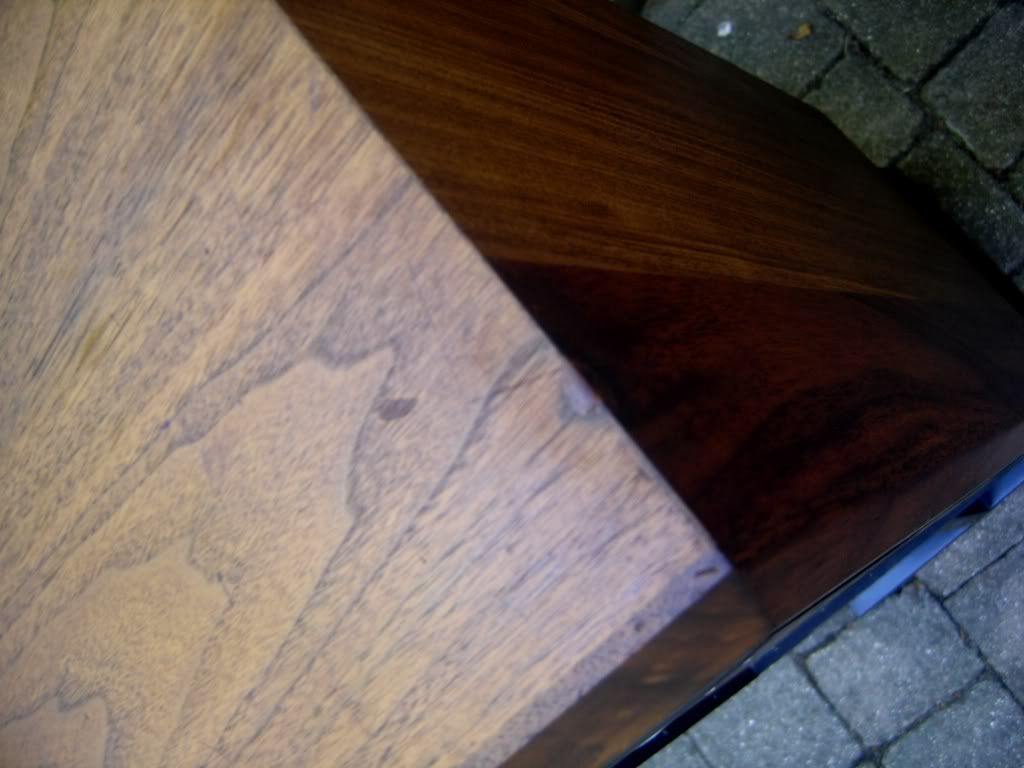
Pic 6 & 7: Spot the gaps – all dents and scratches filled and refinished.
The air seals on the bass driver were a bit of puzzle…just what did KLH use in the first place? No one seems to know for sure and there is a fair old spread of opinion on Audiokarma as to the best stuff to brush on to the fabric surrounds around the bass drivers. I grabbed a couple of old T-shirts and tried a whole variety of plastic and rubber coatings, mixed to different thickness and varying numbers of applications. I also messed around to find the optimum drying conditions. Sad but true.
I finally settled on a triple coat of butyl sealant. The first cost mixed down with some white spirit 1:1 just to seal the fibres in the fabric surround. Two thicker coats were applied to seal up the surround whilst leaving plenty of movement for the driver. I tested the seal by gently pressing the driver inwards. A good seal is meant to take 1 to 2 seconds to return the driver to rest. Mine took 1.5 secs, so I figured the seal was ok.
pic 8: Resealing the bass drivers.
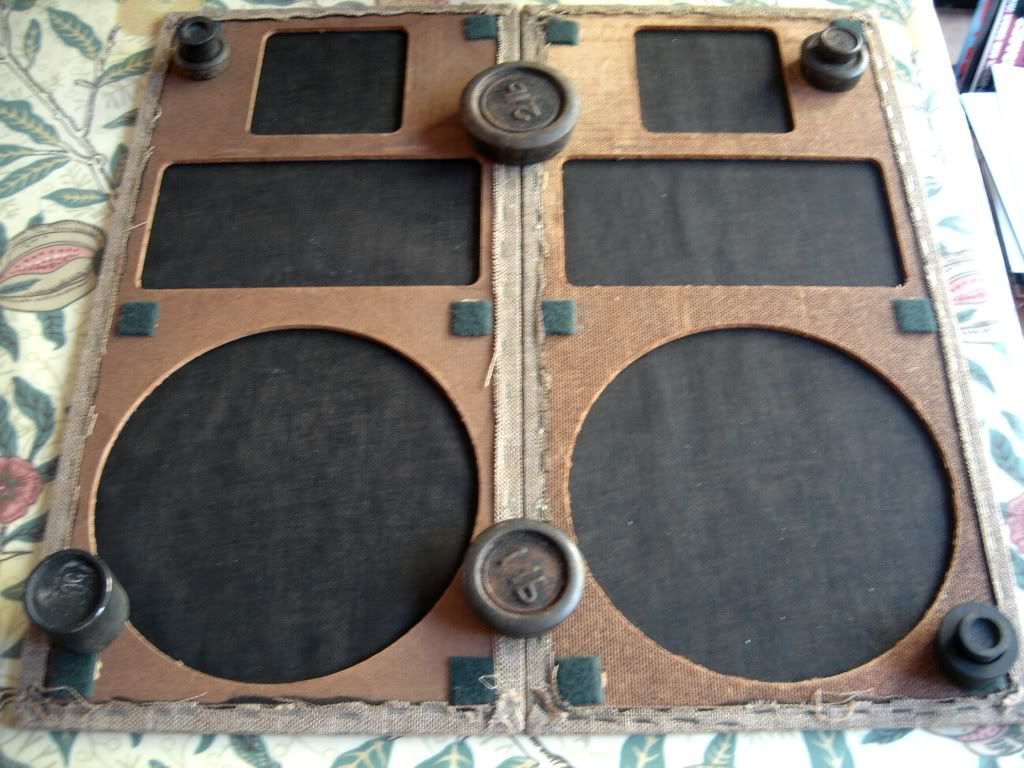
The grilles had some heavy staining, and again, there is a wide opinion on the best cleaning solution. I didn’t want anything too strong, as some of the grille fabric was a bit fragile. In the end I use foaming carpet shampoo, sparingly applied with just enough to get the job done. Because the fabric grilles are stapled to hardboard frames, it was actually quite important to get the drying conditions right – you can’t just let nature take its course because the damp hardwood will warp. I used a hair drier on a medium setting from about 2ft away to remove most of the moisture. The grilles were then anchored with weights to keep them flat and put in the garden to finish drying.
pic 9: Antique scale weights find a use at last…
The grilles originally came with metal KLH badges, but these were long gone. They are a rare replacement part to find, even in the US. At this stage, one of those very small ebay miracles happened. I won a pair of KLH 17s – same vintage, same badges. And the seller had the badges. The completely barmy thing was he was in the next village to me. Really.
pic 10: Original spec badges in place...
There is a black wood frame around the grilles and this was restored with acrylic gloss artists paint, with just a touch of chalk to mute the gloss a bit (don’t want a 40 year old speaker looking too shiny do we?).
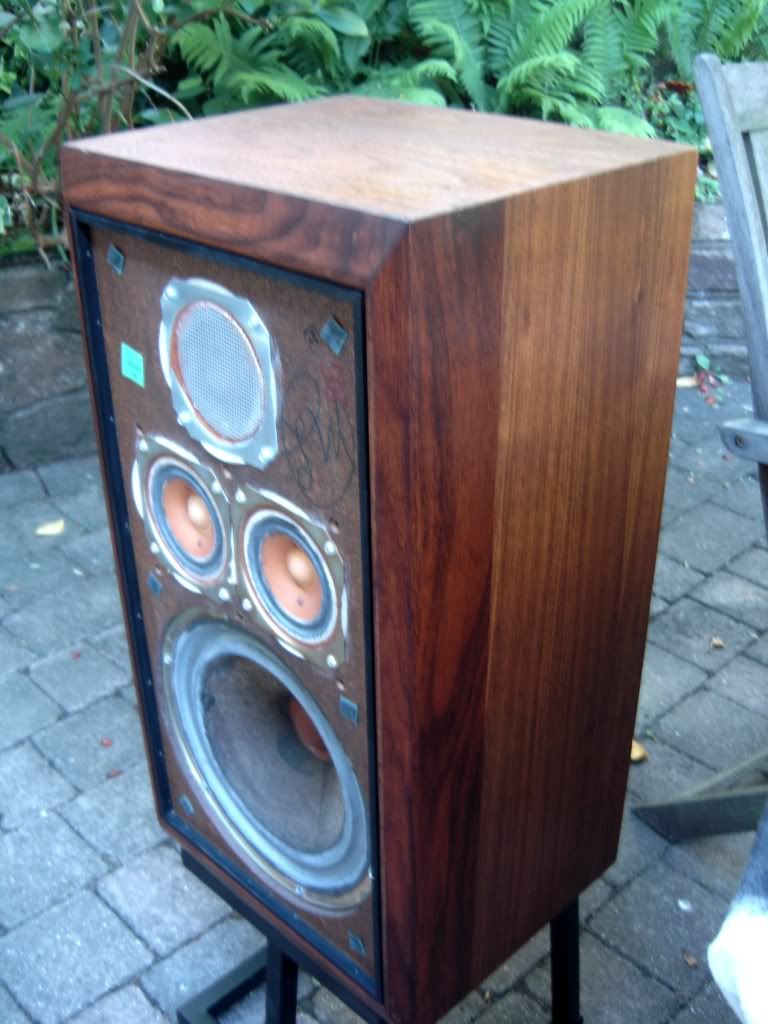
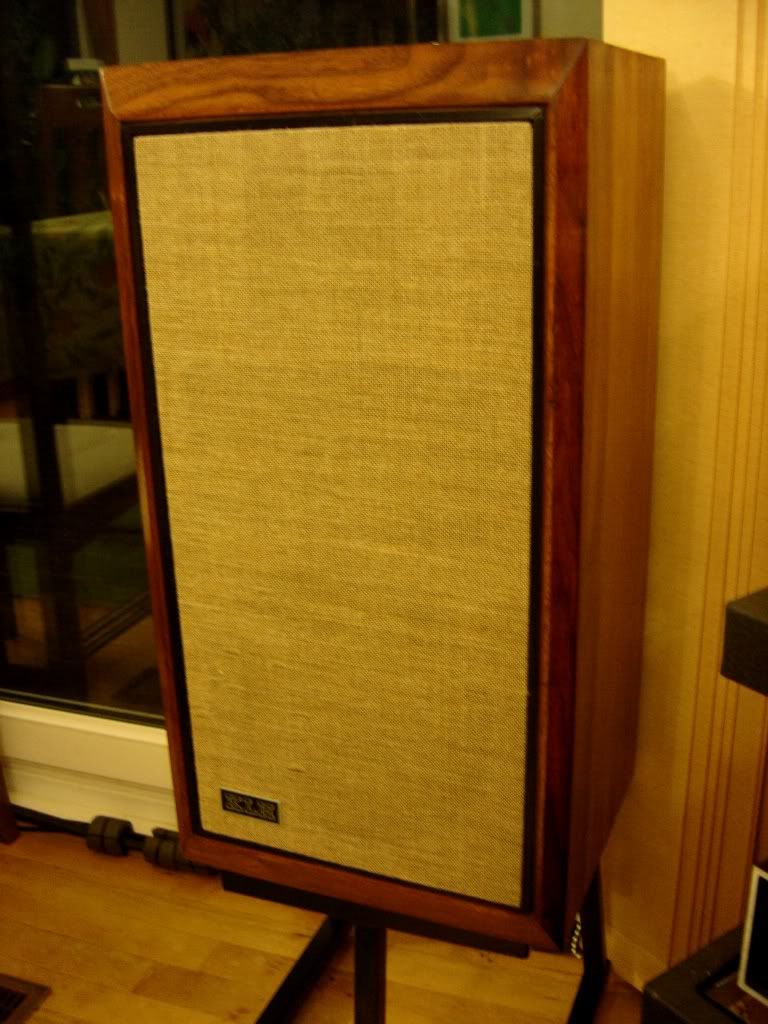
And that was about it. The KLHs were ready to go. At the very start, I had hoped that listening to Nick Drake and John Martyn on the same speakers as John Wood had used to create their recordings would be cool. And it is cool. Very cool.
pic 11 - 13: The finished speakers…


John Wood used these speakers to record some of the greatest albums to come out of the early 70s (or any other era) including Nick Drake’s Bryter Layter and Pink Moon, and John Martyn’s Solid Air.
pic 1: It was the beige decade…a seventies-tastic John Wood and Geoff Frost in the Sound Techniques control room. KLH 5s on the shelf behind.
pic 2: That’s more like it…monochrome cool as the Johns Wood and Cale work out the next tea round. Brian Eno is lurking somewhere out of frame. KLHs just behind John Cale.
JW was kind enough to write me a letter explaining the history of these speakers – how he had become frustrated mixing Bryter Layter and had imported the KLH 5s from the US in the hope that these would give a more open, natural tone to the recordings. Pleased with the results, John continued to use the KLHs as his personal reference monitors throughout his career. These were the speakers now sitting in my garage, looking most of their 40 years of age. My hope was to return the speakers to as close to their original 1970 state as possible, to maybe capture some of what JW had heard in the studio.
So began what turned out to be, on and off, a year-long restoration project.
First off, some research. Various vintage speaker sites were visited and views elicited. Audiokarma was especially great, with several KLH owners happy to offer advice. The KLH 5 is a large sealed three-way speaker, with a tweeter, dual mids and a big bass driver. It was apparent that the main issues would be the crossovers (the caps in KLH crossovers do not age well) and the air-suspended bass drivers, which lose their air seal over time.
To rebuild the crossovers I enlisted the help of my mate Will, who knows much more about these things than it is reasonable for a person to know. The KLHs went on a 400 mile round trip to Plymouth, where Will was waiting with a box of replacement components we had ordered in from the US.
The crossover board was interesting; hand built with point-to-point wiring throughout. No PCB trickery here. The rotary controls for the mid / hi switches looked corroded and knackered. We did discuss replacing them, but it turned out that most of the problem could be remedied with switch cleaner applied with a small stiff nylon brush (like those supplied with electric razors). Brushing all of the surfaces carefully, it took one evening per board to restore all contacts to rude health. By the end, the controls were looking almost new. All caps were replaced, although the difference in size caused a few headaches with placement, as the new caps were 2-3 times the size of the originals. Some of the cap values had to built out with 2 components . Will spent one evening working out how to arrange the caps on the first board. Lessons learned, he did the second one in half an hour. The drivers were rewired and new cable binding posts were added. I did think about keeping the original nickel plated binding posts, but as Will pointed out, they were (a) a bit cheap and could be bettered, and (b) the original posts were simply compression fitted to the main board, so new posts and silver solder would give a much better contact. This was the only deviation from the original spec during the restoration.
I did take lots of pics of the crossover rebuild but lost the files. Oh dear. With the crossovers back in place, the KLHs were boxed up ready to return to Surrey for part two of the restoration.
pic 3: The KLH 5s in the garden workshop.
First up, I had to remove four decades of studio residues (pre smoking ban remember!) and a thick yellowing varnish.
The varnish was stubborn stuff. I started with medium gauge wire wool and a bucket of white spirit to get the worst of it off, and then used progressively finer grades of wire wool. Both cabinets needed a day to dry out thoroughly. Then it was on to the sanding – fine and super fine wet & dry paper was used to take off just enough veneer to remove all but the deepest scratches.
pic 4: Before…
pic 5: After…
Wood filer mixed with paint to achieve a close colour match with the veneer was used to fill deep knocks, especially around the edges. A medium stain was applied to bring the veneers back to life. Two coats of Danish oil revealed the true colour of the wood and gave a lovely warm, satin finish
Pic 6 & 7: Spot the gaps – all dents and scratches filled and refinished.
The air seals on the bass driver were a bit of puzzle…just what did KLH use in the first place? No one seems to know for sure and there is a fair old spread of opinion on Audiokarma as to the best stuff to brush on to the fabric surrounds around the bass drivers. I grabbed a couple of old T-shirts and tried a whole variety of plastic and rubber coatings, mixed to different thickness and varying numbers of applications. I also messed around to find the optimum drying conditions. Sad but true.
I finally settled on a triple coat of butyl sealant. The first cost mixed down with some white spirit 1:1 just to seal the fibres in the fabric surround. Two thicker coats were applied to seal up the surround whilst leaving plenty of movement for the driver. I tested the seal by gently pressing the driver inwards. A good seal is meant to take 1 to 2 seconds to return the driver to rest. Mine took 1.5 secs, so I figured the seal was ok.
pic 8: Resealing the bass drivers.
The grilles had some heavy staining, and again, there is a wide opinion on the best cleaning solution. I didn’t want anything too strong, as some of the grille fabric was a bit fragile. In the end I use foaming carpet shampoo, sparingly applied with just enough to get the job done. Because the fabric grilles are stapled to hardboard frames, it was actually quite important to get the drying conditions right – you can’t just let nature take its course because the damp hardwood will warp. I used a hair drier on a medium setting from about 2ft away to remove most of the moisture. The grilles were then anchored with weights to keep them flat and put in the garden to finish drying.
pic 9: Antique scale weights find a use at last…
The grilles originally came with metal KLH badges, but these were long gone. They are a rare replacement part to find, even in the US. At this stage, one of those very small ebay miracles happened. I won a pair of KLH 17s – same vintage, same badges. And the seller had the badges. The completely barmy thing was he was in the next village to me. Really.
pic 10: Original spec badges in place...
There is a black wood frame around the grilles and this was restored with acrylic gloss artists paint, with just a touch of chalk to mute the gloss a bit (don’t want a 40 year old speaker looking too shiny do we?).
And that was about it. The KLHs were ready to go. At the very start, I had hoped that listening to Nick Drake and John Martyn on the same speakers as John Wood had used to create their recordings would be cool. And it is cool. Very cool.
pic 11 - 13: The finished speakers…
")