
flashgo
DIY Practitioner
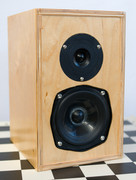
Its been over a year, but Ive finally finished my first DIY mini-monitors:
(Click to view larger pix.)
A long time ago, I thought that I had fried 2 tweeters on my briks, so I ordered some replacements. Of course, when I swapped in the replacements, I discovered that the original Hiquphons were fine. So they sat in a cabinet for over a decade. Then, more than a year ago, my wife needed some small speakers to go on the wall in her studio, and I figured that I could finally put the Hiquphons to use. Paul (a.k.a. Pulse Studio) recommended that I build up some clones of a long defunct Falcon mini-monitor in the BBC tradition. Because theyll be in a large room, the cabs would be 2 inches deeper than the base build. They would use the same KEF B110s found in the briks. And they would work well on the wall.
So .
 Boy these speakers are sweet! Theyre some of the best Ive ever heard. Theyve got great throttle. When the sound comes, it just flows without inhibition. It is amazing how loud and clean they are. Its also amazing how much bass there is for such small boxes. Since the drivers are the same as those in my briks, Im pretty copacetic with the sound. In comparison to the briks, the minis are leaner and have more spatial definition, especially in depth. Theyre different presentations, and Im not sure that one is necessarily better than the other. In the long run, I may want these mini-monitors to use as surround speakers with my briks. The matching drivers should sound pretty ultimate.
After a few days with the minis, the briks are back in. The soundstage is bigger and fuller with the briks. It fills the room and is very relaxed and natural. In contrast, the minis invite you into their intimate sweet spot. The minis are very, very tempting (and cheaper and easier to drive). My daughter prefers the briks, but my wife and I like them both. I cant remember the last time in hi-fi that I liked 2 options equally!
So now my wife whisks the minis away, and Im wanting to build James PFM-SIIs. Jim, my carpenter buddy, says I can use his shop, and with this model X-over, I think I can layout and construct the next passive X-over. The next build will be real DIY. (Well, at least I know where to go for help.)
A big thanks to Pulse Studio and the Skiing Ninja for all their advice! Paul really knows his mini-monitors and is just an all around great guy. And the Ninja defined what personal attention to detail means.
(Click to view larger pix.)
A long time ago, I thought that I had fried 2 tweeters on my briks, so I ordered some replacements. Of course, when I swapped in the replacements, I discovered that the original Hiquphons were fine. So they sat in a cabinet for over a decade. Then, more than a year ago, my wife needed some small speakers to go on the wall in her studio, and I figured that I could finally put the Hiquphons to use. Paul (a.k.a. Pulse Studio) recommended that I build up some clones of a long defunct Falcon mini-monitor in the BBC tradition. Because theyll be in a large room, the cabs would be 2 inches deeper than the base build. They would use the same KEF B110s found in the briks. And they would work well on the wall.
So .
- I found some nearly unused B110s of the appropriate series on eBay (thankfully, just before these things turned into gold in the current market).
- Jim, a carpenter buddy, built up the cabs out of Baltic birch ply. (But I paid him, so I dont know if this is pukka DIY.) Note the cool rabbeting at the corners. There is no internal bracing, as Paul says the sealed cabs are supposed to behave like wooden balloons. The cut-outs for the B110s were a pain, and I certainly couldnt have done them myself.
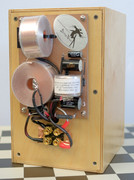
- I bought the bits for the passive X-overs but then couldnt figure out how to mount and align them. I sent them to the Skiing Ninja who built up some really ace X-overs and mounted them on the cabinet backs. (I paid the Ninja, so this is really not sounding like DIY .) Its all point-to-point wired and mounted on painted MDF, then screwed to the backs with some rubbery spacers in between. One resistor can be easily swapped out in order to adjust the balance between the drivers. The speaker jacks provide simultaneous connections via bananas to the speaker cables and via spades to the X-overs and bi-wire couplers. A sealed port sends the X-over outputs through the back panel.
- The cabs are lined with NoRez, and I siliconed some Spectra Dynamics Deflex circles to the backs of the B110s. I forgot to add polyfill, but I really like the way they sound as is, so I think Im leaving the polyfill out.
- I assembled all the bits and plugged the speakers into a StarFish/NAP250.
Boy these speakers are sweet! Theyre some of the best Ive ever heard. Theyve got great throttle. When the sound comes, it just flows without inhibition. It is amazing how loud and clean they are. Its also amazing how much bass there is for such small boxes. Since the drivers are the same as those in my briks, Im pretty copacetic with the sound. In comparison to the briks, the minis are leaner and have more spatial definition, especially in depth. Theyre different presentations, and Im not sure that one is necessarily better than the other. In the long run, I may want these mini-monitors to use as surround speakers with my briks. The matching drivers should sound pretty ultimate.After a few days with the minis, the briks are back in. The soundstage is bigger and fuller with the briks. It fills the room and is very relaxed and natural. In contrast, the minis invite you into their intimate sweet spot. The minis are very, very tempting (and cheaper and easier to drive). My daughter prefers the briks, but my wife and I like them both. I cant remember the last time in hi-fi that I liked 2 options equally!
So now my wife whisks the minis away, and Im wanting to build James PFM-SIIs. Jim, my carpenter buddy, says I can use his shop, and with this model X-over, I think I can layout and construct the next passive X-over. The next build will be real DIY. (Well, at least I know where to go for help.)
A big thanks to Pulse Studio and the Skiing Ninja for all their advice! Paul really knows his mini-monitors and is just an all around great guy. And the Ninja defined what personal attention to detail means.
Last edited: